How to Prototype a Search Bar
Prototype a fully-functioning search field / bar with ProtoPie’s "indexOf" and "lowerCase" functions.

.jpg)
Quick summary
Almost every digital experience has a search experience of some kind, and it’s likely you’ll need to prototype that experience at some point. A working search bar is beyond the capabilities of most prototyping tools, and as designers, we often resort to faking the experience by showing a few screenshots of what the search experience looks like in various representative states.
💡 This limitation does not exist in ProtoPie!
ProtoPie’s advanced code-free logic model makes it quick and easy to make a truly functional search bar experience. Furthermore, while many prototyping tools feature the ability to create components in order to re-use visual styles, ProtoPie takes this further by allowing you to also re-use interactions and, more importantly for this tutorial, logic.
Take a look at the demo below to see what you can create.
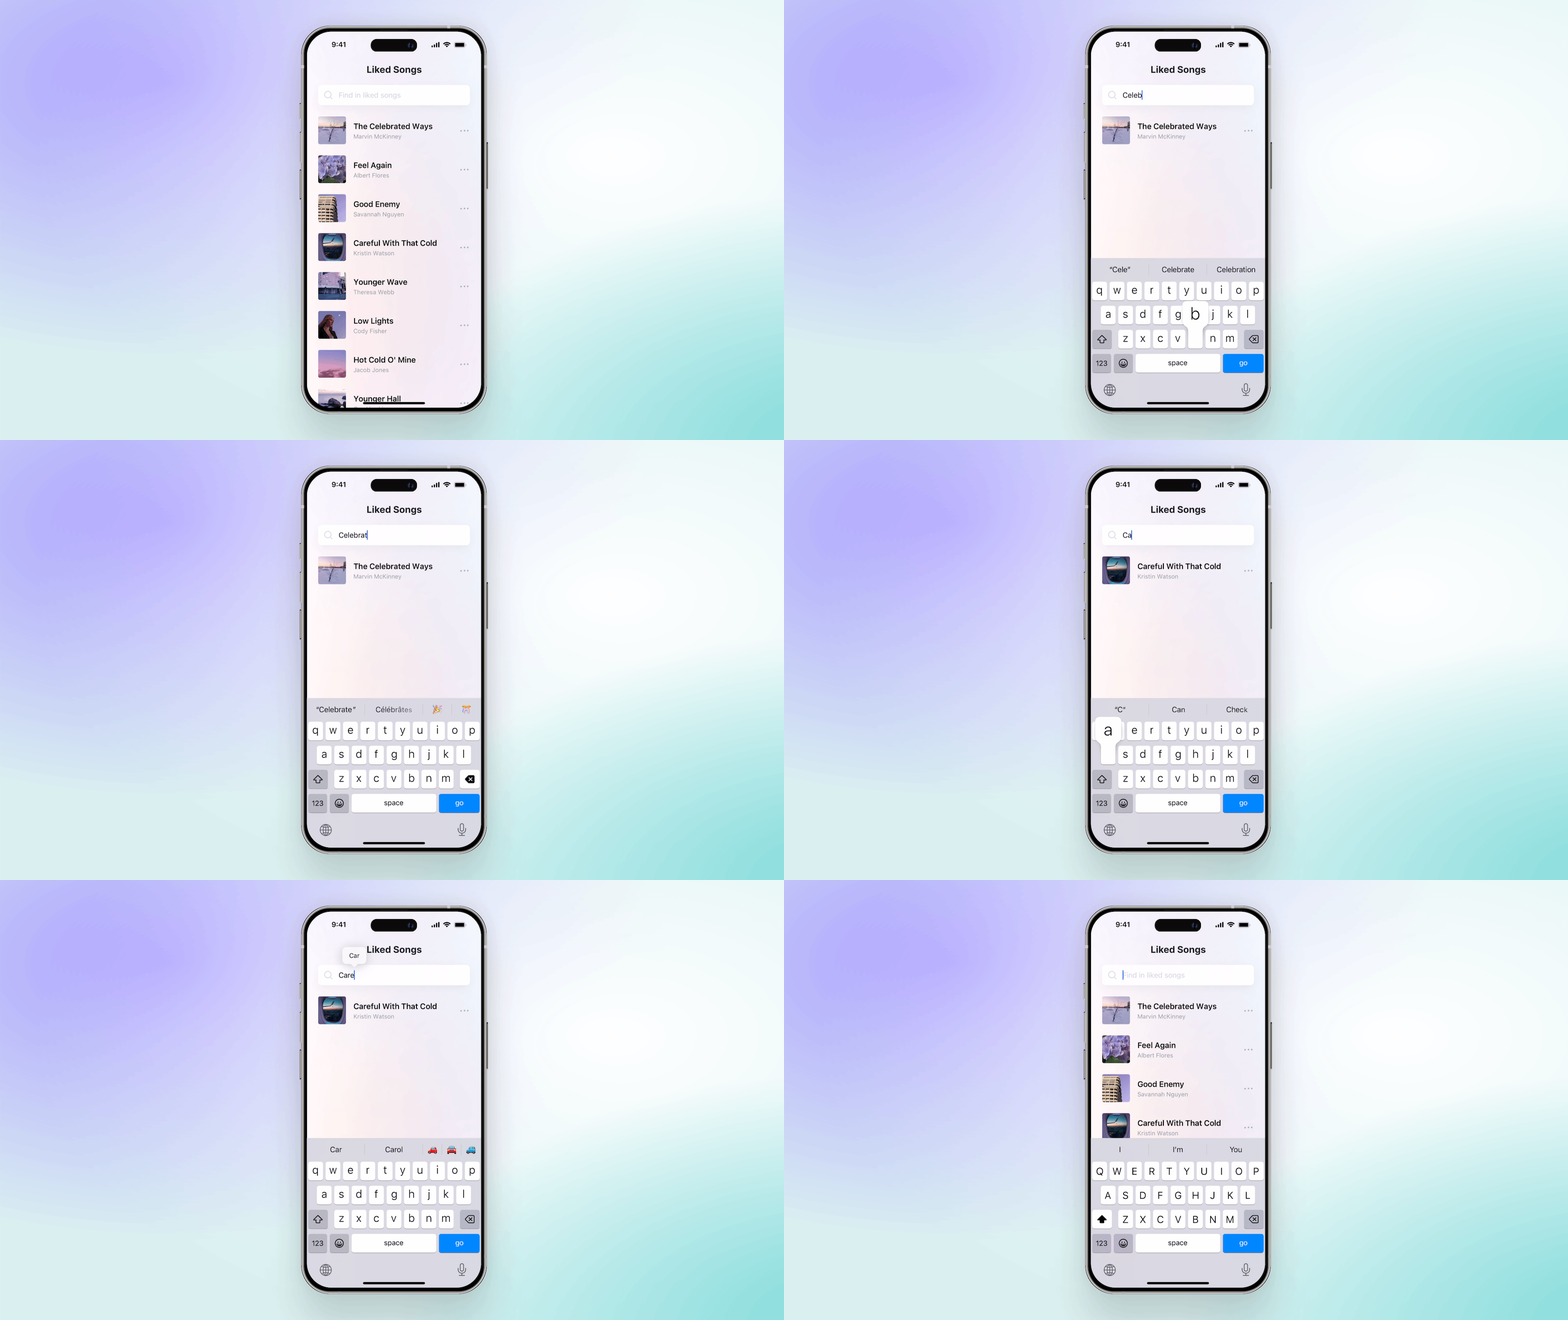
Overview
- What you'll learn
- Before you start
- Step-by-Step Guide
- That’s it! Easy as Pie!
- Elevate your prototypes with a fully functioning search bar
What you’ll learn
By the end of this tutorial, you’ll have learned
- How to use the built-in
indexOf()andlowerCase()functions. - How to make your components communicate with the scene and with each other.
- How to build re-usable logic into your components
- How quick and easy it is to build a working search experience. I mean this! You’ll be amazed at how easy this is to do!
Before you start
First, open the starting Pie file. It is a mock music app with a listing of 8 songs. At the top of the list is the search box. Each of the songs in the list is a copy of a component called 'Song'. It’s created as a component because the structure is identical among all of them.
Instead of duplicating our work 8 times, we used the component to create the structure once, and then we used 8 copies in our scene, customizing the cover art, song title, and artist in each copy.
We’ll be working in both the scene as well as within the master copy of the Song component to make our search bar work.
Step-by-Step Guide
Part 1: Set up the search
Let’s start by adding some interaction to our search bar in the main scene.
- Add a Detect Trigger to the Search field input layer. Choose Text as a property to detect.

- Add a Send Response. Choose “Send to Current Scene” for the Channel. Use the message
SEARCHand check the box “Send Value Together”. In the box that appears use the following formula:`Search field`.text
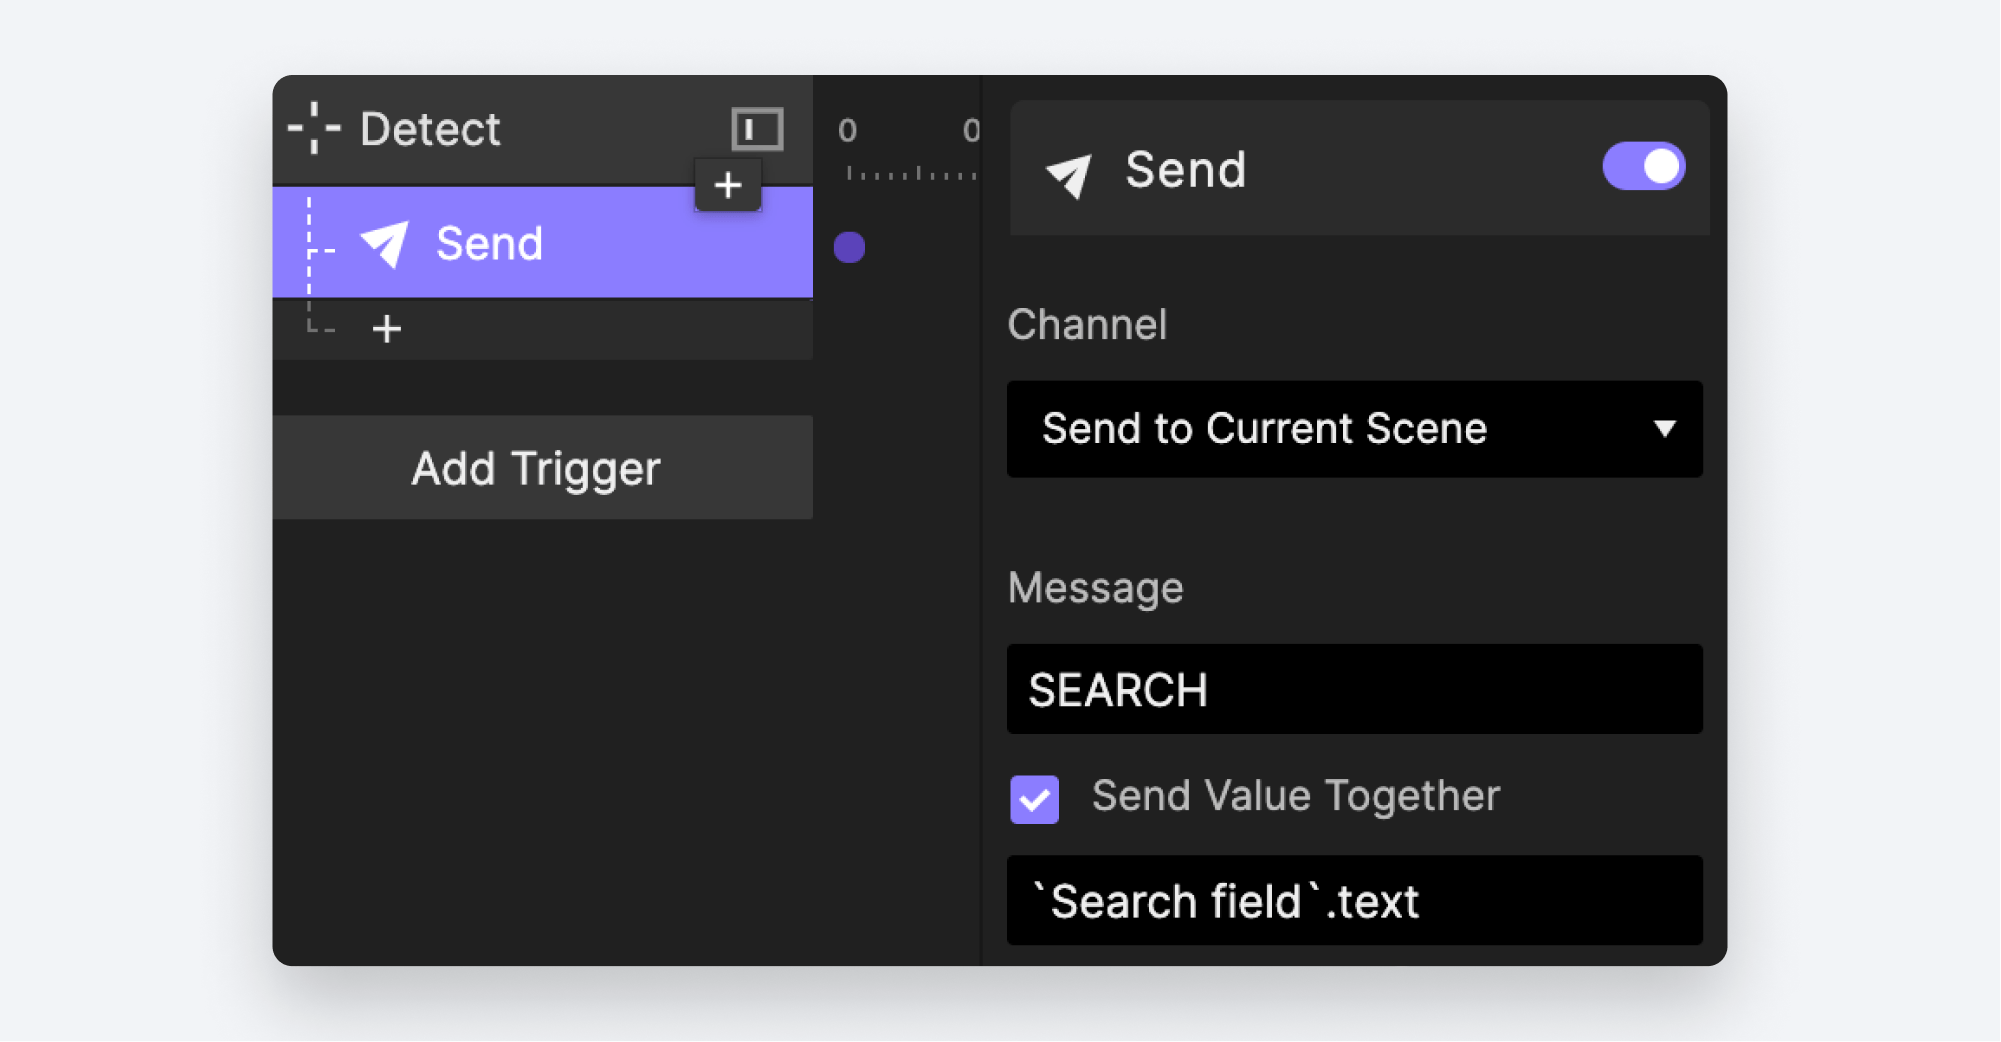
💡 What’s going on?
The Detect Trigger fires every time the value of the text property of our search box changes. With each keypress, the message SEARCH is sent to the scene along with the contents of the search box. Anything configured to listen for this message will receive it and can respond to it. We’ll do that next!
The benefit of making each item in the song list a component is that we can put logic inside the master component that will be included in ALL copies. In this way, we can make each component individually responsible for figuring out if it matches the search.
- Head over to the master copy of the Song component.
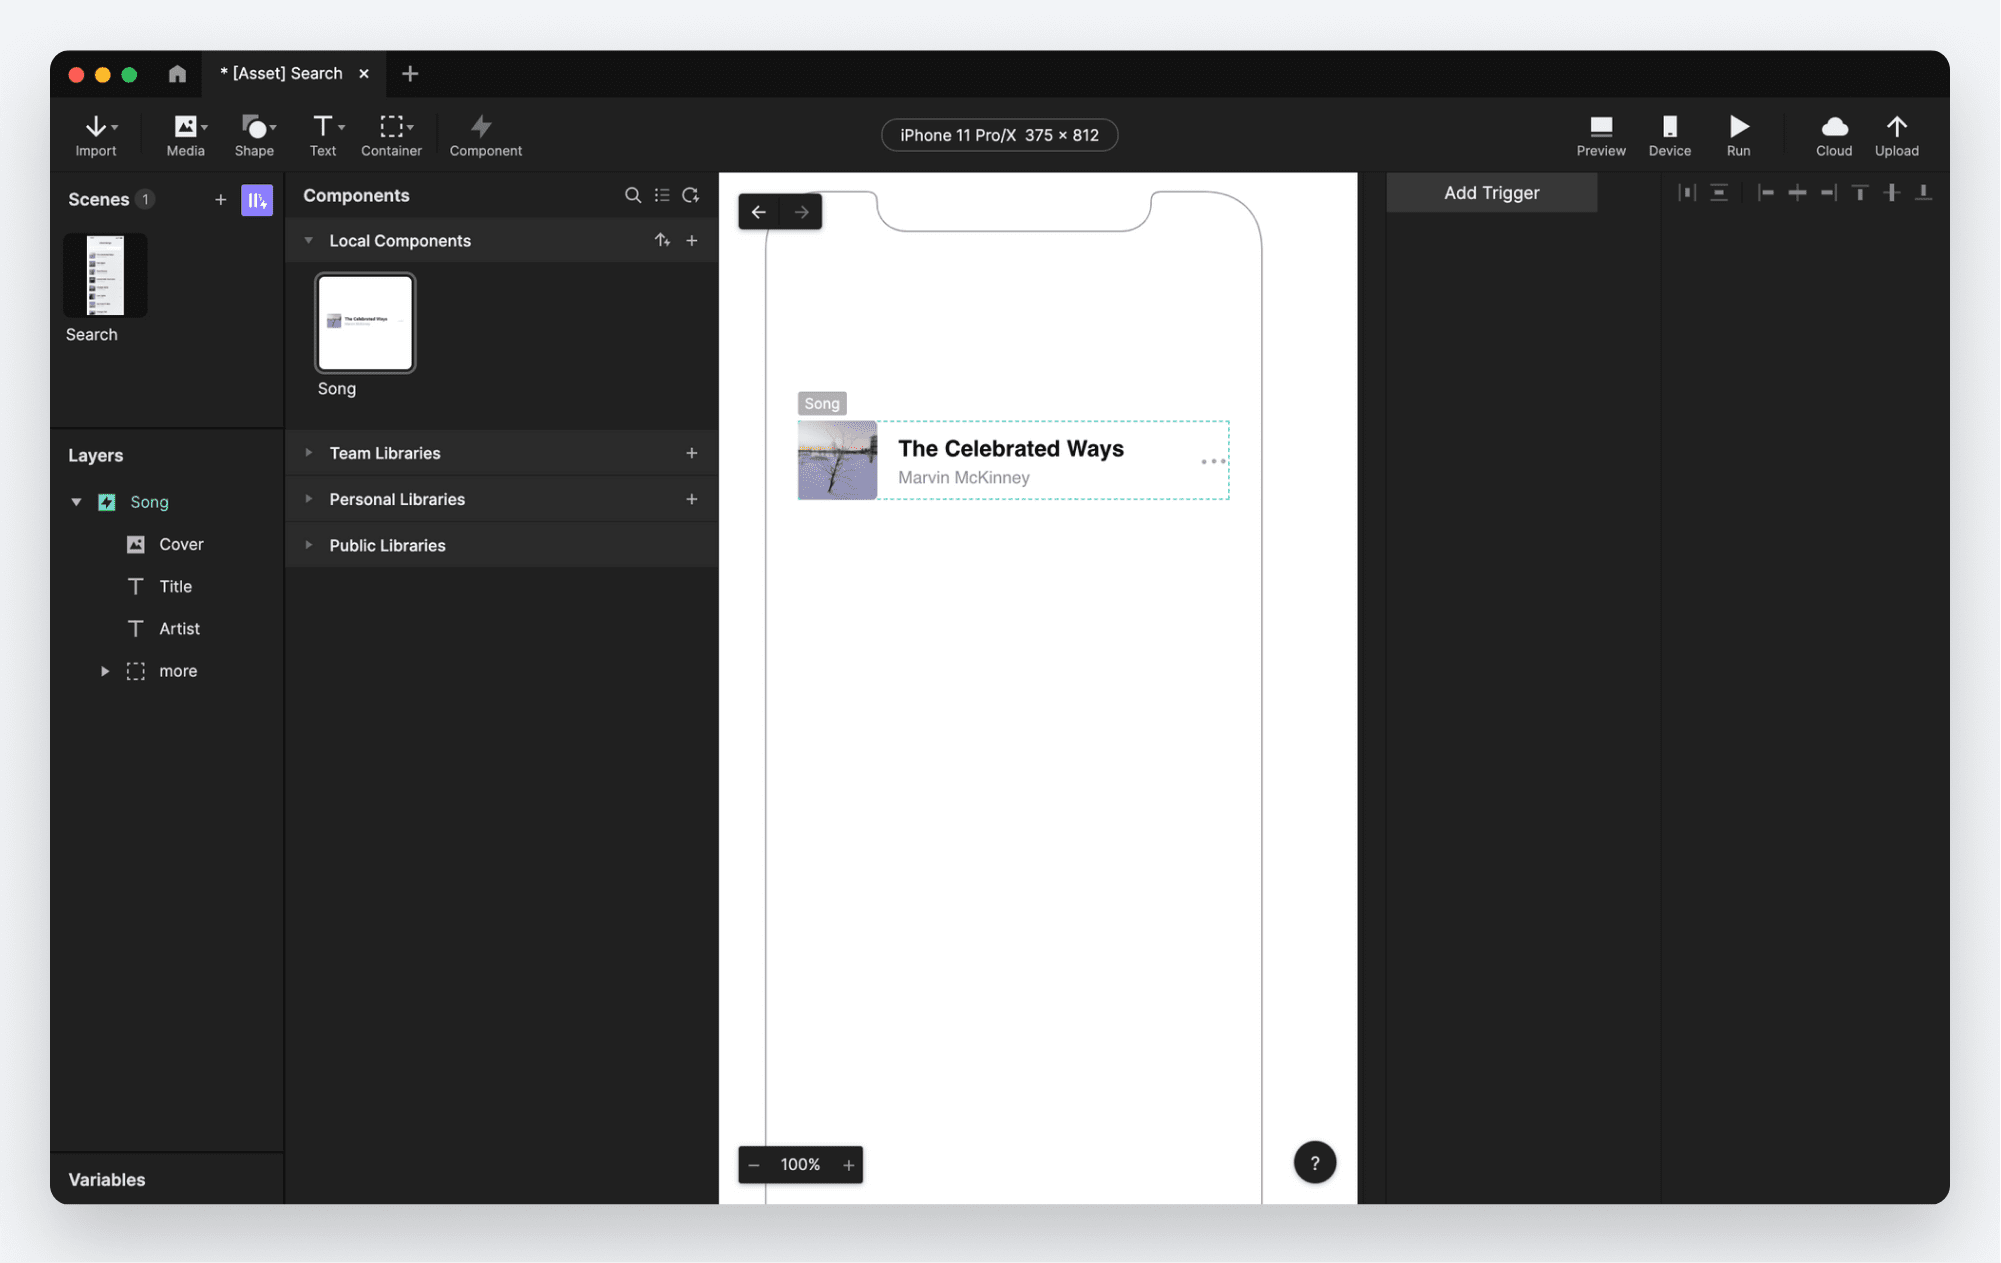
Now that we are editing the master copy of the Song component, any work we do here will be automatically duplicated to all of our copies in the main scene. Let’s make our component react to the SEARCH message.
- Add a Receive Trigger. Select “Receive from Current Scene” for the channel. Use the message
SEARCH. Check the box “Assign to Variable”. We don’t currently have any variables in our component so we’ll need to create one.
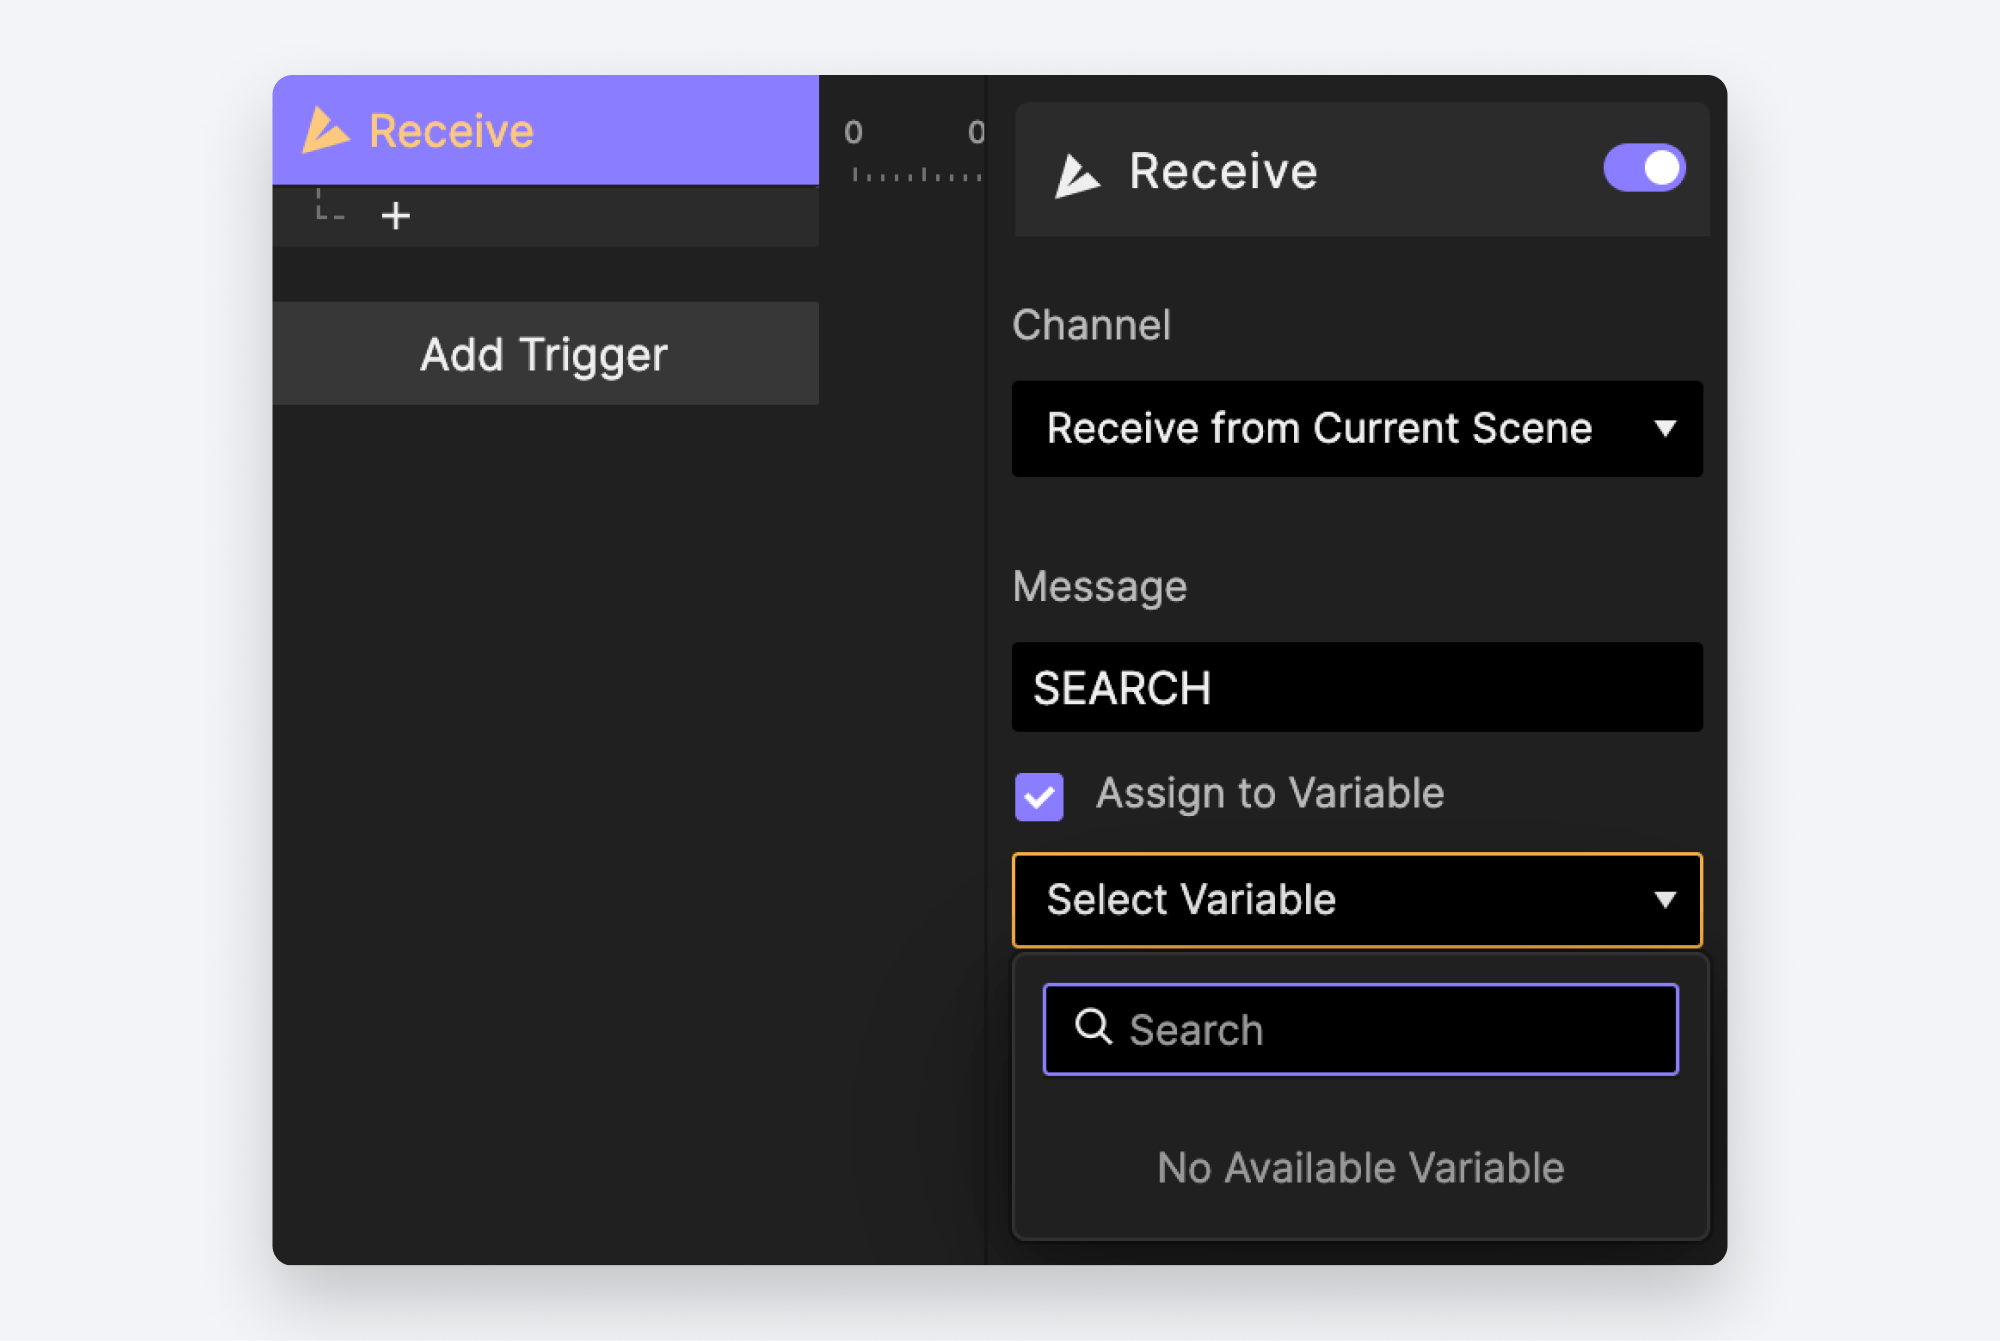
💡 When configuring a Receive Trigger, the message AND the channel it is received through must match what was used in the corresponding Send Response.
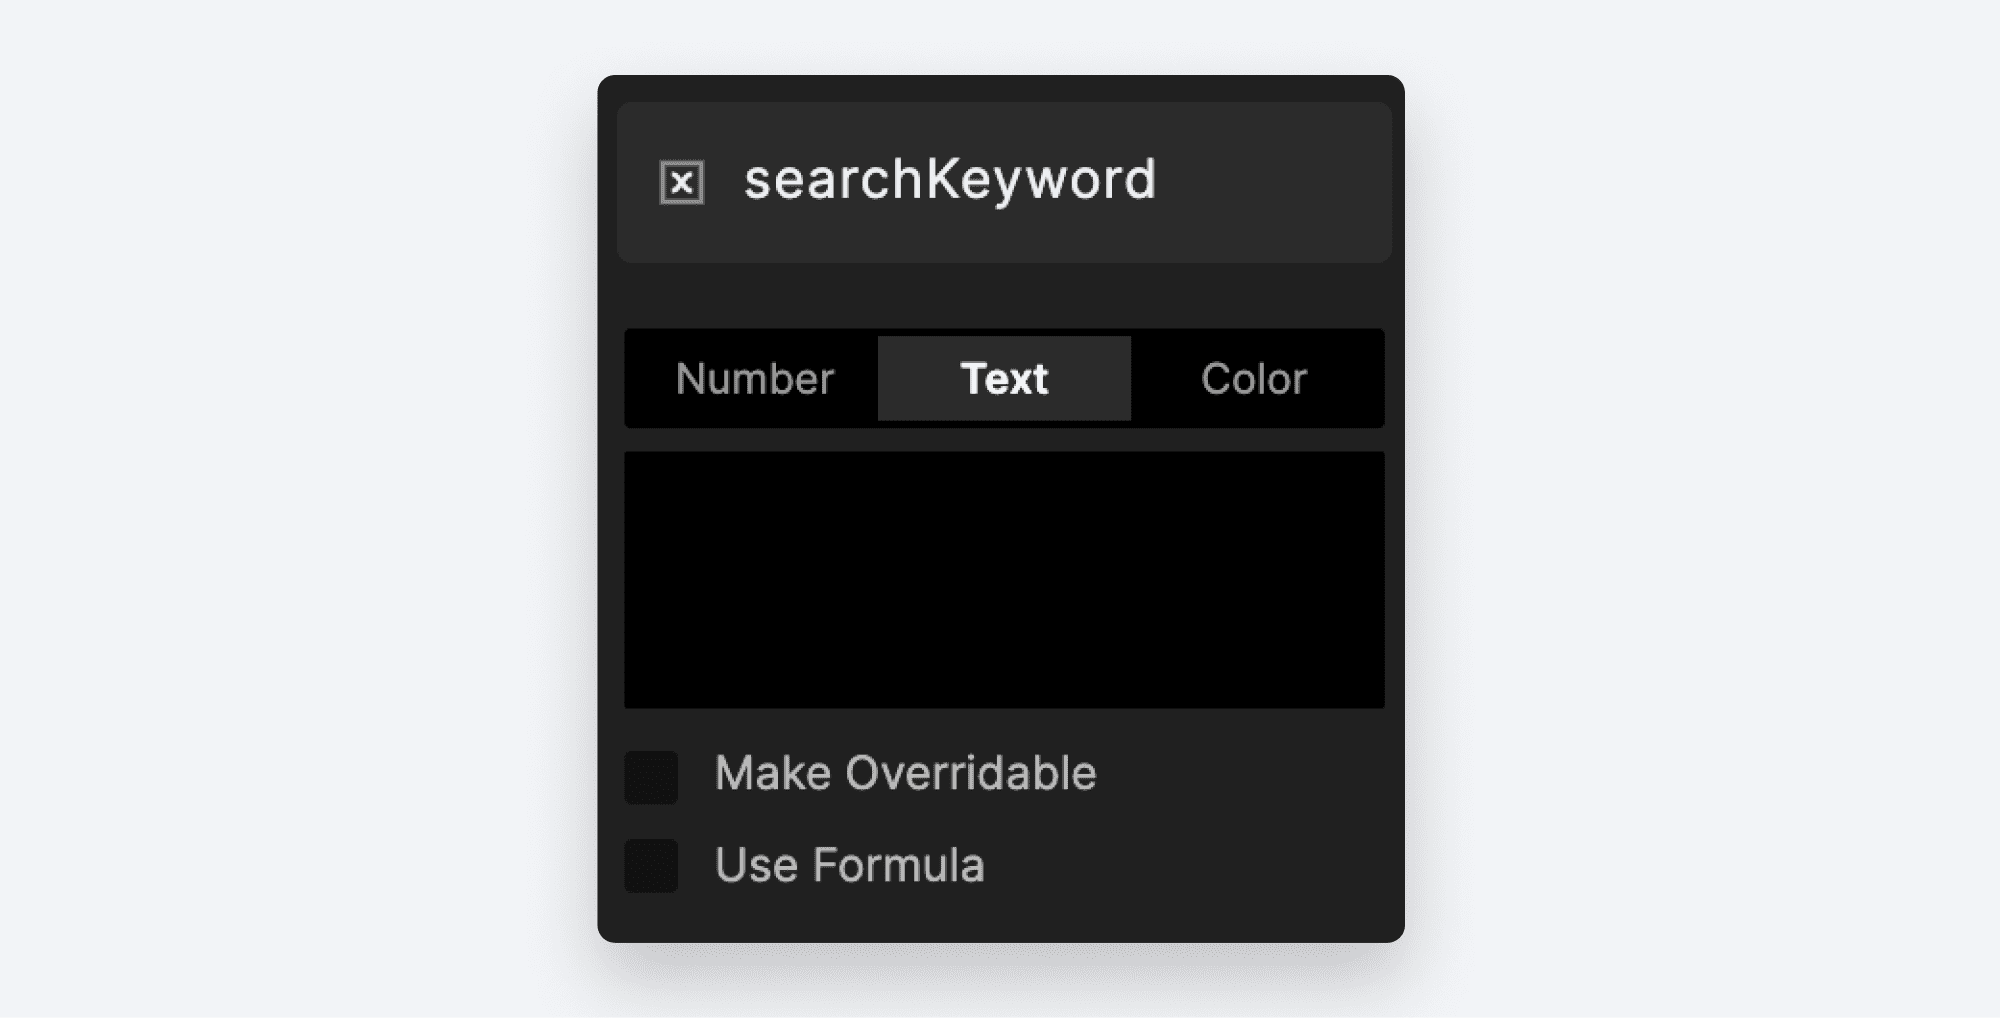
- Create a variable in your component and call it
searchKeyword. Make sure you set it to the Text type.
- Now go back to the Receive Trigger you made in the previous step, and under “Assign to Variable” choose the newly created
searchKeywordvariable.
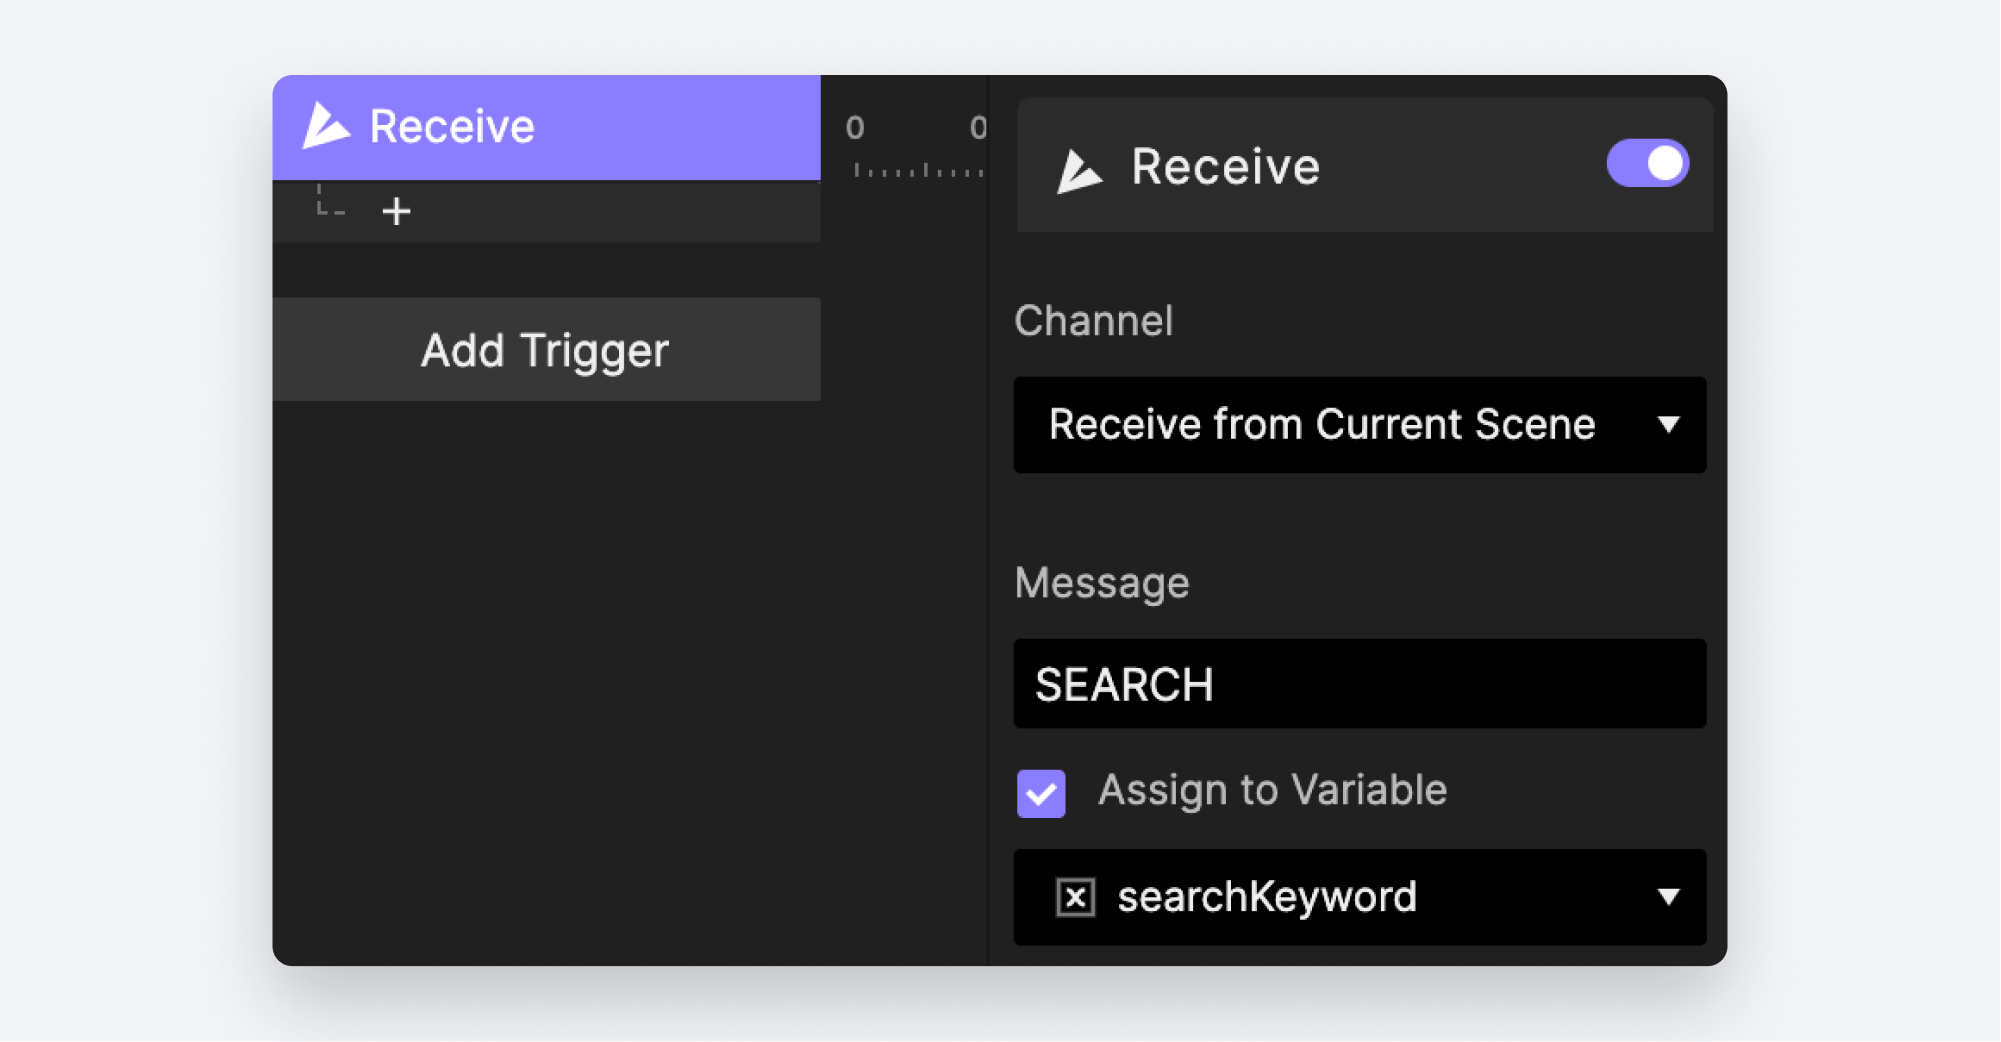
💡 Whenever your Pie receives a message that has a value supplied along with it, you need to assign that value to a variable first before you can work with it. That’s what we’re doing here when we choose Assign to Variable.
Part 2: Displaying results in the Search Bar
We’ve set up our Song component to receive the search keyword from the scene. Now we’d like to determine if the keyword matches any part of the song title.
We’re going to use ProtoPie’s built-in indexOf() function in our condition. indexOf() looks through some text to see if some other text is present in it. It works with two parameters: source and searchValue.
sourceis the text you want to search through. In our case, the Song title.searchValueis the keyword you’re looking for withinsource. This will be the value we passed into the variablesearchValue.
When we execute indexOf(), it gives us back a number indicating the position of the found text, or -1 if no match is found. We care about two possibilities:
- If the function gives us the value
-1this means the song doesn’t match our search, and therefore should be excluded from the search results. - If the function gives us anything other than
-1then this song matches our search and should be included in the results.
Let’s see indexOf() in action!
- Still, in the master copy of the Song component, add a condition under the Receive Trigger.
- In our condition, we’re going to check for the first possibility — no match.
- In the first drop-down pick “Formula.”
- Use the following formula:
indexOf('Title'.text, searchKeyword)and click OK. - Leave
=(equals) selected as the operator, and enter the value-1in the bottom box.
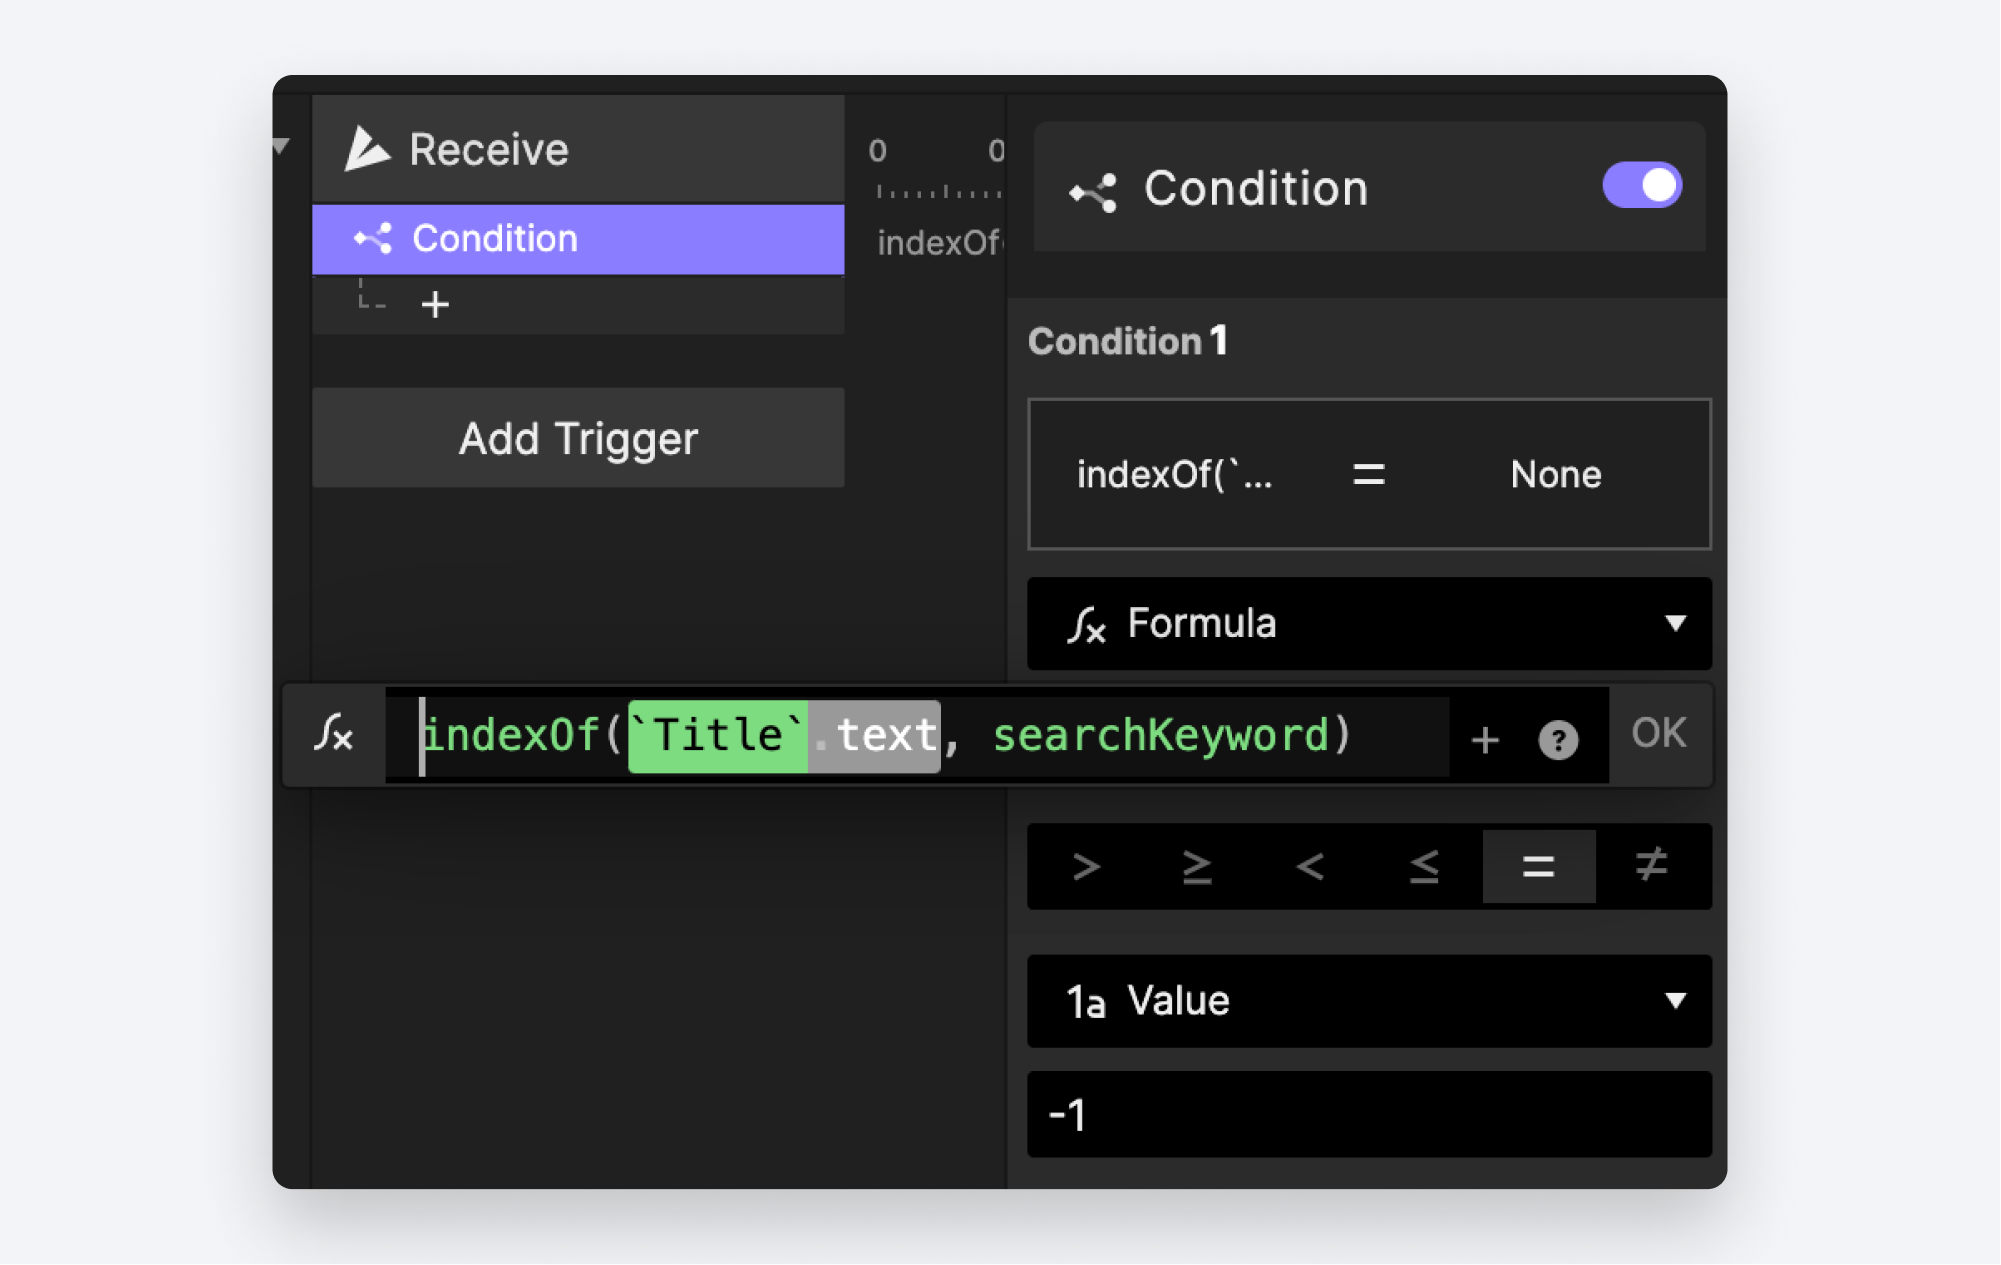
💡 An Operator instructs ProtoPie how you’d like to make your comparison. Look at the strip of icons in the middle of the condition — > ≥ < ≤ = ≠ — These are all of the operators available in ProtoPie.
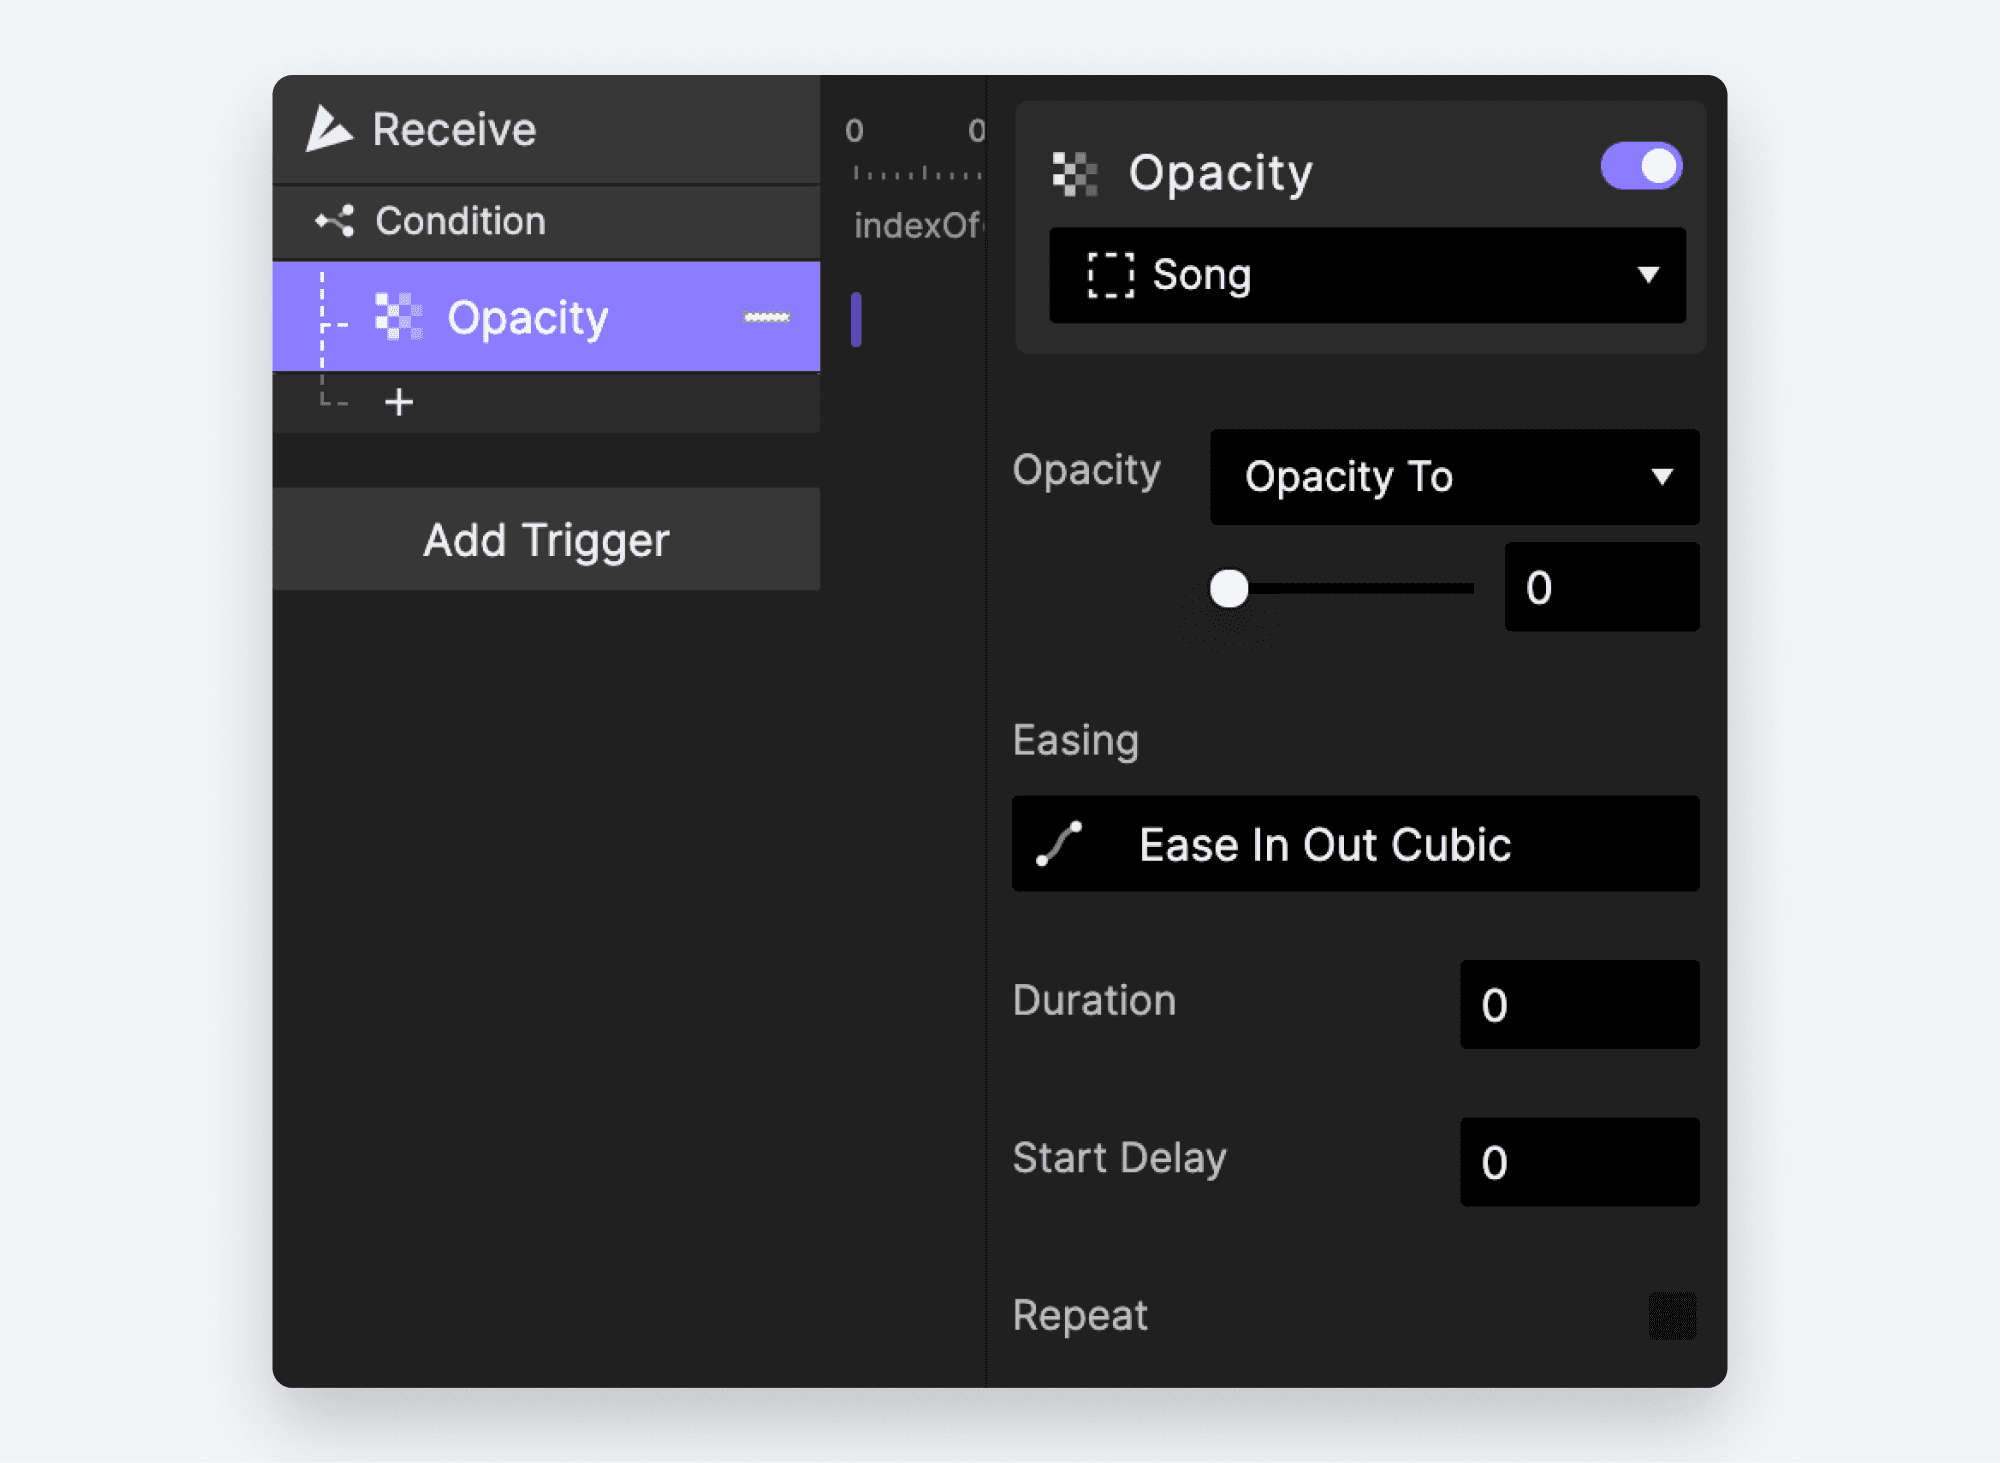
- When there is no match, we hide the song. Add an Opacity Response under our condition. Choose the
Songlayer — that’s the top-level container of the component. Set the opacity to0and the duration to0. Setting the duration to0ensures the opacity change is not animated. It will happen instantly.
Now we need to account for the second possibility, and that is when there IS a search match.
- Add another condition. Use the same formula for the top portion:
indexOf('Title'.text, searchKeyword). - This time, choose the
≠(does not equal) operator. For the value, once again use-1.
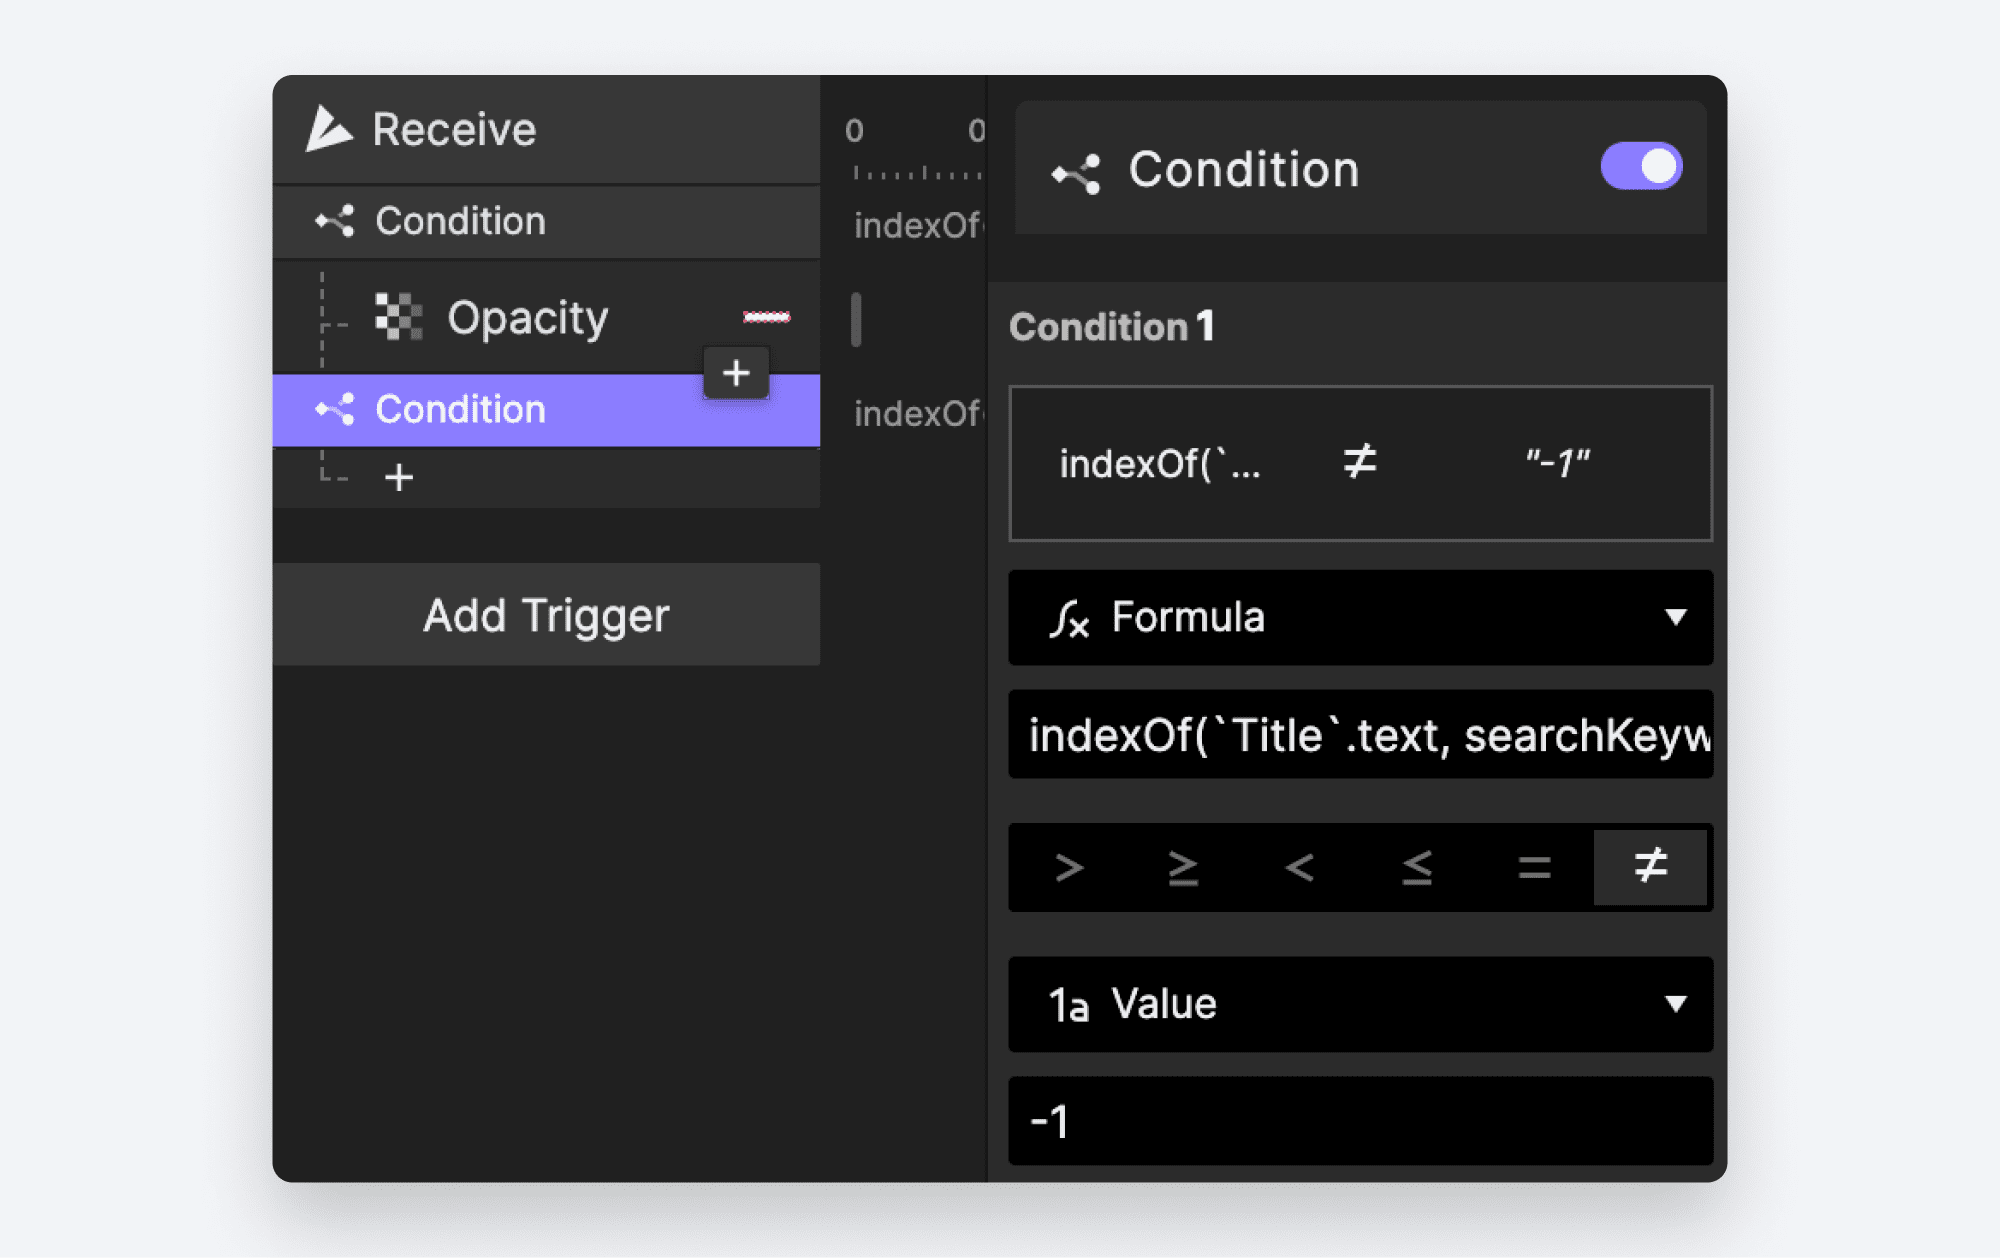
To make things more clear, let’s rename our conditions.
- Double-click the first condition, and rename it to
NO MATCH - Double-click the second condition and rename it to
MATCH

At this point, we should have a working search. Let’s return to the main scene.
- Preview your work. As you type, you should see songs that don’t match your search term disappear, and reappear if you backspace.
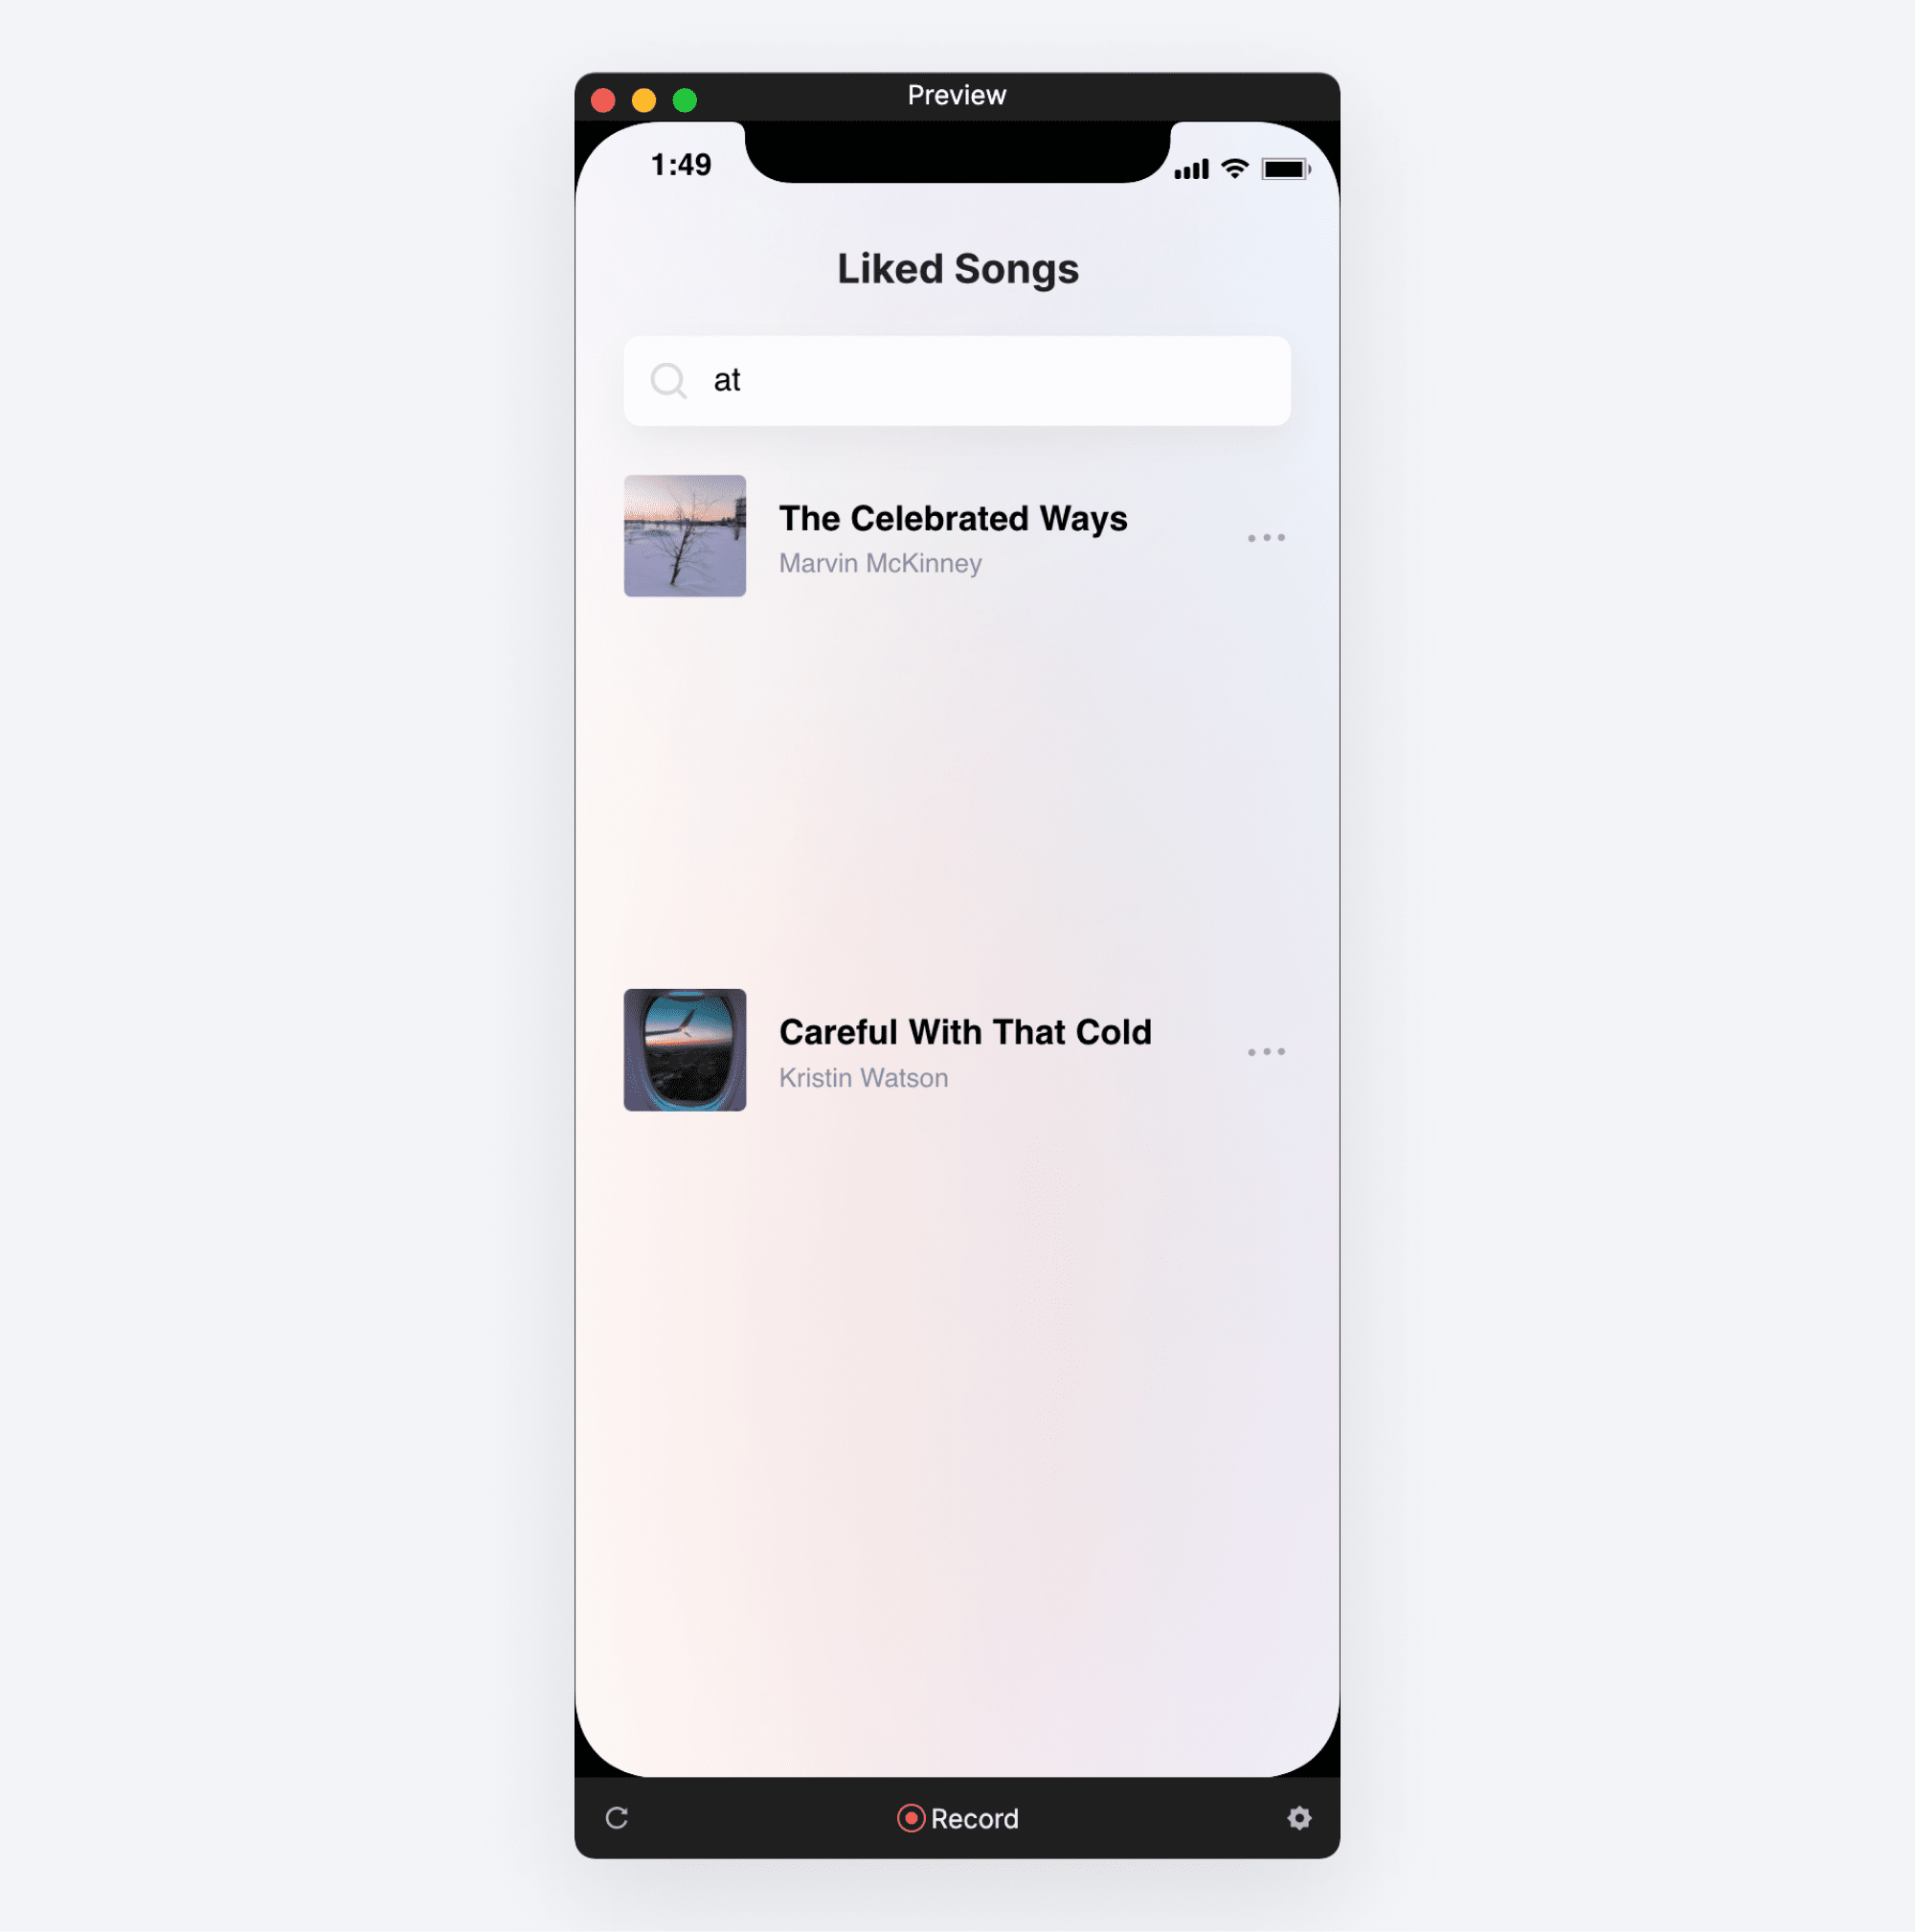
In just a few simple steps, you’ve created the basis for a working search experience!
It does work, but you’ve likely noticed a problem. If you search with the capital “C”, three songs remain visible. However, if you search with lowercase “c”, you get no results.
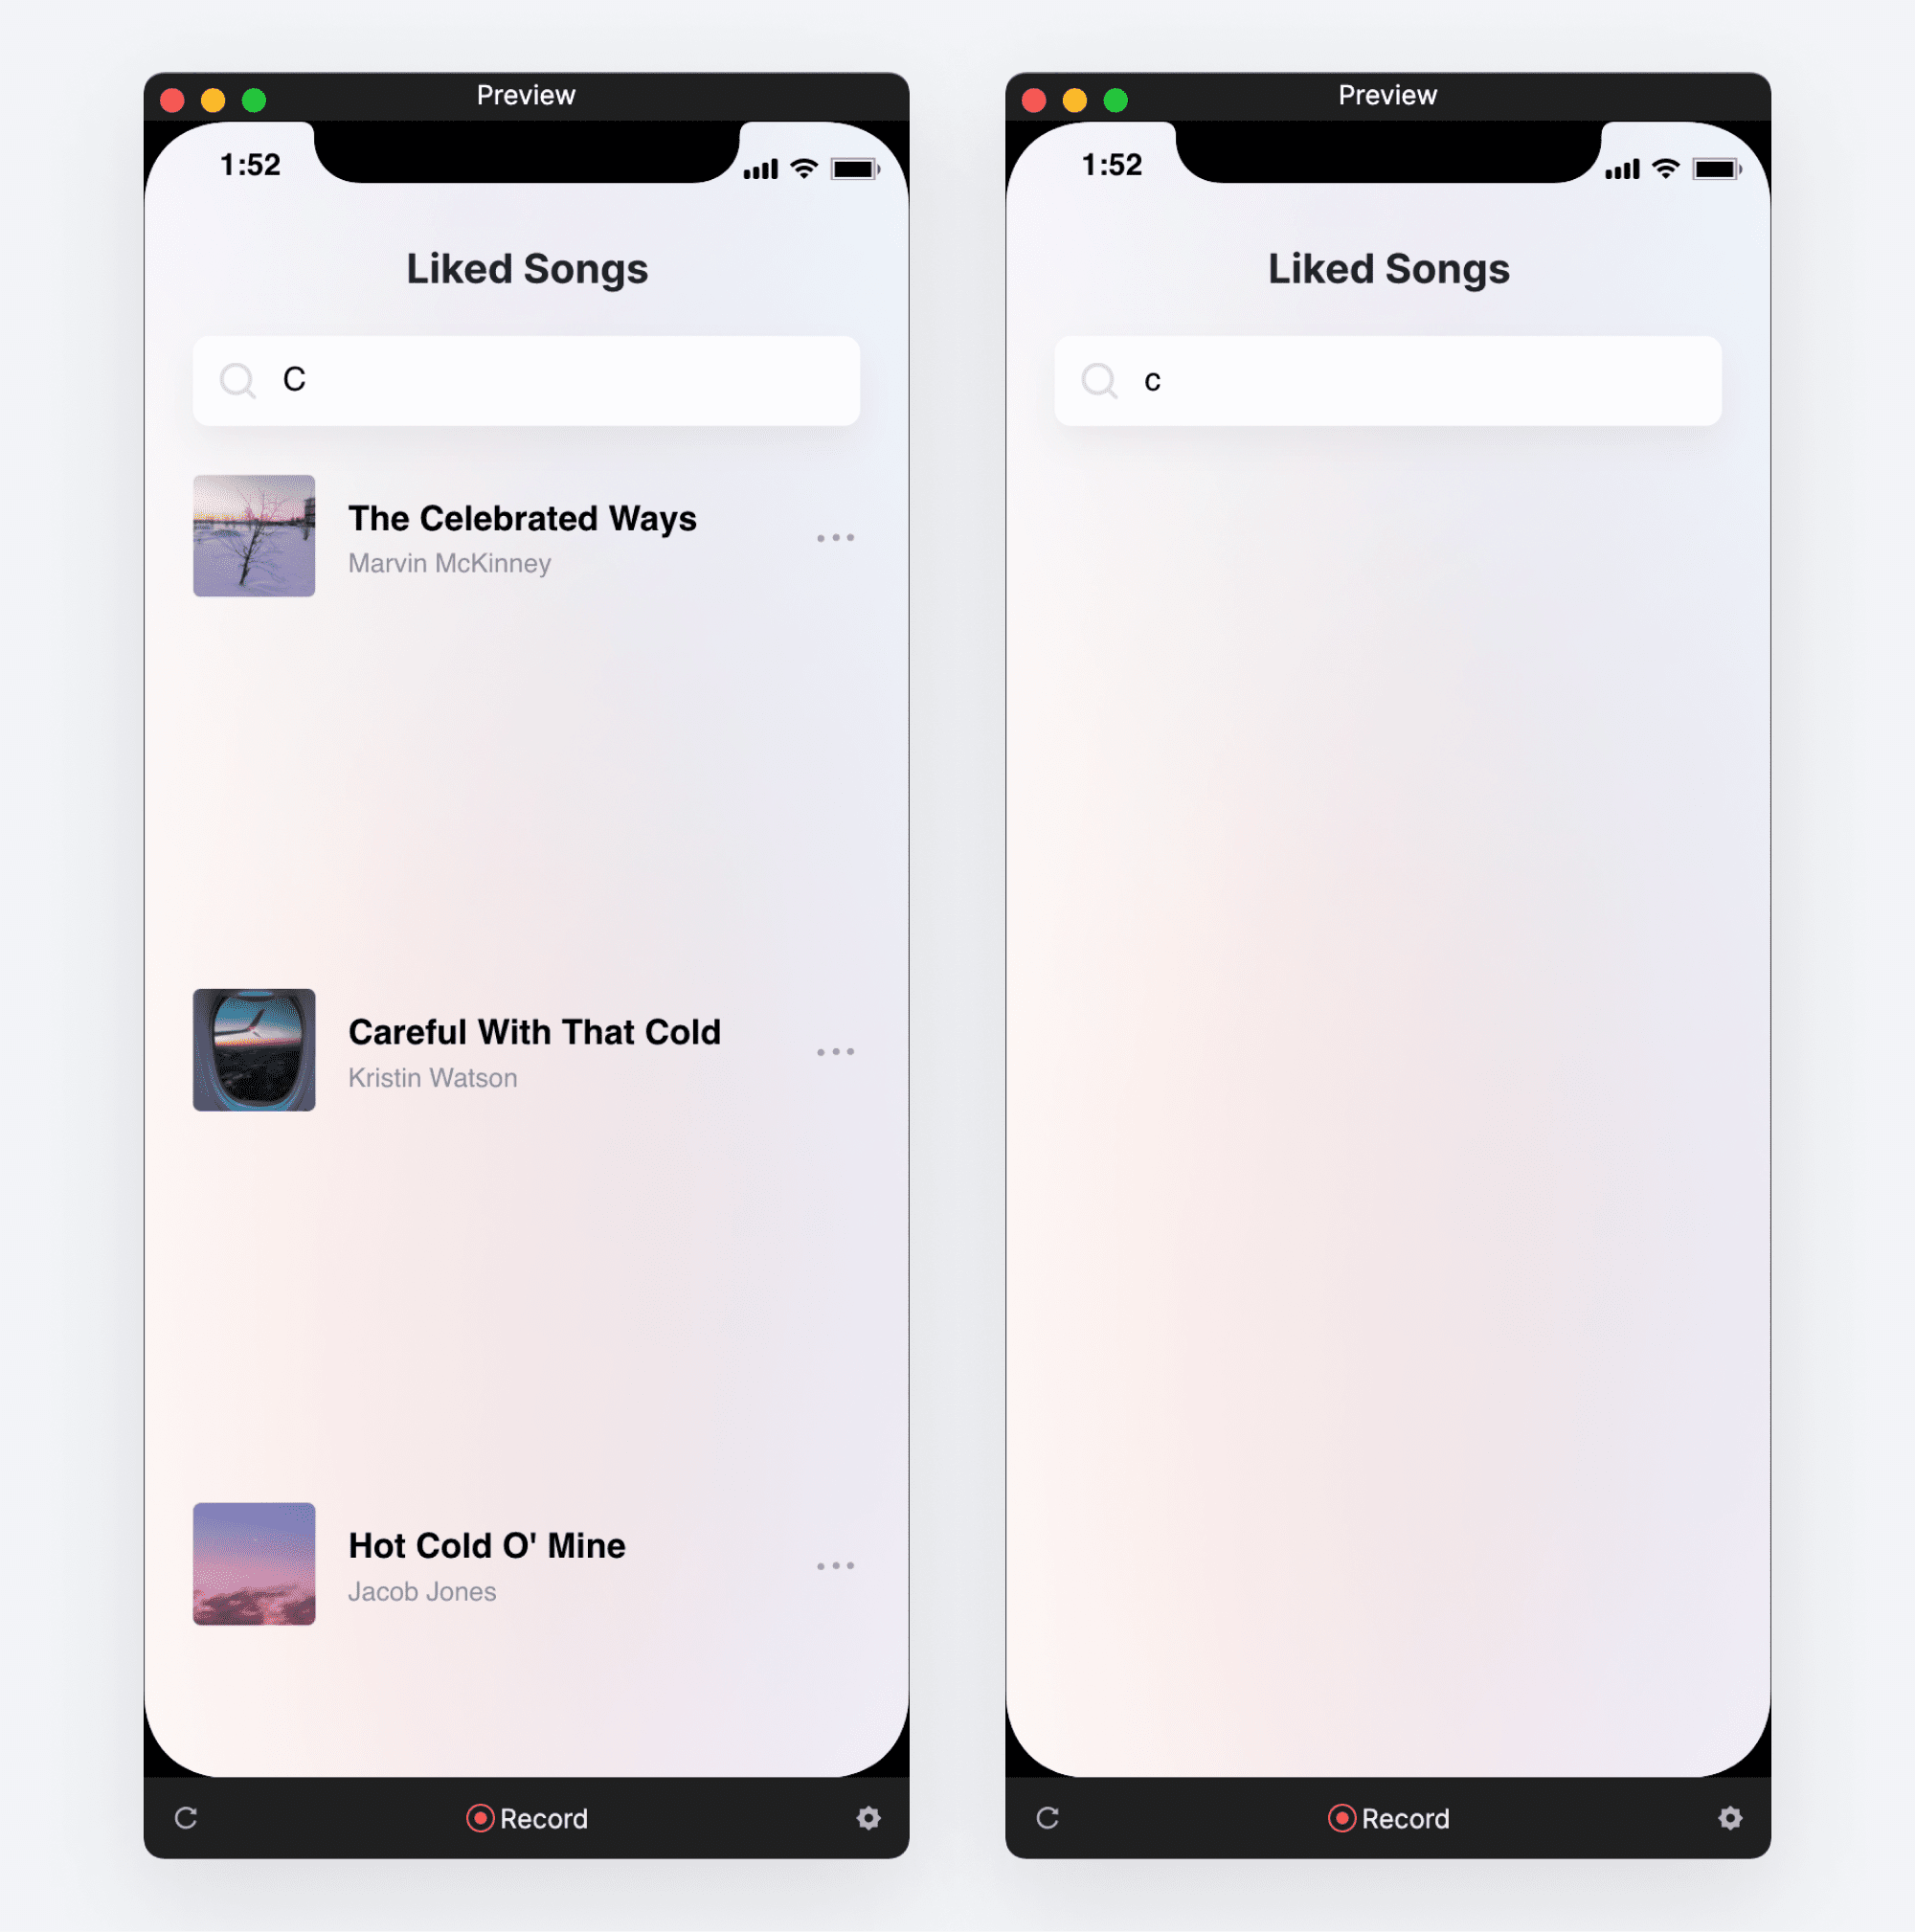
Let’s fix this!
Part 3: Make the search case insensitive
When using the indexOf() function, case matters. As far as it is concerned, C is not the same thing as c. However we would have a poor experience if we settled for this behavior.
To solve this, we need to remove case sensitivity from the equation. Our approach will be to convert BOTH our search keyword AND the song title to lower case before we execute the indexOf() function.
ProtoPie includes another built-in function we can use called lowerCase(). As the name suggests, it converts text to lower case. For example, lowerCase("ProtoPie is the BEST!!") will give us protopie is the best!!.
Let’s see lowerCase() in action!
Still, in the main scene, let’s modify our Send Response under the Detect Trigger.
- In the box under “Send Value Together” modify the existing formula to use the
lowerCase()function as follows:lowerCase('Search field'.text). By doing this, we ensure that all of our components receive the lower case version of whatever we typed in the search bar.
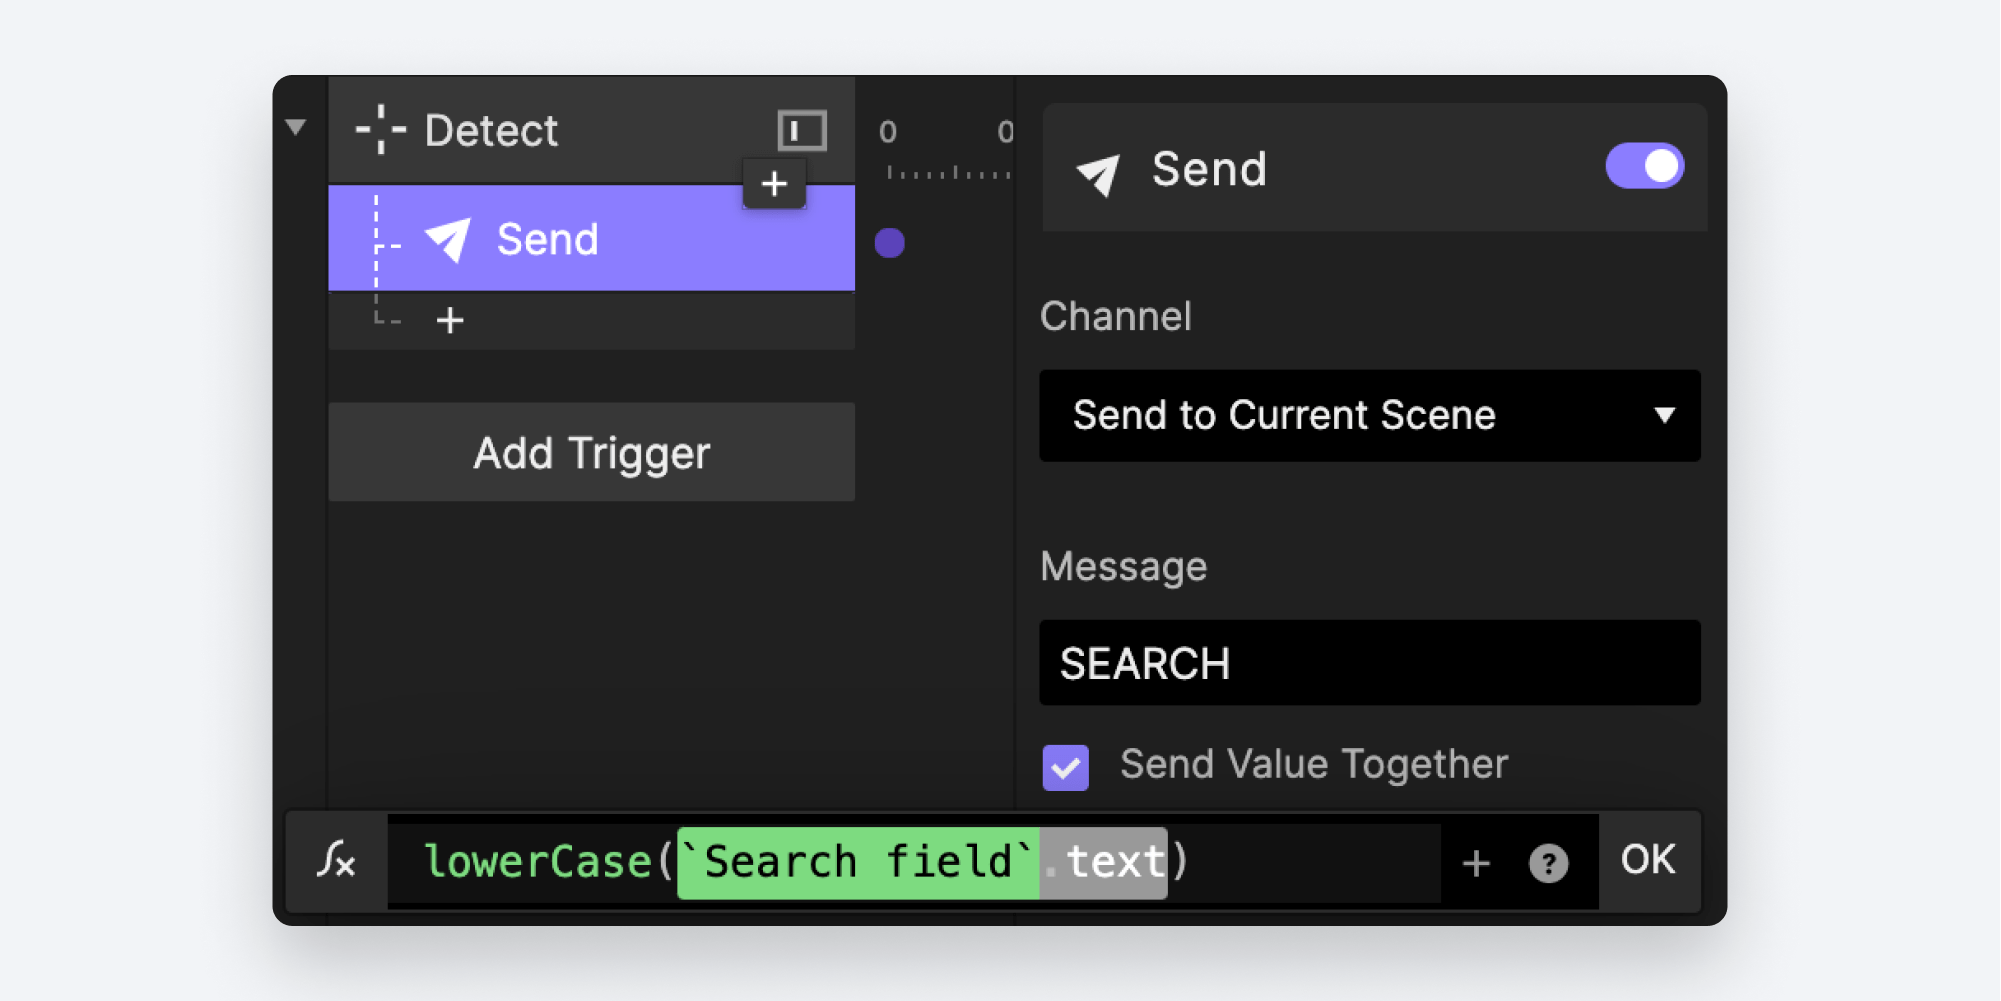
💡 Note the capital “C” in the name of the lowerCase() function. Names of functions are also case sensitive. Your formula won’t work if you accidentally use the name lowercase() with a small “c”.
We need to do the same thing to the Song title before we execute indexOf().
- Edit the master copy of the Song component once again.
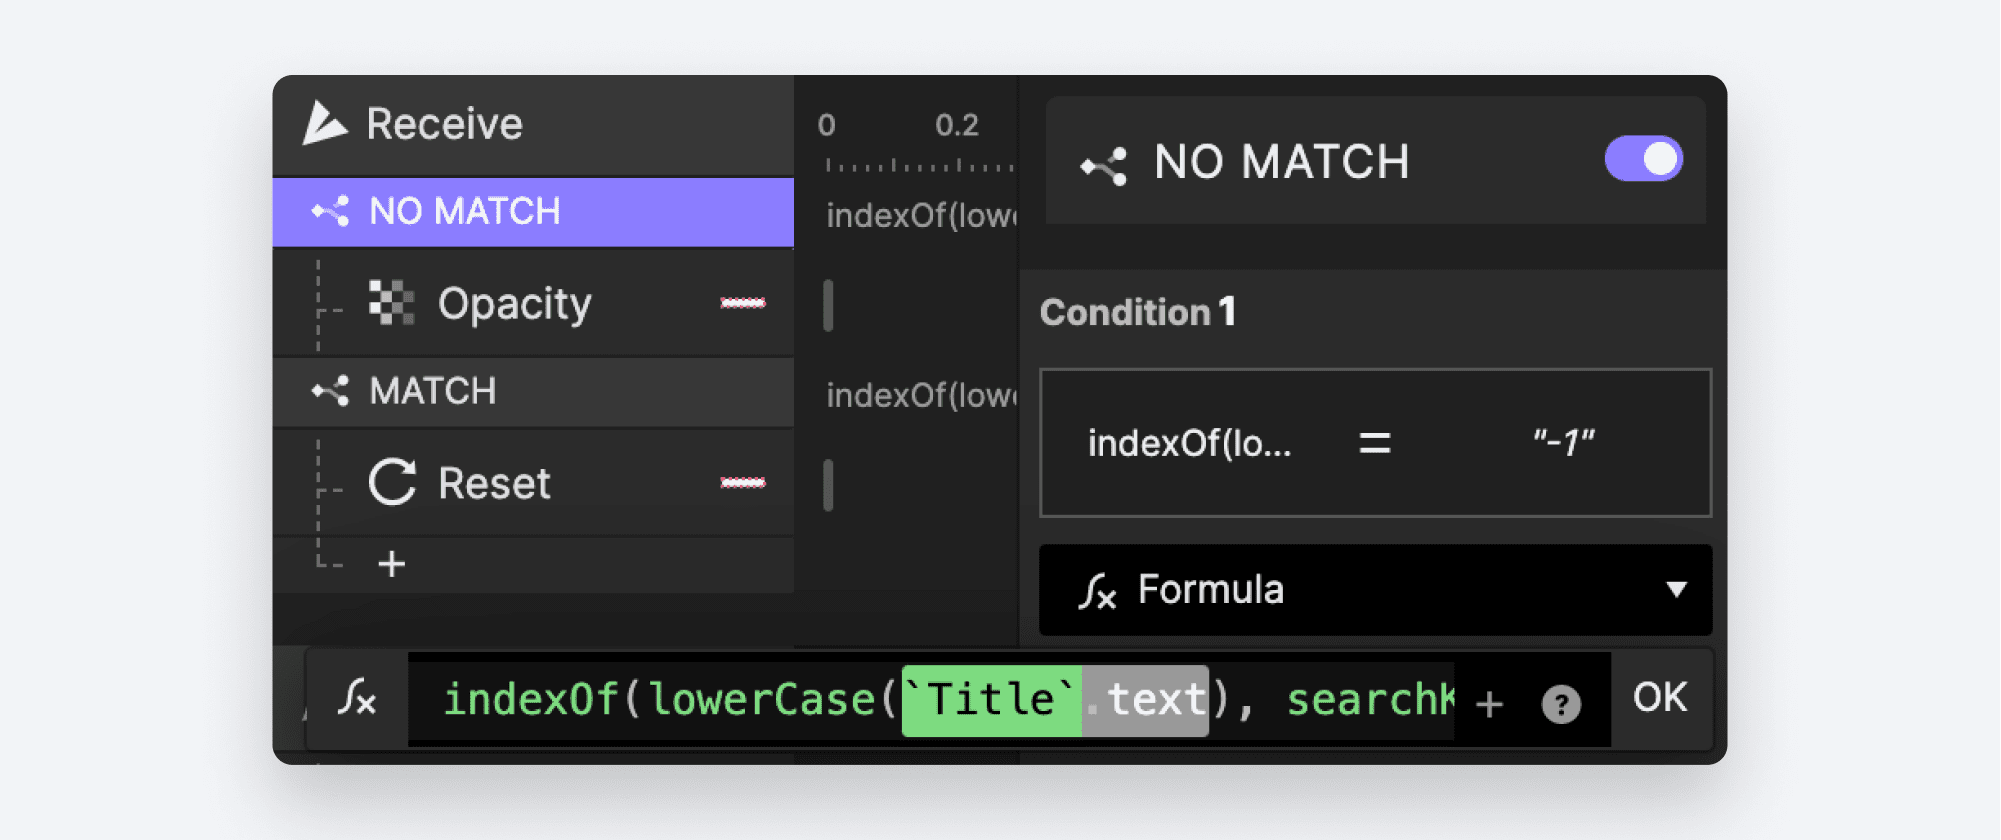
- We need to modify both of our conditions. Click the first condition, and modify the formula as follows:
indexOf(lowerCase('Title'.text), searchKeyword)
💡 What’s going on?
A function can be nested within another, and can therefore be used as a parameter inside another function.
Since the indexOf() function expects Text as the first parameter, we can use ANY function which outputs Text — which the lowerCase() function does! When functions are nested like this, the inside one executes before the outside one. This results in indexOf() working with the song title converted to lower case.
- Make the same modification to the formula in the second condition.
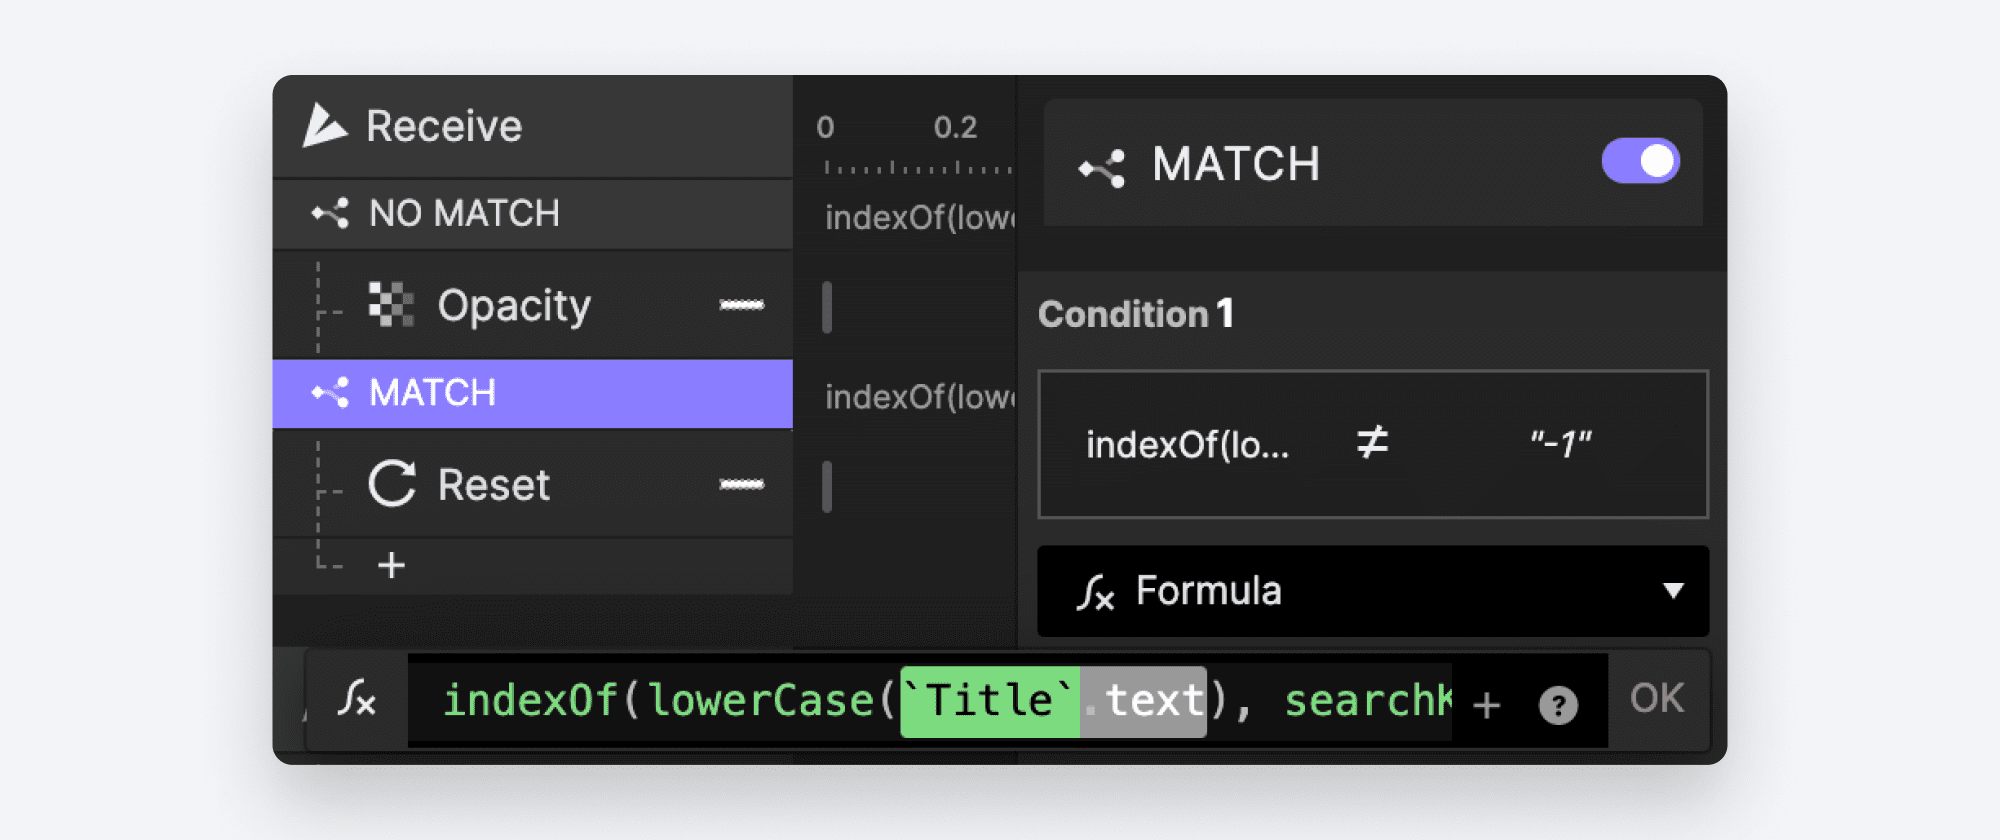
Return to the main scene and preview again. Your search should now be case-insensitive.
Part 4: Collapse the results
Our search is fully functional, but we’re left with blank spaces where the songs that don’t match our search used to be. We’d like to collapse the results as they are displayed.
In the same way we were able to send messages from the main scene to our components, components can send messages to each other. Before we do that, though, we need to modify our components so that they can tell each other apart.
- Edit the master copy of the Song component.
- create a variable called
id. Leave it as the default Number type. Check the box labeled “Make Overridable.”
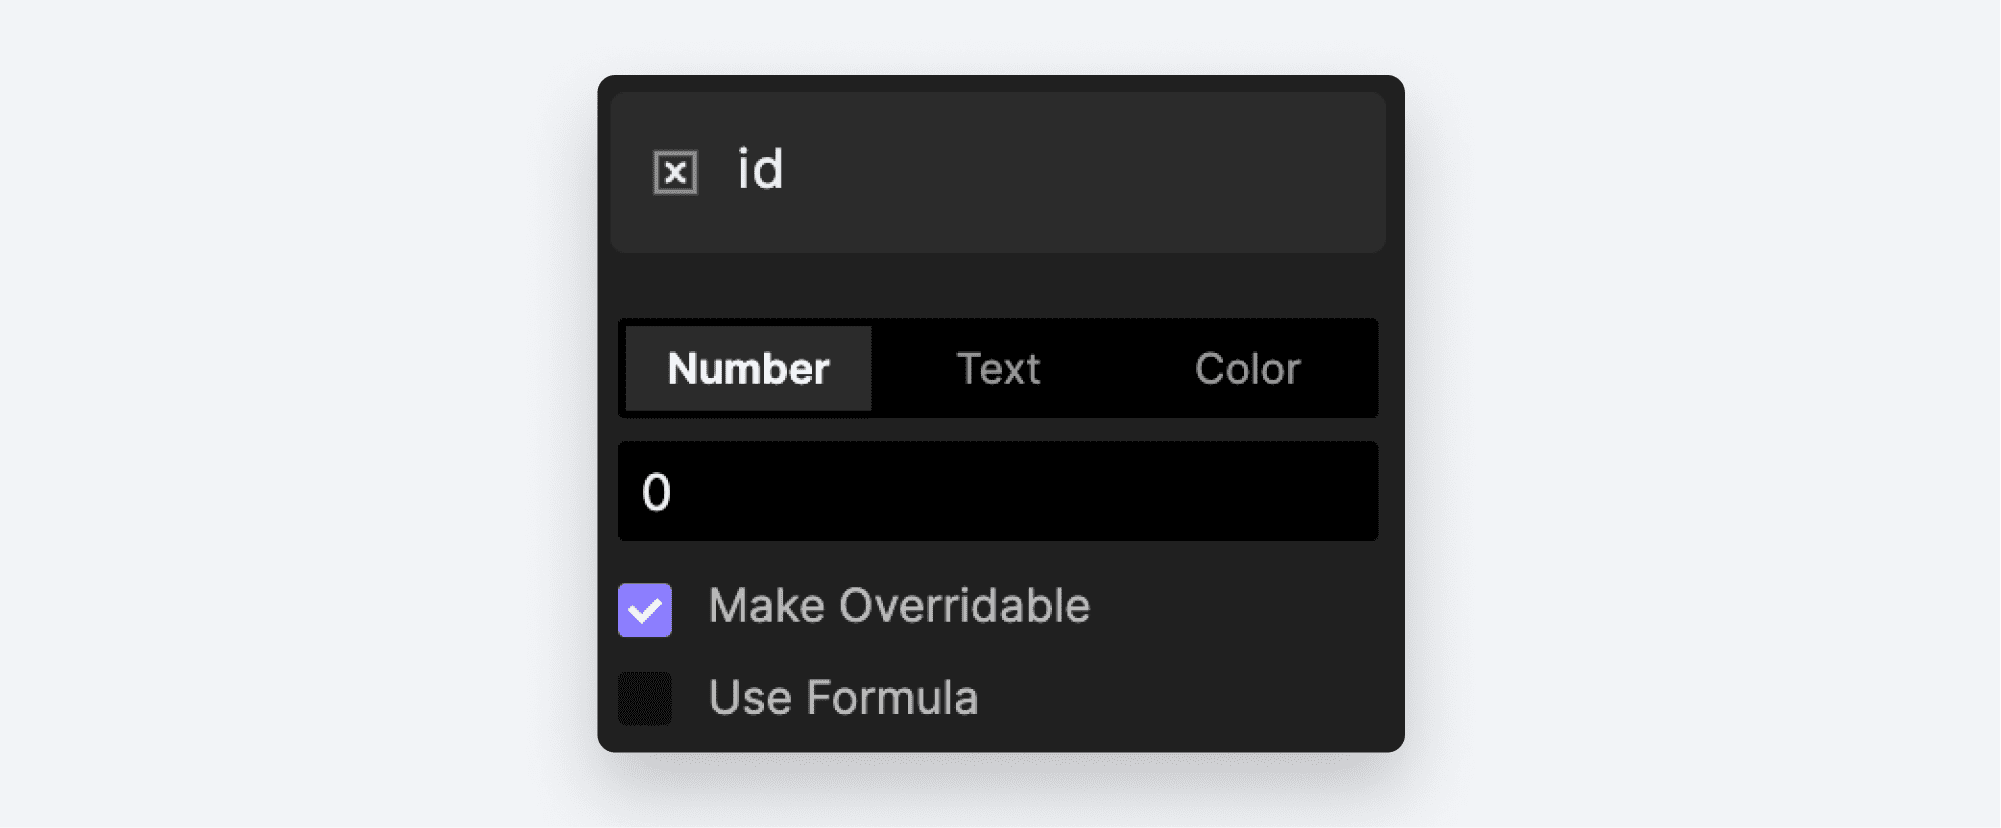
💡 By checking “Make Overridable,” each copy of the component in our scene can have a different value for id.
- Return to the main scene. Each Song component copy has a section in the right-hand properties panel called “Overrides” and you’ll notice that our newly created
idvariable is available for editing.
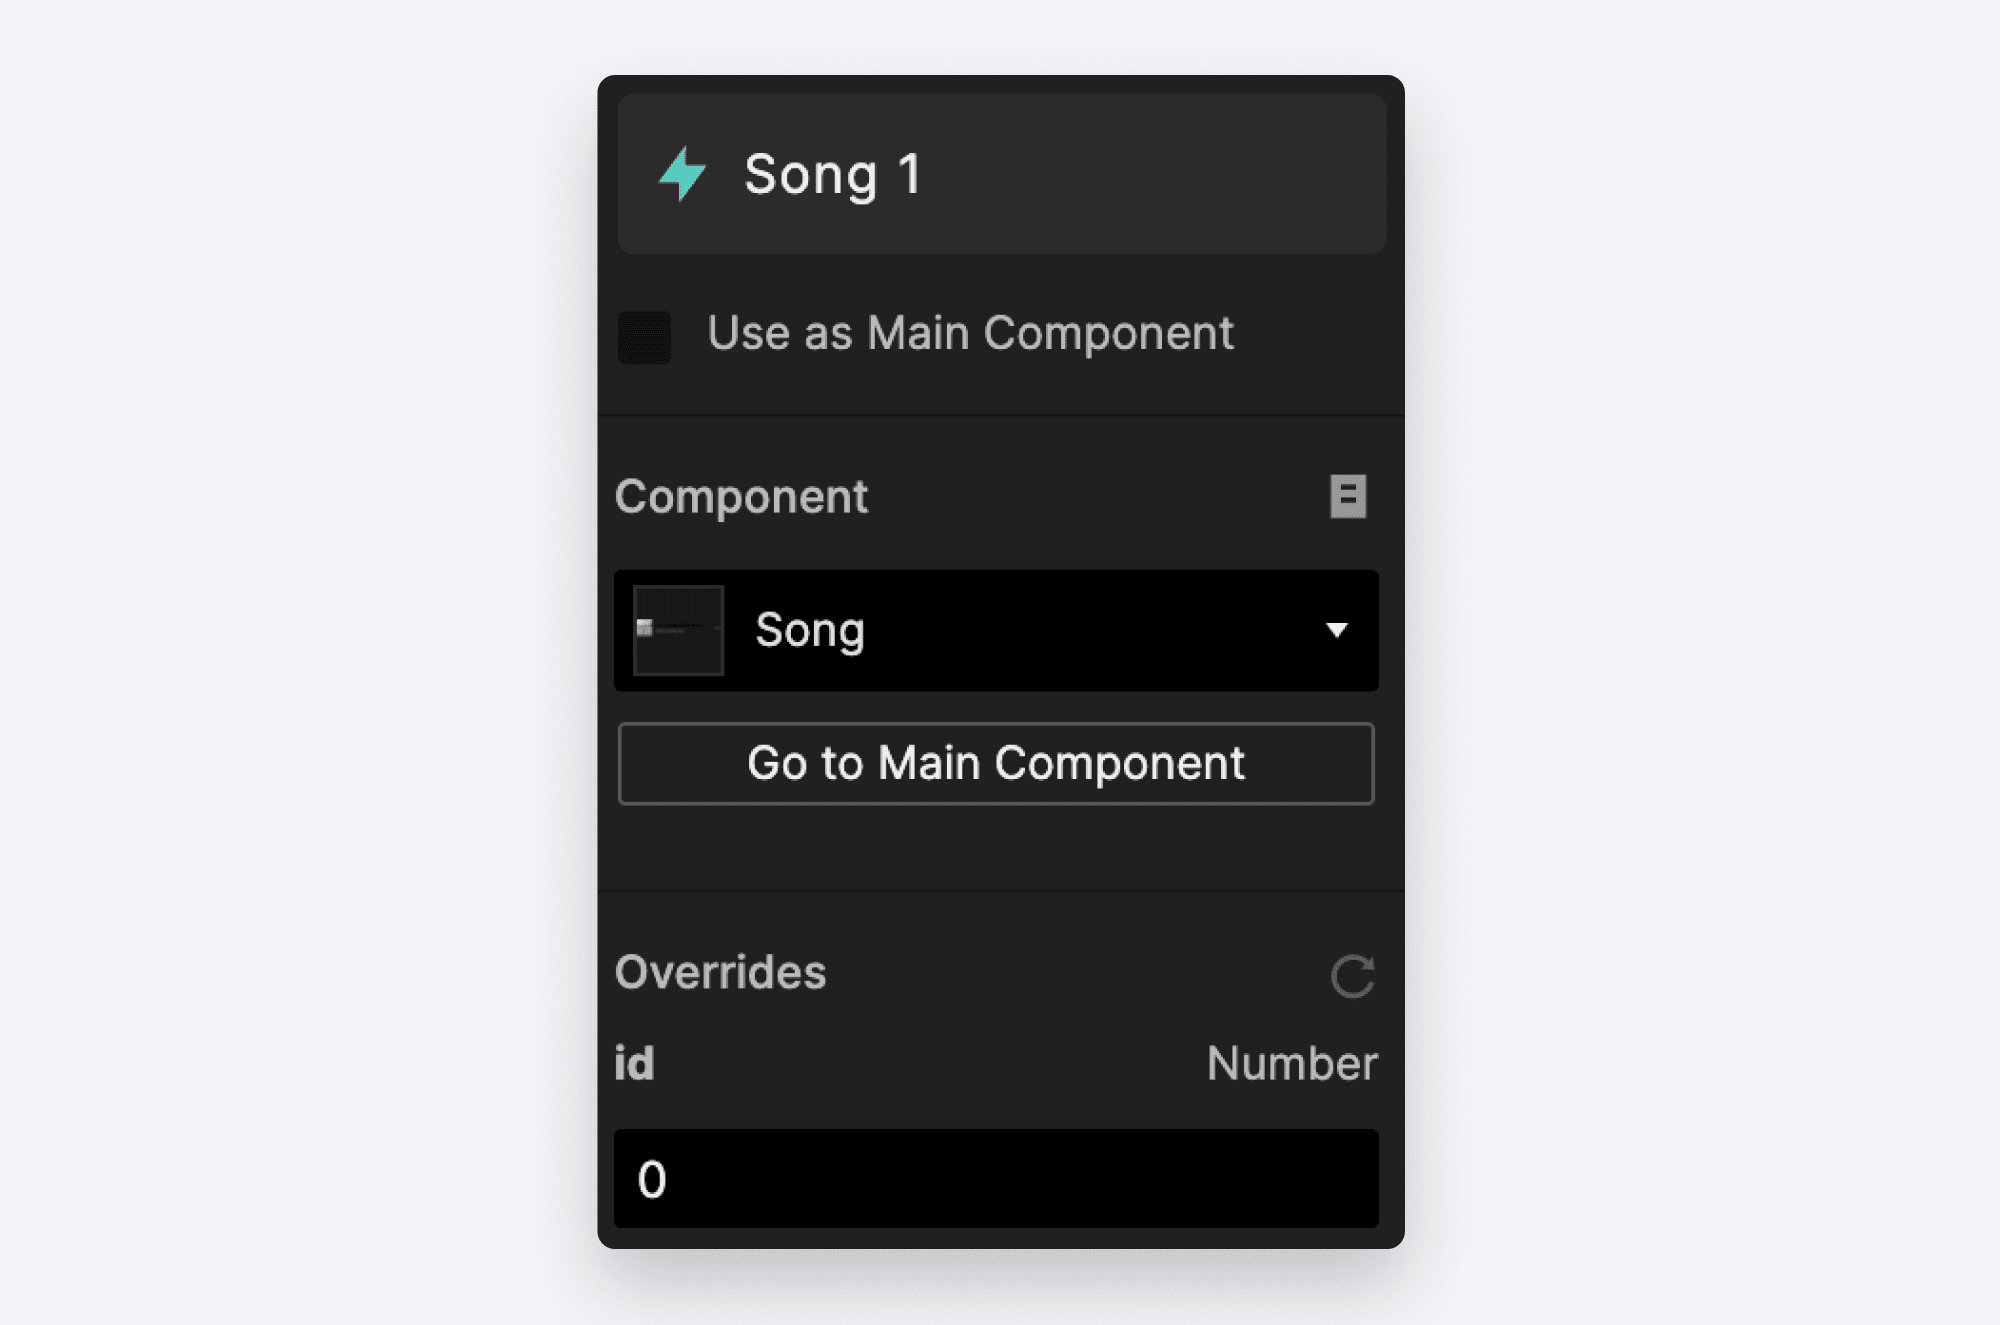
- Give each component copy a different value for
id. Use sequential values.- e.g., give the first item “The Celebrated Ways” the value
1 - give the second item “Feel Again” the value
2 - give the third item “Good Enemy” the vale
3 - etc.
- e.g., give the first item “The Celebrated Ways” the value
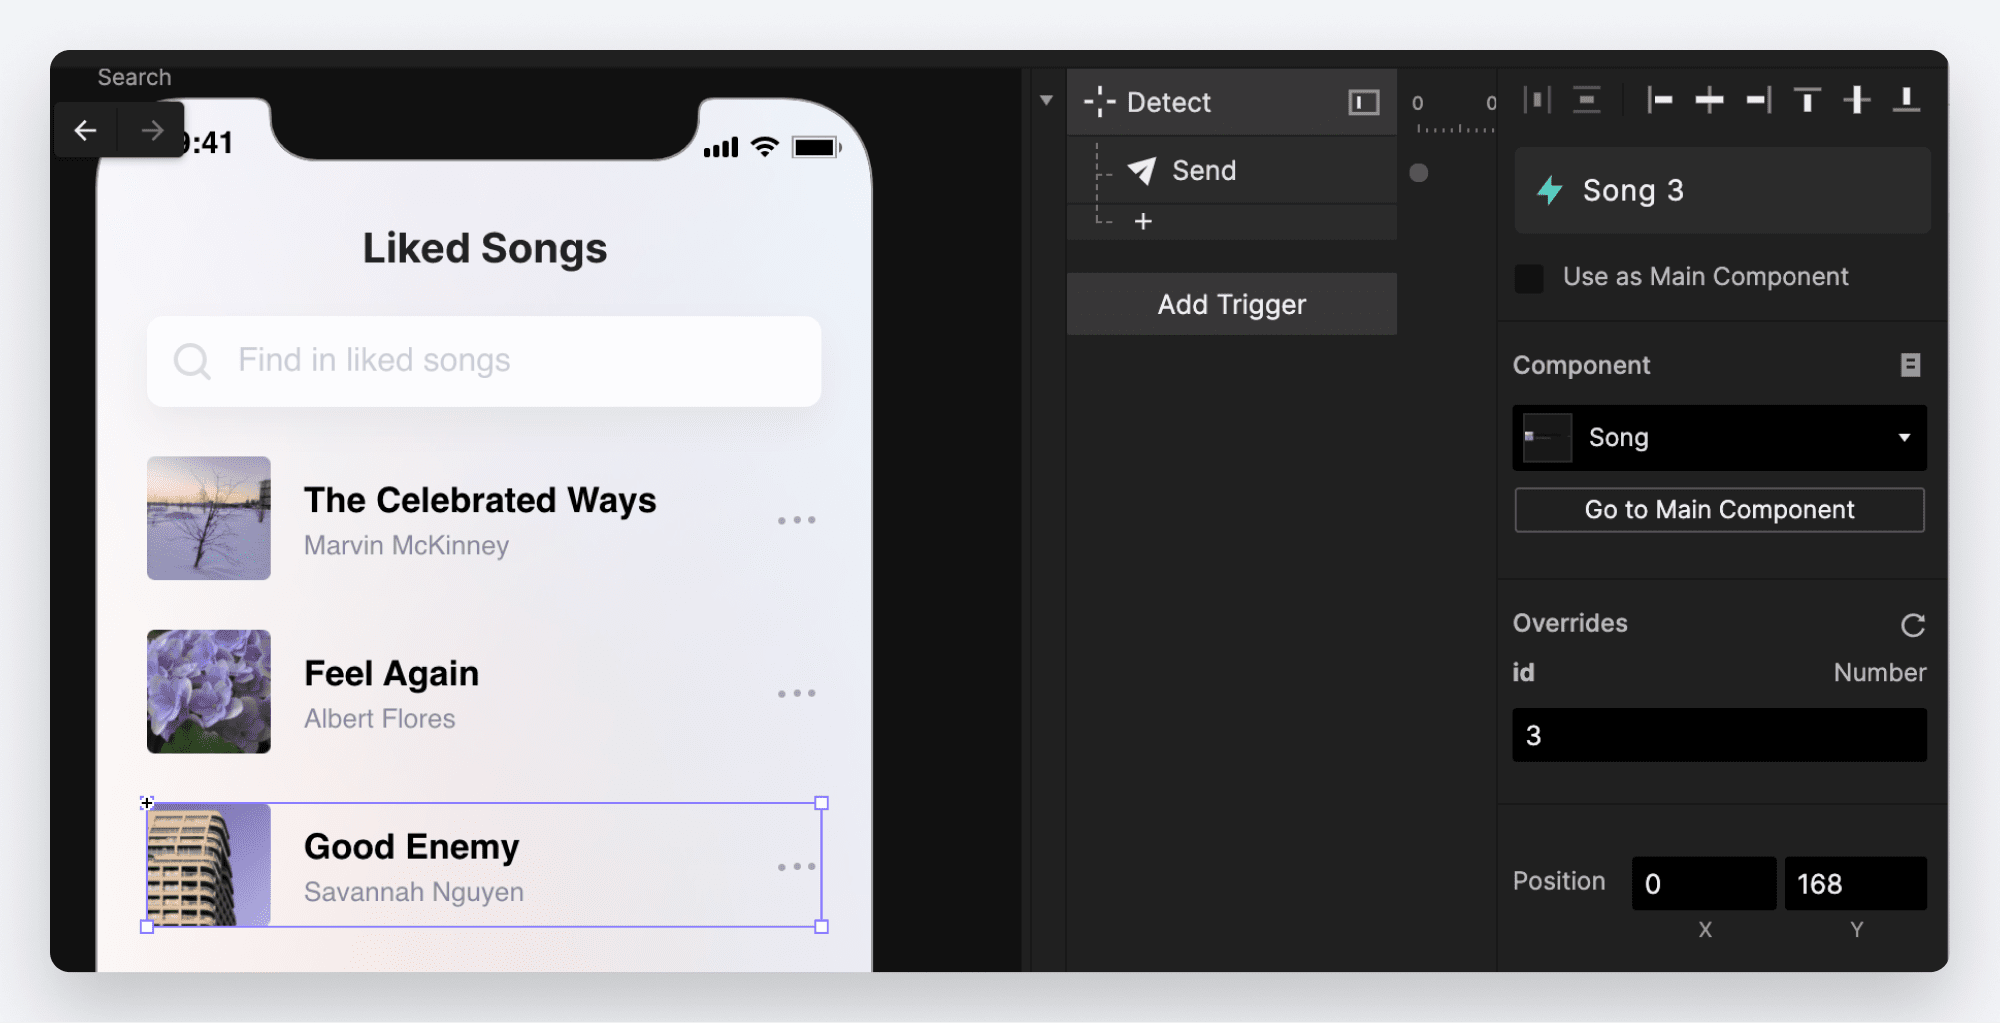
💡 This sequential numbering will become very important in our logic.
Luckily the layer names for the copies correspond to the value that id should have. Take a second to double-check that Song 1 has id:1, Song 2 has id:2, etc. all the way through to Song 8.
Now let’s make the magic happen!
- Edit the master copy of the Song component once again.
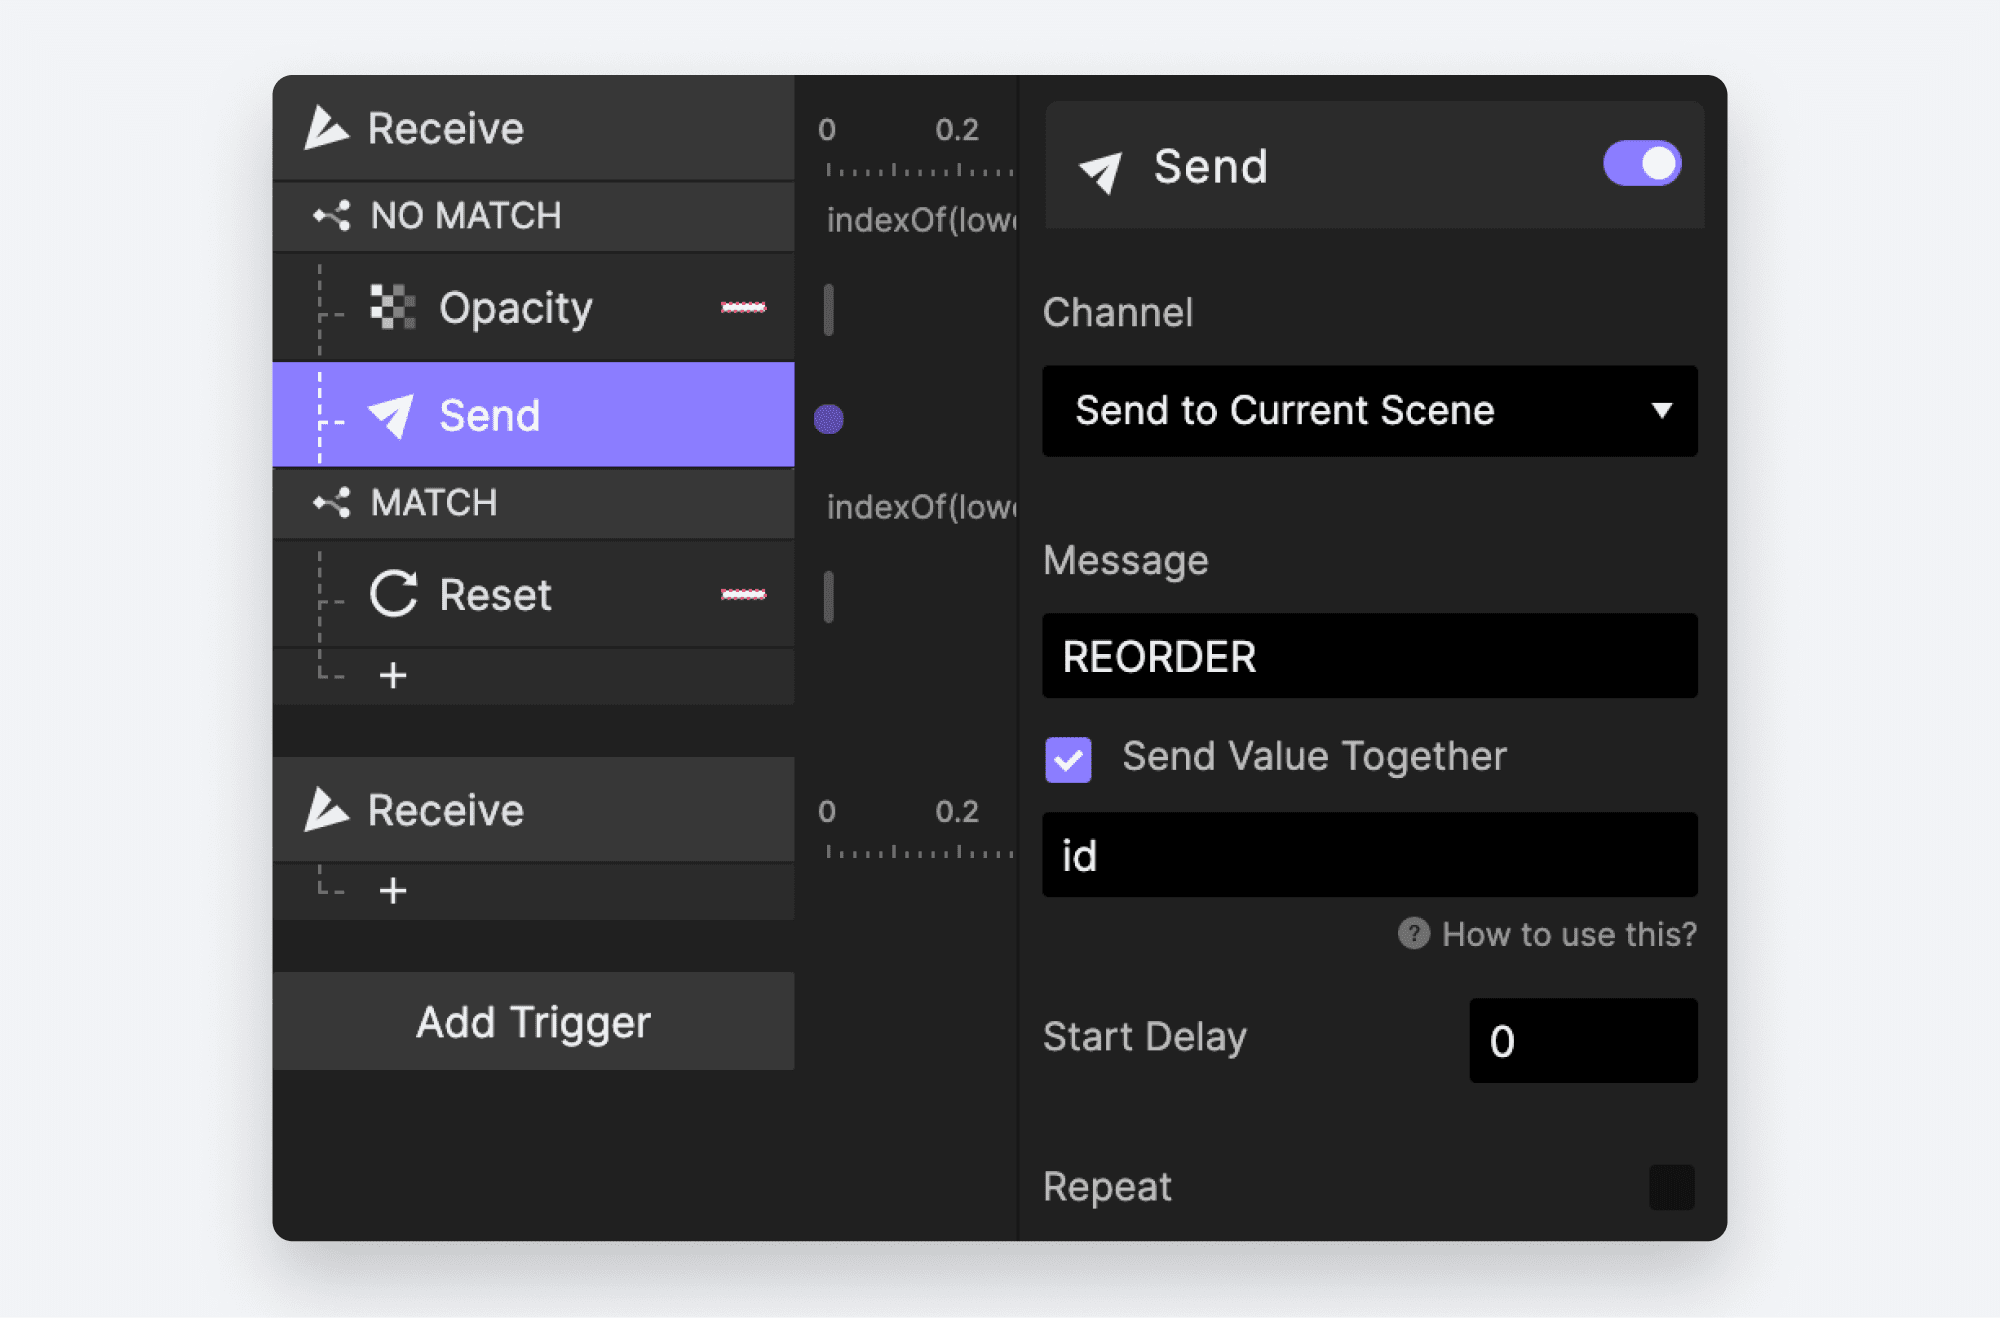
- Add a Send Response under the “NO MATCH” condition. Choose “Send to Current Scene” as the Channel. Use the message
REORDER. Check the box “Send Value Together” and in the box that appears underneath, use the formulaid.
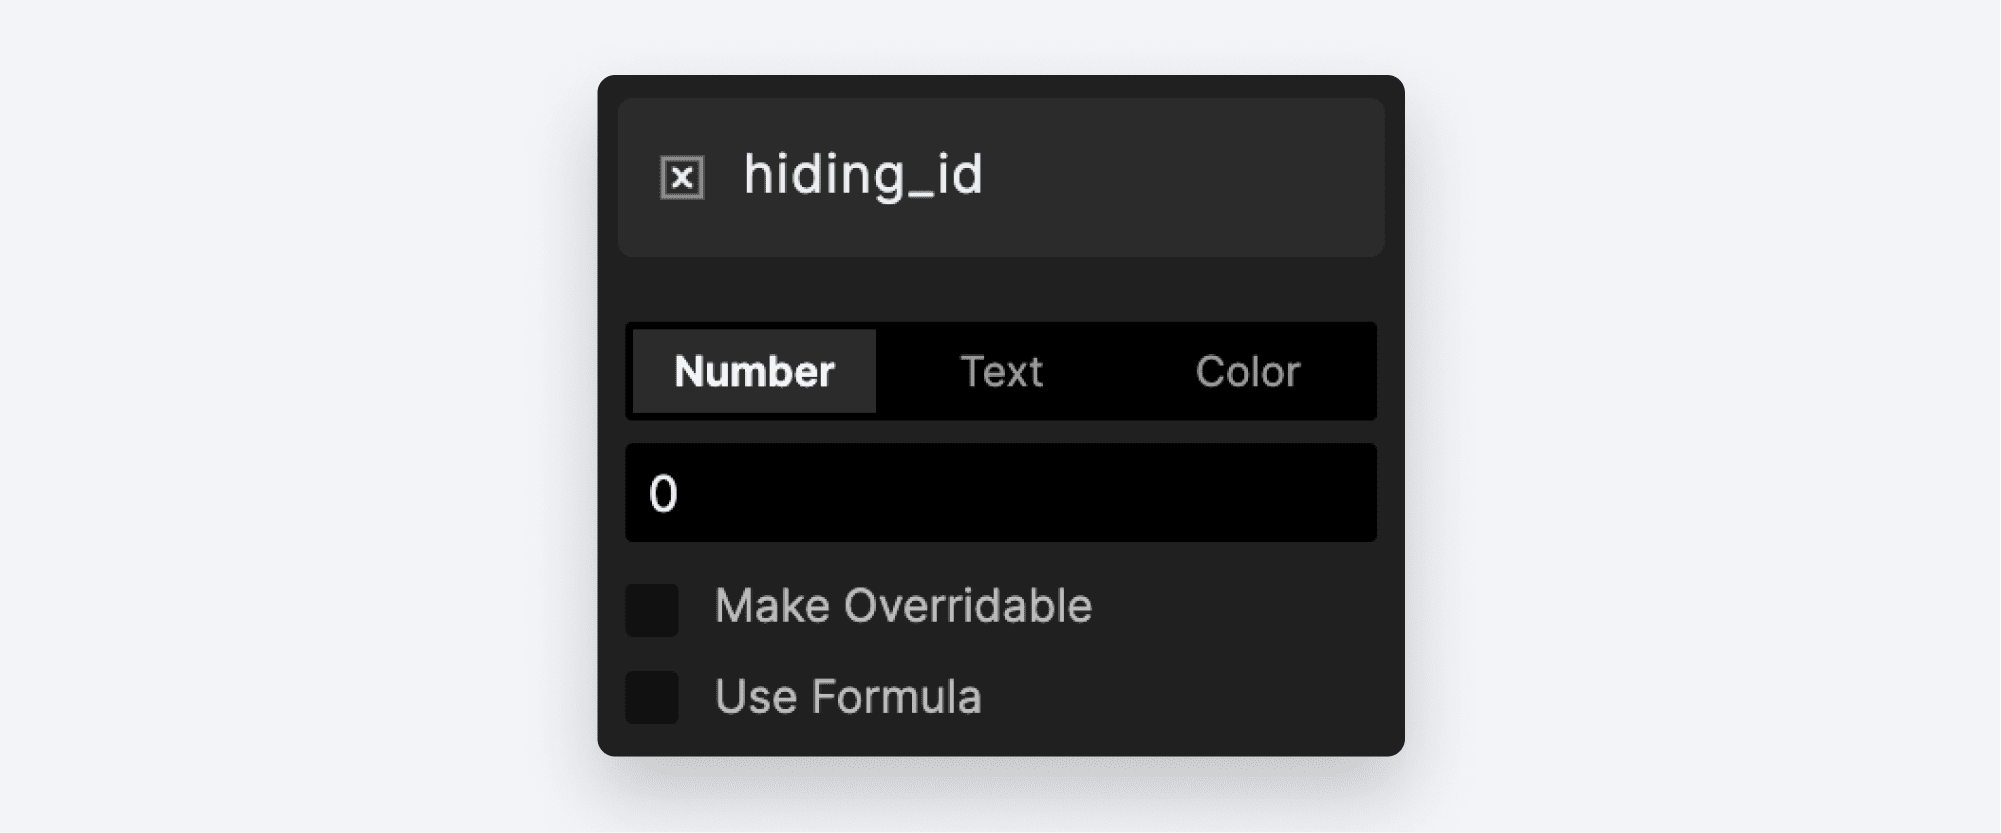
- Create a new variable called
hiding_id. Leave it as the default Number type.
- Add a Send Response under the “NO MATCH” condition.
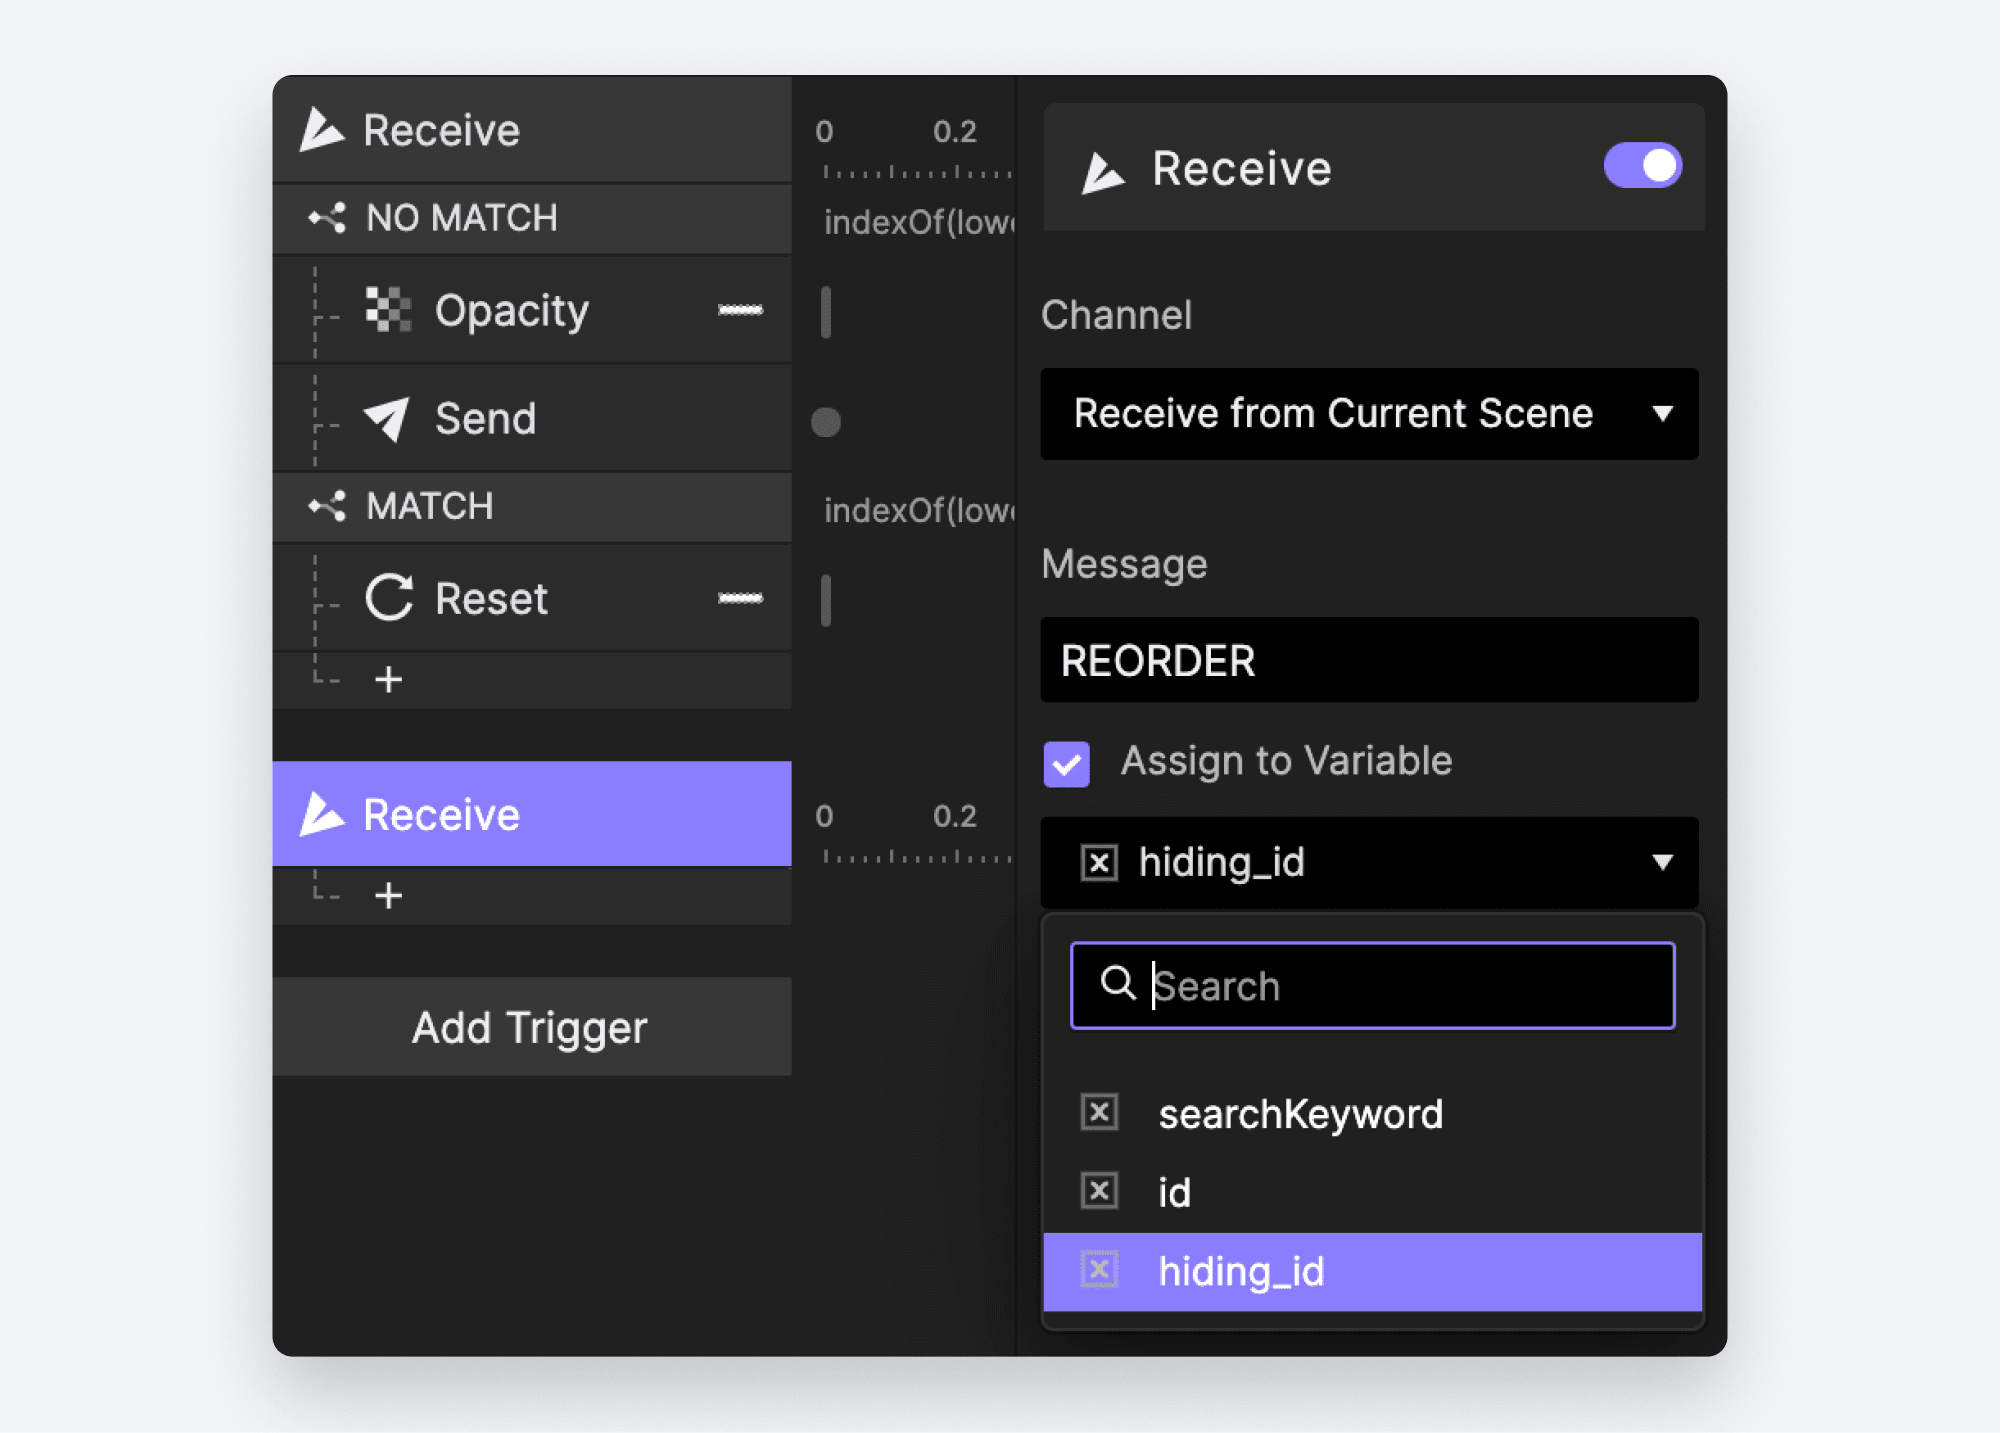
- Add a Receive Trigger. Choose “Receive from Current Scene” as the Channel. Use the message
REORDER. Check the box beside “Assign to Variable.” - In our Receive Trigger, choose the newly created
hiding_idvariable under “Assign to Variable.”
Before we continue it’s important to point out what will happen.
We’ve used a Send Response in our “NO MATCH” condition to broadcast the message REORDER. If components could talk, this particular copy of the Song component would be telling ALL of the other copies “I’m id:x. I don’t match the search, so I am hiding. All other components reorder yourselves accordingly.”
At this point ALL copies of the Song component will receive that message INCLUDING the copy that sent it. We’ve also sent along the id of the component that originally sent the message and assigned that value to a variable named hiding_id. In the Receive, each copy will compare its OWN id to hiding_id.
Here’s the crucial part:
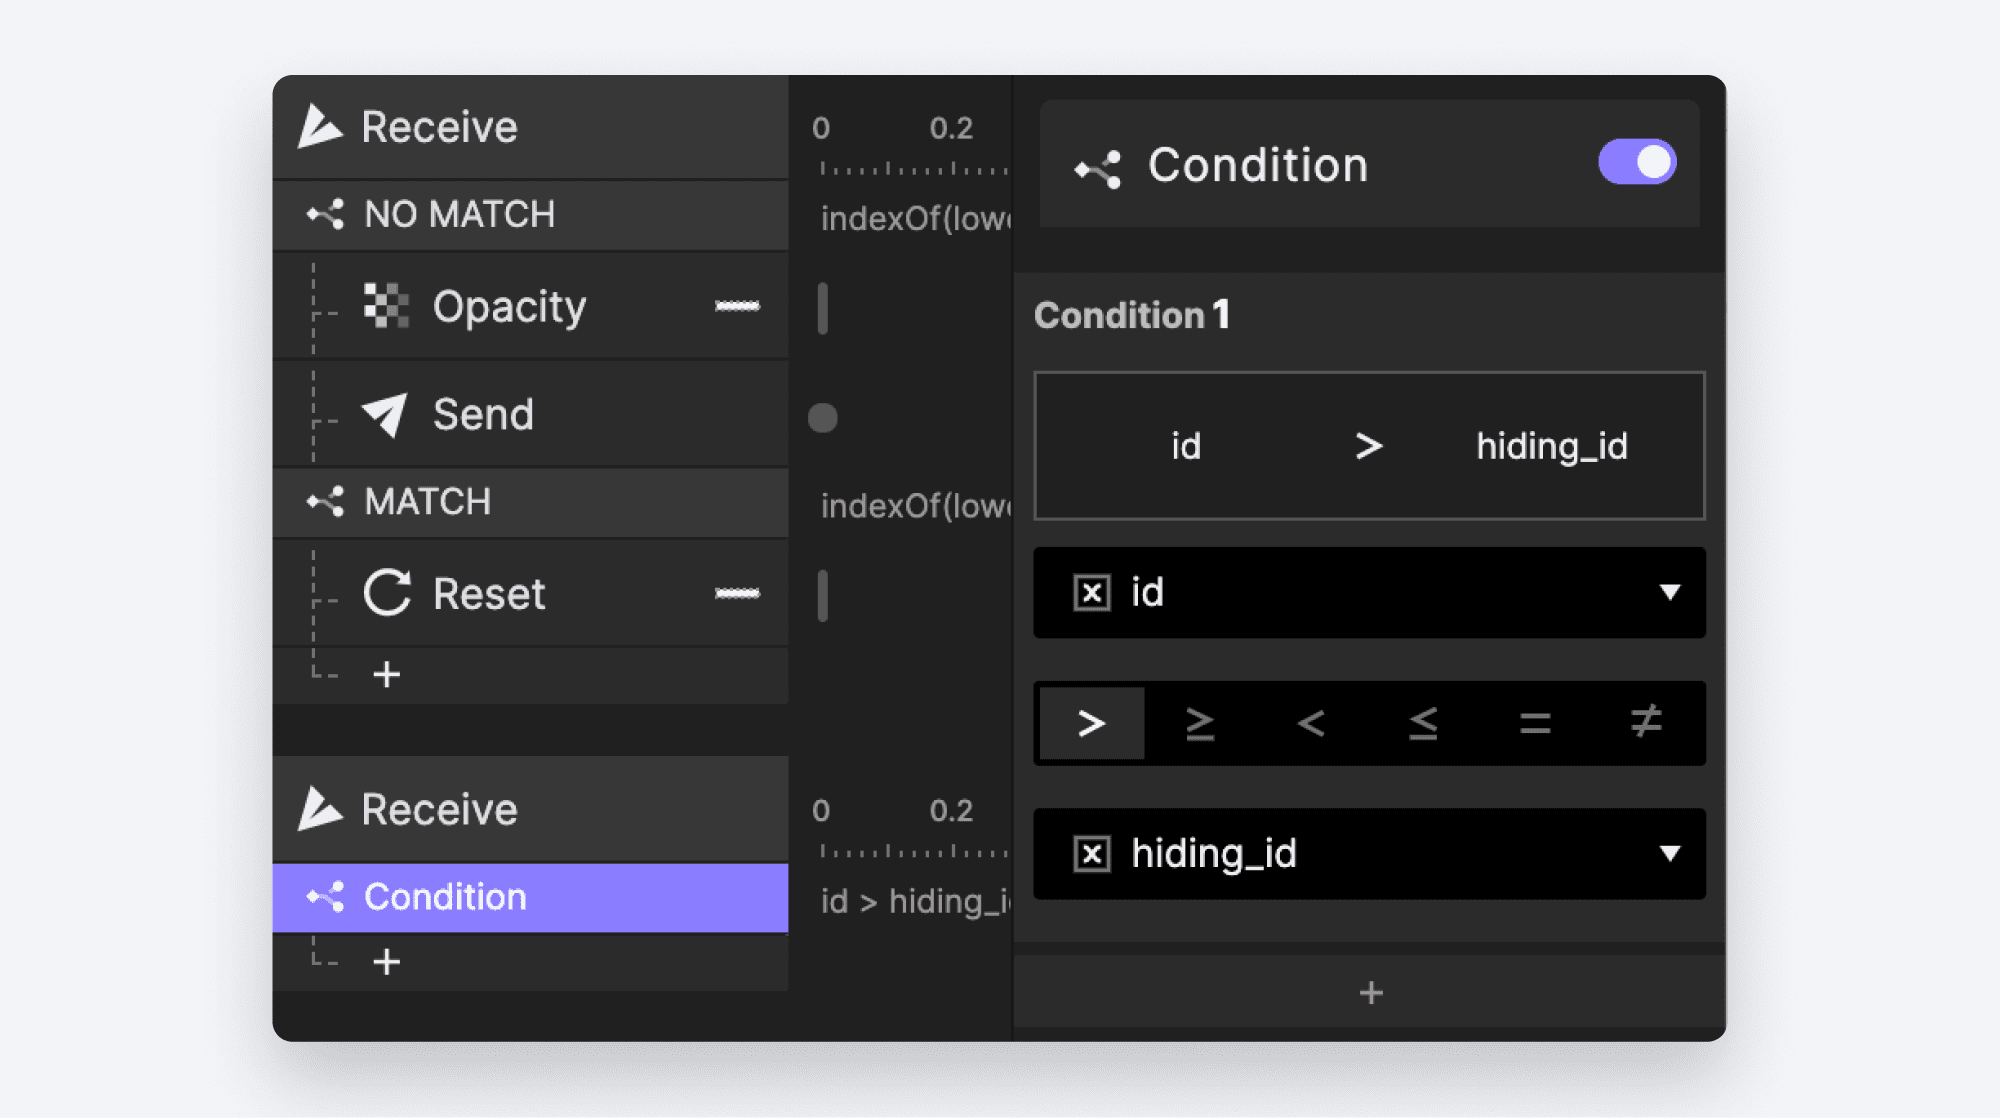
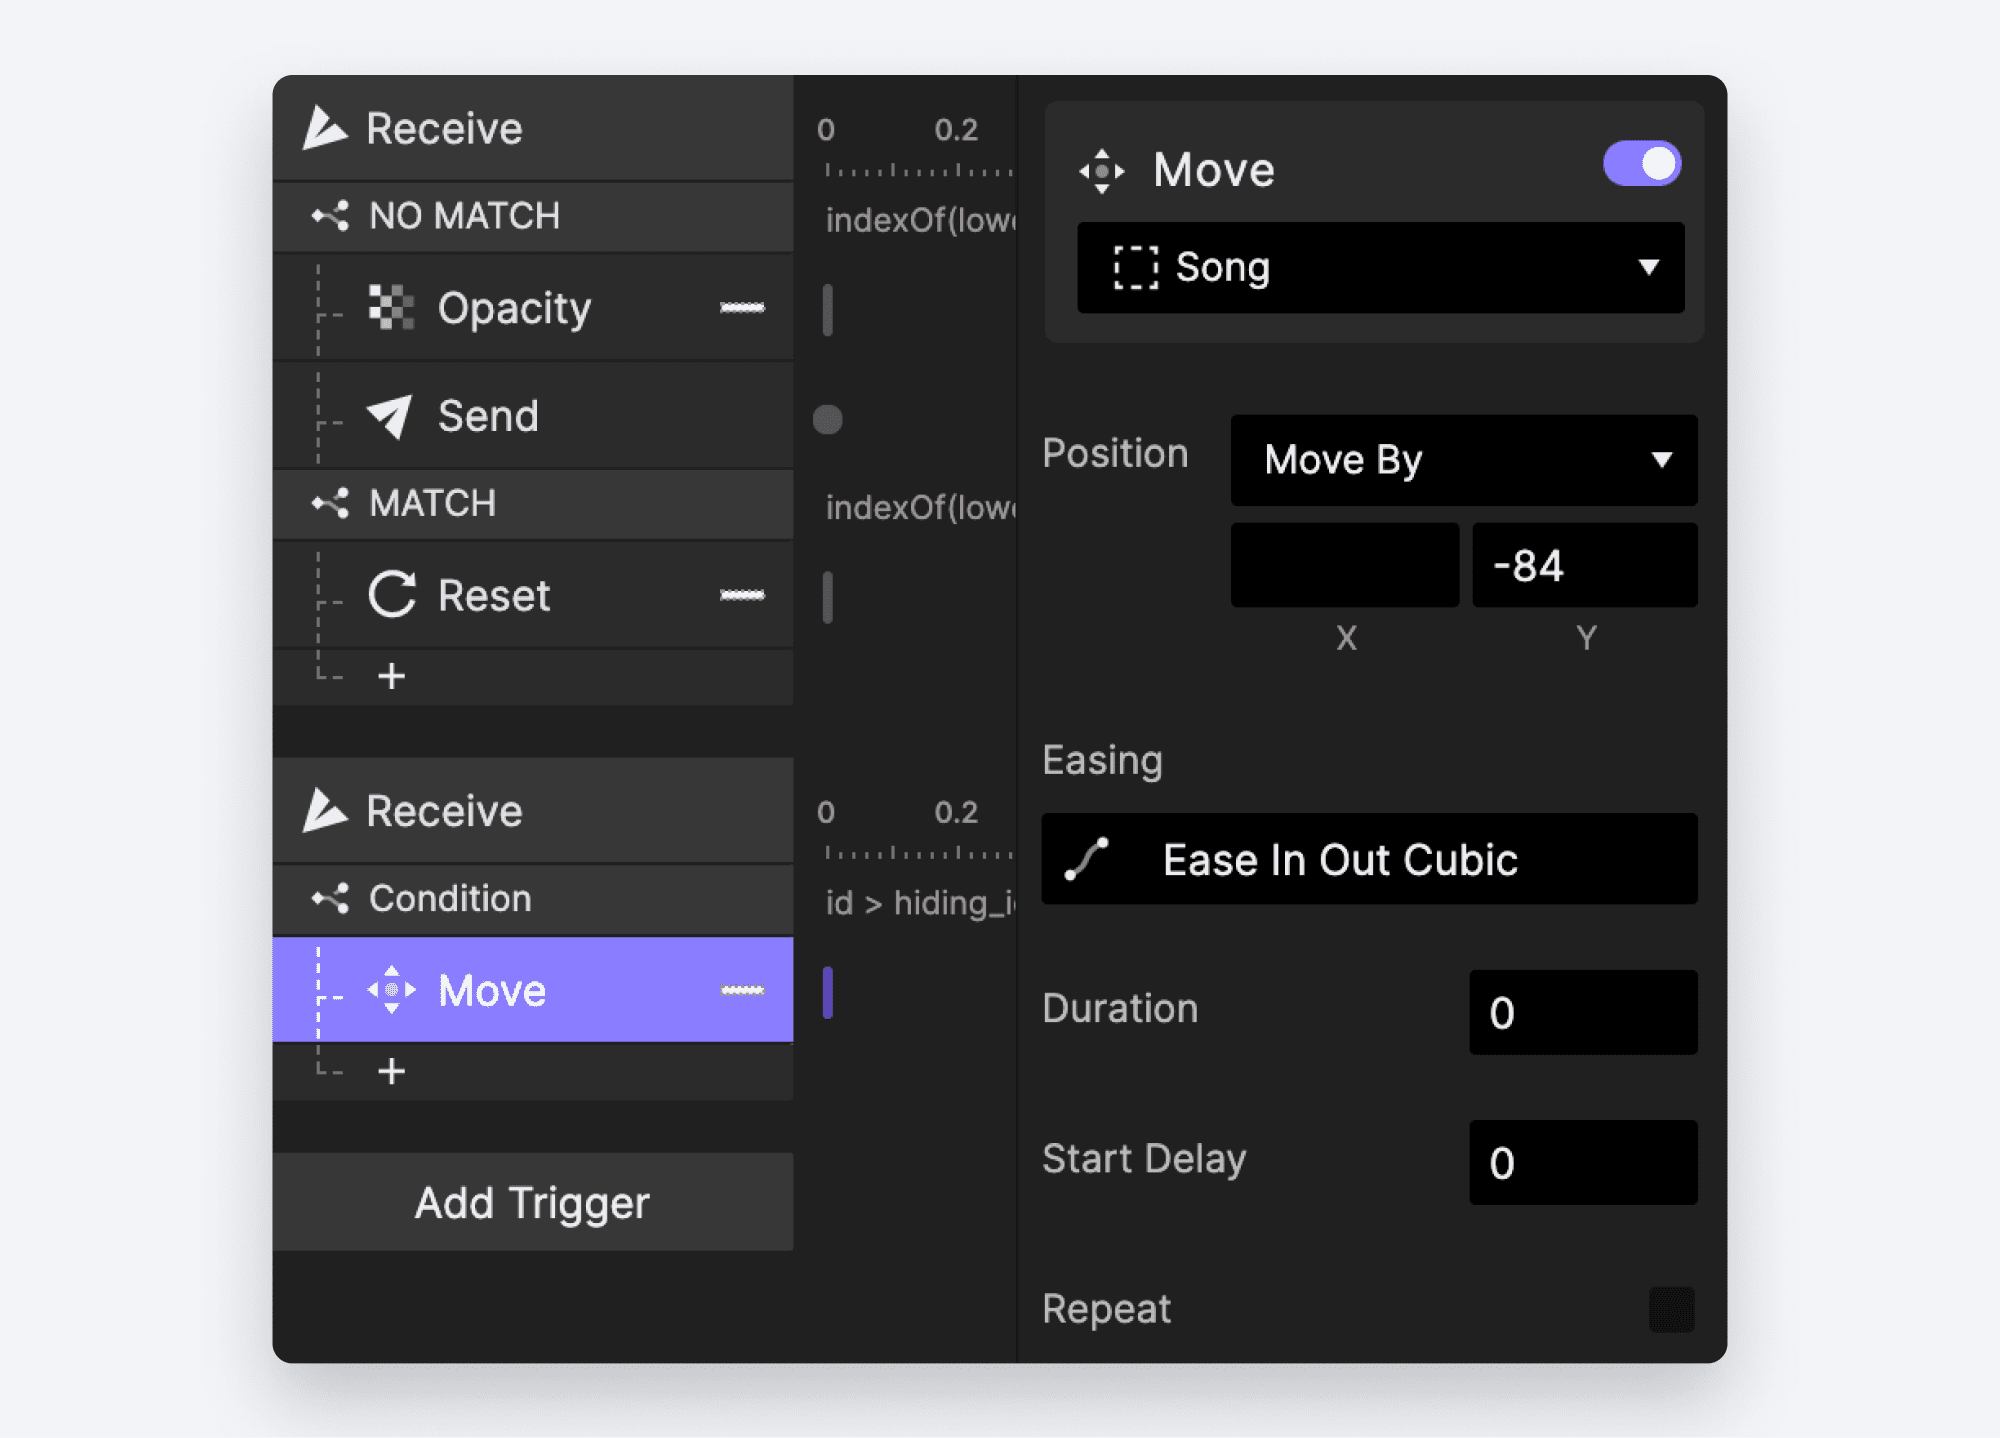
If the receiver’s id is GREATER than the sender’s id (i.e., id > hiding_id), then we’ll move the receiver’s position upwards one slot. This is why we needed to use sequential numbering when we gave each song a value for id.
Let’s see it in action.
- Add a condition under the Receive Response. In the first drop down, choose the variable
id. Click the>(greater than) operator. In the bottom drop down, choose thehiding_idvariable.
- Under the condition, add a Move Response to the
Songlayer. Choose “Move By” in the “Position” drop-down, and enter-84into theYbox. Lastly, set the duration to0to ensure this move is not animated.
This will be all we need to do! return to the main scene and preview. Your search should be fully working!
Why does this work?
If you’re still a little cloudy on why this is working, let’s recap the logic. Feel free to skip ahead if all of the above makes sense.
Hide, Reset, and Reorder happen on every keystroke
Each time a letter is typed into the search bar, EVERY component decides if it matches the search, with no memory of whether it matched previously. If it matches, it resets itself (position AND opacity), even if it is already visible and in its original position. If it does not match, it hides itself, even if it’s already hidden. Any item hiding itself broadcasts the message REORDER along with its id and ALL components underneath (e.g., with an id greater than that of the hiding component) move upwards by 84 pixels.
Let’s look at an example. We’ll just examine the first 3 songs and ignore the rest.
- “The Celebrated Ways”
- “Feel Again”
- “Good Enemy”
Let’s assume the user types the character n into the search bar. The following happens:
- Song 1 does not match and hides itself.
- Song 1 broadcasts
REORDERto all components along with its value forid. - Song 2 matches and resets itself.
- Song 2 receives
REORDERfrom song 1 and moves up into the first slot. - Song 3 matches and resets itself.
- Song 3 receives
REORDERfrom song 1 and moves up into the second slot.
Now let’s assume the user continues to type in the search bar. The next character they type is e making our search term ne. The following happens:
- Song 1 does not match and hides itself, even though it was already hidden.
- Song 1 broadcasts
REORDERto all components. - Song 2 does not match and hides itself.
- Song 2 broadcasts
REORDERto all components. - Song 2 receives
REORDERfrom song 1 and moves up into the first slot, but since it is hidden, we don’t see it. - Song 3 matches and resets itself, putting it BACK to its original position 3.
- Song 3 receives
REORDERfrom song 1 and moves up into the second slot. - Song 3 ALSO receives
REORDERfrom song 2, and it moves again into the first slot.
That’s it! Easy as Pie!
In creating a functional search experience, you successfully used many of ProtoPie’s most powerful features:
- Functions and formulas
- You learned how to use the
indexOf()andlowerCase()functions - You learned how to nest them inside each other in a formula to perform complex manipulation of information
- You learned how to use the
- Send & Receive
- You used Send and Receive to enable your main scene to communicate with all of your components, and to enable your components to communicate with each other.
- Functional Components
- Not only are your components reusable from a visual style perspective, but you’ve also made them functionally reusable! In fact, the Song component does almost all of the work in making your experience happen.
Most of all, I hope your eyes were opened to how easy it was to get this working. Just a couple of built-in functions were involved and — most importantly — NO CODE!
Elevate your prototypes with a fully functioning search bar
Ready to search, click, and wow? Then get started with ProtoPie and follow the search bar tutorial to create seamless user experiences.
Want to learn more about prototyping?
- Documentation: ProtoPie’s Built-in Functions
- #Ask ProtoPie: How to Interact With Components
- #Ask ProtoPie: Ultimate Guide to Making an Accordion Dropdown Menu
- Tips & Tricks: Multi-Select Photos Using Components, Variables, and Formulas
- Tips & Tricks: Making a Functional Star Rating Using Components
.jpg)

.jpg)