How to Build Advanced Prototypes
Master advanced prototyping! Learn how to transform complex ideas into sleek prototypes effortlessly, and unleash your design potential.

High-fidelity, high-functionality, advanced prototyping is fast becoming a popular topic. However, many designers are struggling to adopt this skill. The truth is that a shift in mindset is needed in order to tread these waters. But it doesn’t have to be difficult if you learn to break the problem down into manageable pieces.
When you're working on an advanced prototype, you're essentially laying down the foundation for what the final product will look like — the one that your engineering team will bring to life. You might think, "But I'm a designer, not a programmer! Where do I even start?"
The good news is: you already know more than you think.
Overview
- Starting with the right question
- The universal problem with advanced prototyping
- Case study: recreating the macOS Calculator app
- The power of advanced prototyping
- Next: how to prototype a calculator step-by-step
Starting with the right question
The journey begins with a change in perspective. When faced with the task of creating an advanced prototype, it's tempting to immediately reach for a tool like ProtoPie and ask, “Okay, now how do I build this prototype?” But, that’s a misstep.
The first real question before jumping into your prototyping tool of choice should be: “How does the product I’m designing work?”
The universal problem with advanced prototyping
It is quite common to hear designers mentioning that ProtoPie is tough to crack. However, this isn’t a fair judgment on ProtoPie or any other advanced prototyping tool.
The challenge is that advanced prototyping is a different ball game compared to the simpler prototyping you might have done in tools like Figma or Sketch. The reality is that advanced prototyping will never be as easy as dragging noodles around and joining objects together. Advanced prototyping is about constructing a working model of your design, which naturally demands a deeper understanding of how your product functions.
I mentioned Figma as a "simple" prototyping tool, which might not do justice to its recent prototyping enhancements. But here's a little insight: if you're facing hurdles with ProtoPie, chances are you'll encounter similar challenges when dealing with Figma’s variables and conditions. It's less about the tool and more about the mindset you bring to the table.
The good news is that you have these skills!
I'm going to ask you to take a leap of faith with me. In order to build an advanced prototype, you’ll need to wear a programmer’s hat for a while. Don’t worry, you don’t need to code! But, you do need to understand how your product functions — the way a programmer would before they start coding it.
It might seem like a huge ask. However, reflect on the time you’ve spent designing the product. You’ve already delved deep into how the product works. After all, haven’t you just spent the last several weeks or months doing nothing but thinking about how the product actually works? Didn’t that guide your design decisions?
For example, I’m sure you’ve created a document that looks something like this to support your developer handoff:
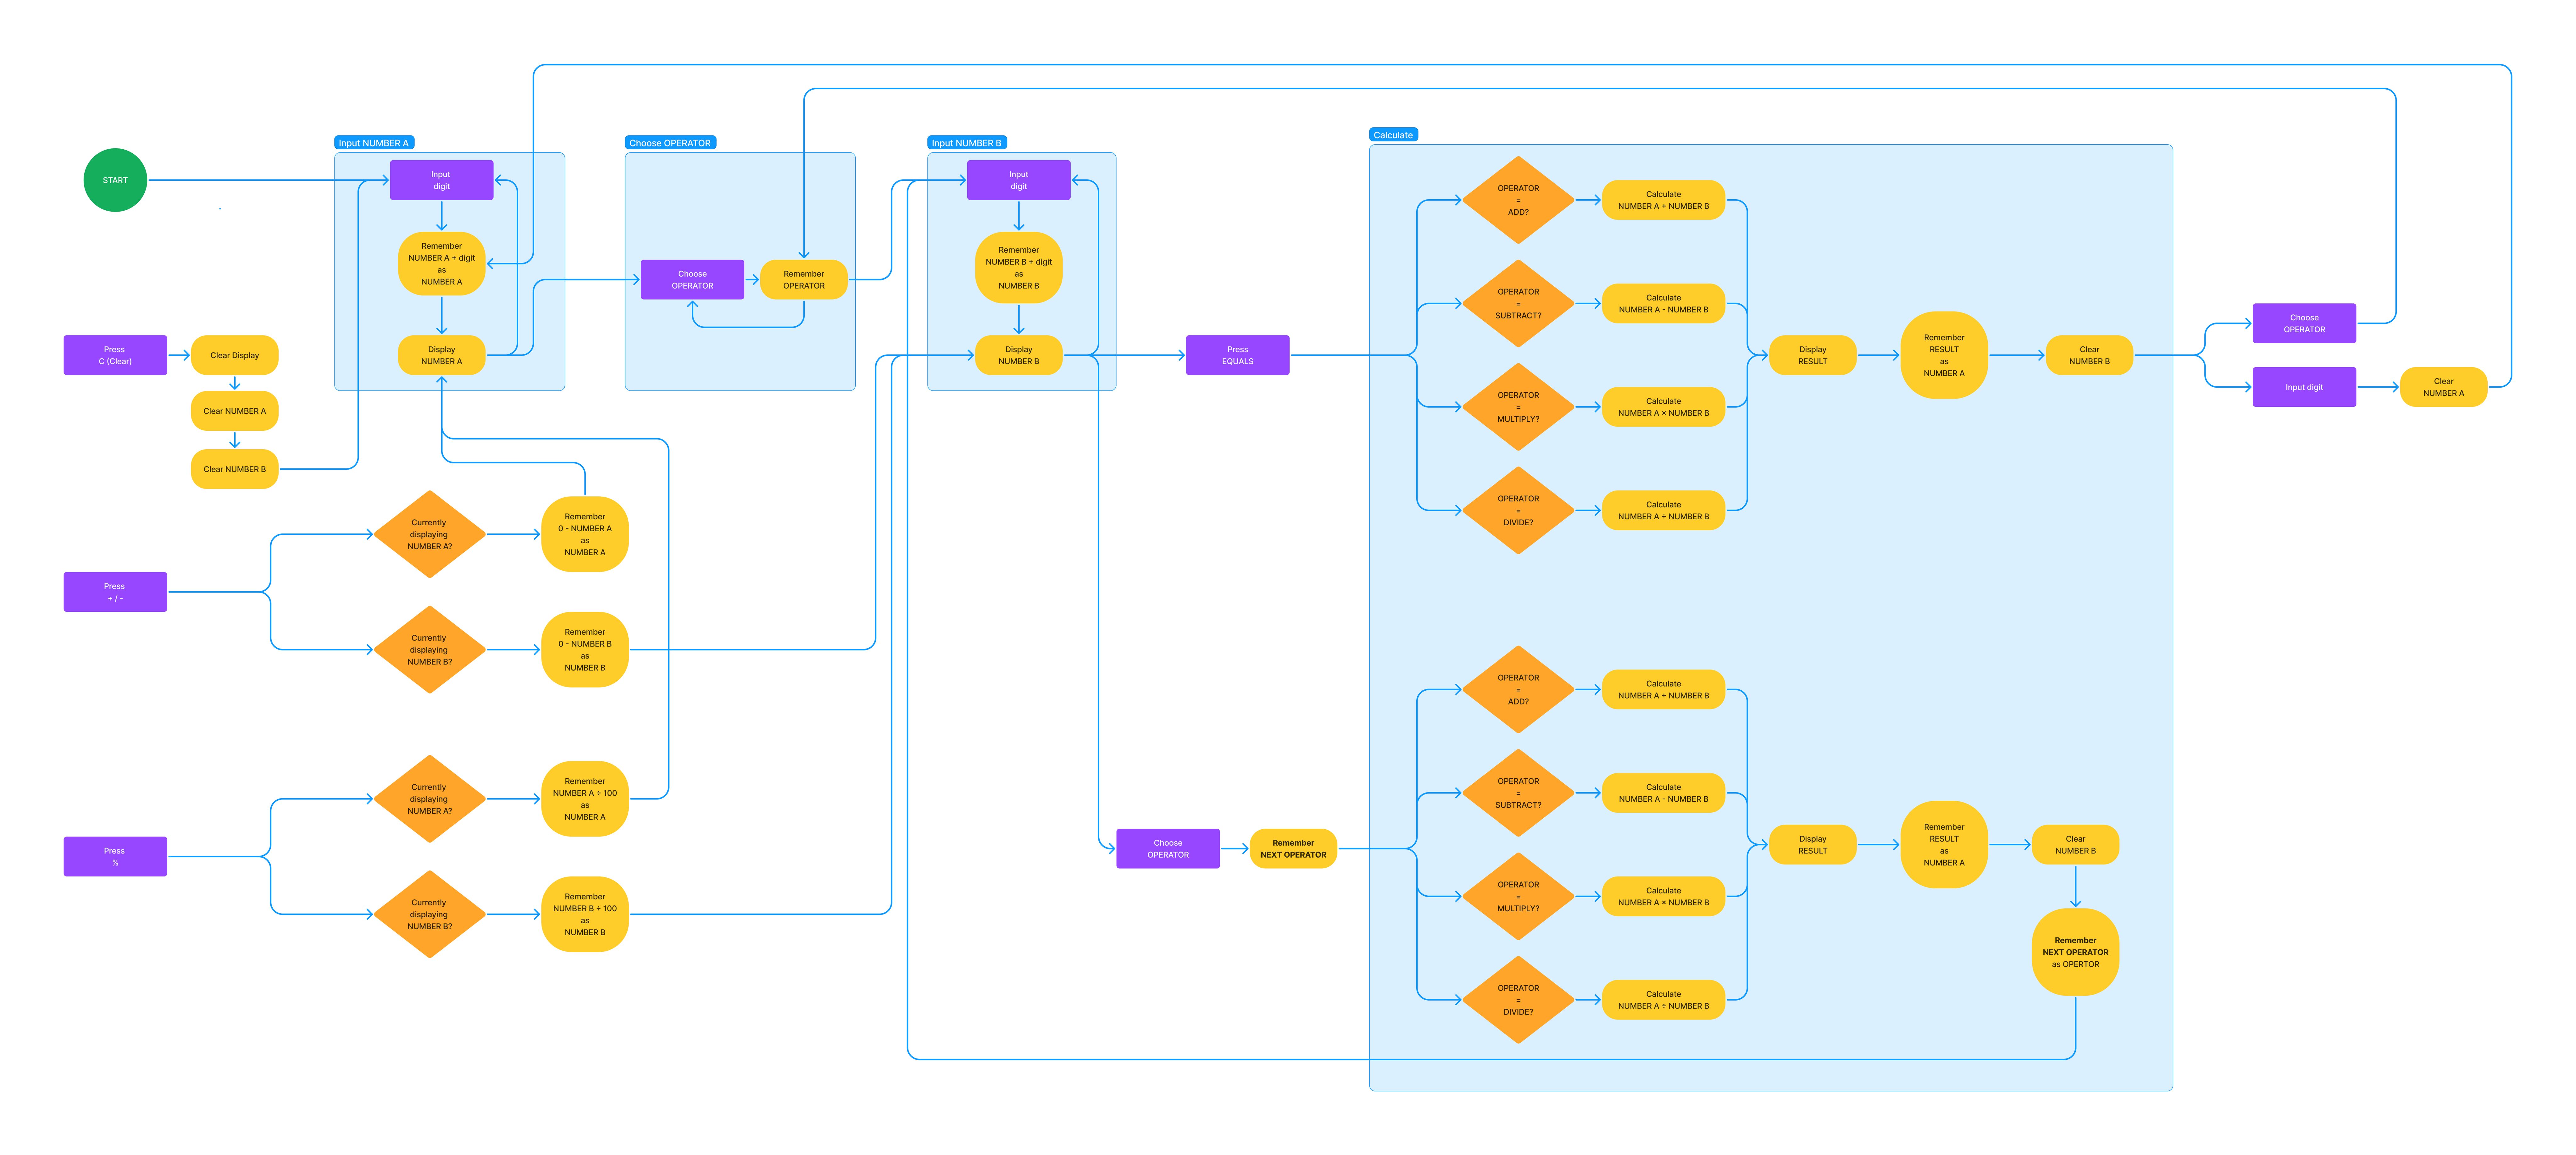
💡 Pro-tip! A document like this is a treasure trove of knowledge on how your product functions. You understand your product, perhaps even more than the developer who will eventually build it. You’re already halfway there.
Getting over the prototyping hurdle
So, why is crafting an advanced prototype still so tough? This brings us to the essence of this article — you don’t start prototyping in a tool, you start prototyping in your mind. To start prototyping in your mind, you need to think like a programmer — that is breaking down your product into smaller pieces of interaction that makes the whole work.
Let’s take a walk through my thought process before I even open ProtoPie Studio.
Case study: recreating the macOS Calculator app
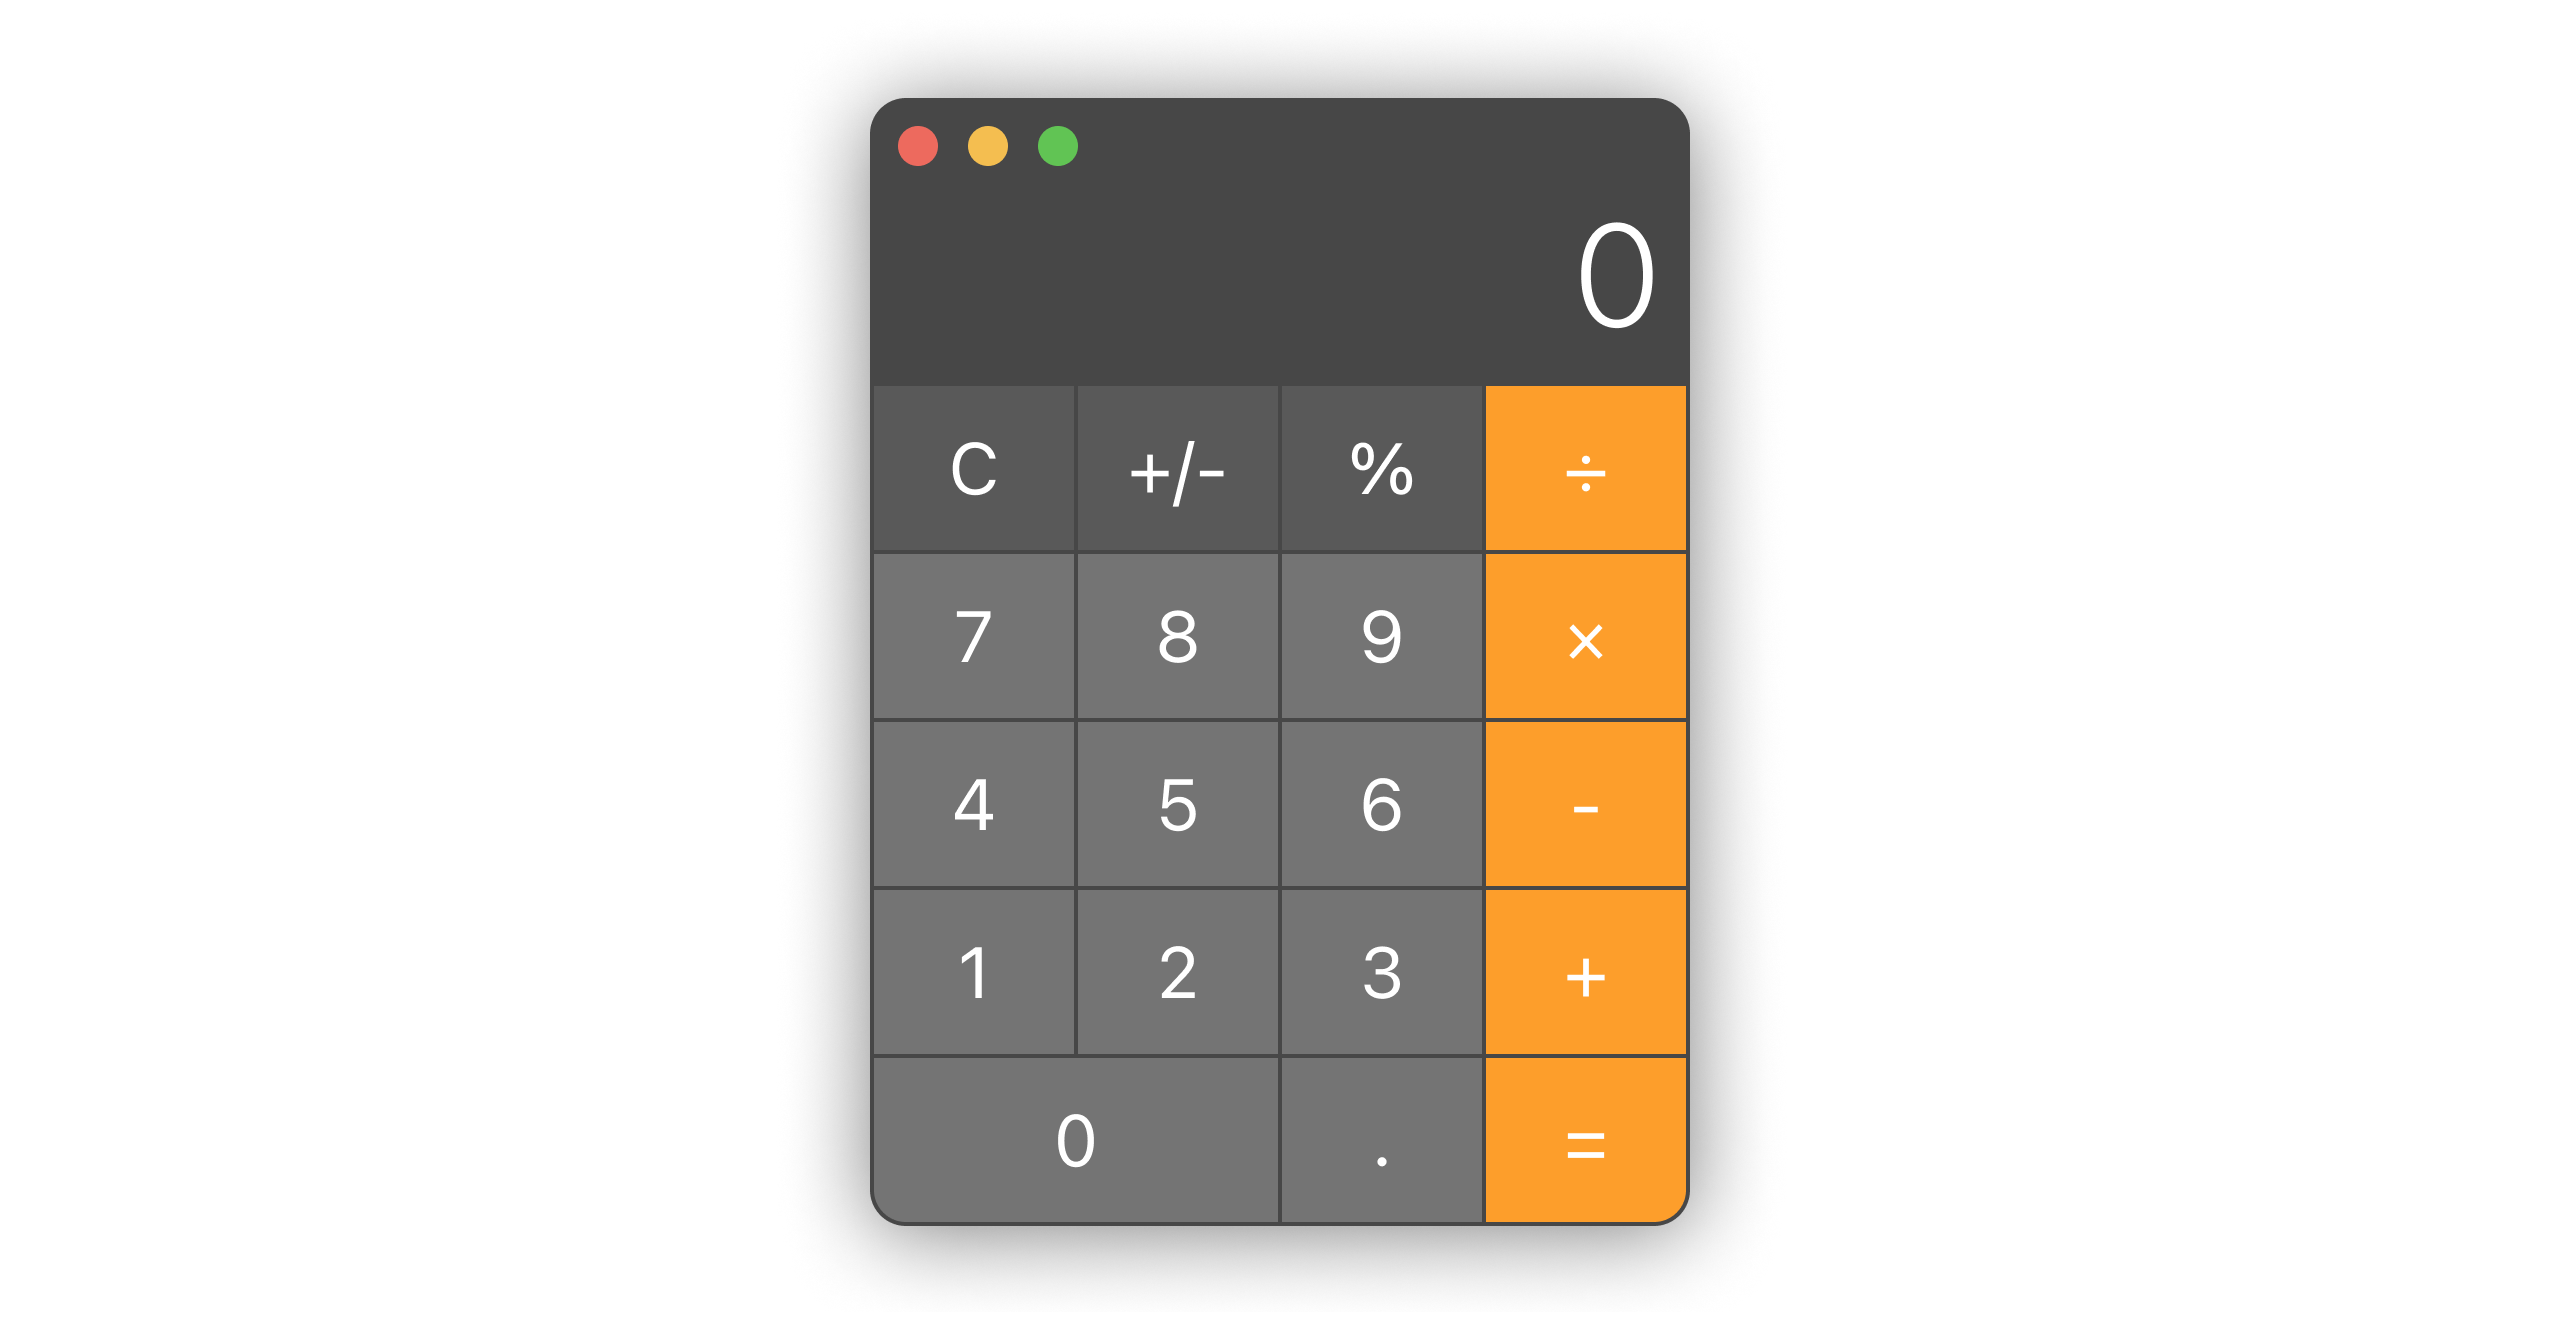
Let’s take a real-world example, the macOS Calculator app. It's simple, yet a perfect use case to demonstrate the process since we all know how it works. The basic workflow is straightforward: enter a number, pick an operation, enter another number, and hit equals to see the result in the calculation window.
Let's delve into the simple steps needed for a calculation. Here, "user" is the person using the app, and "system" refers to the app and its functions.
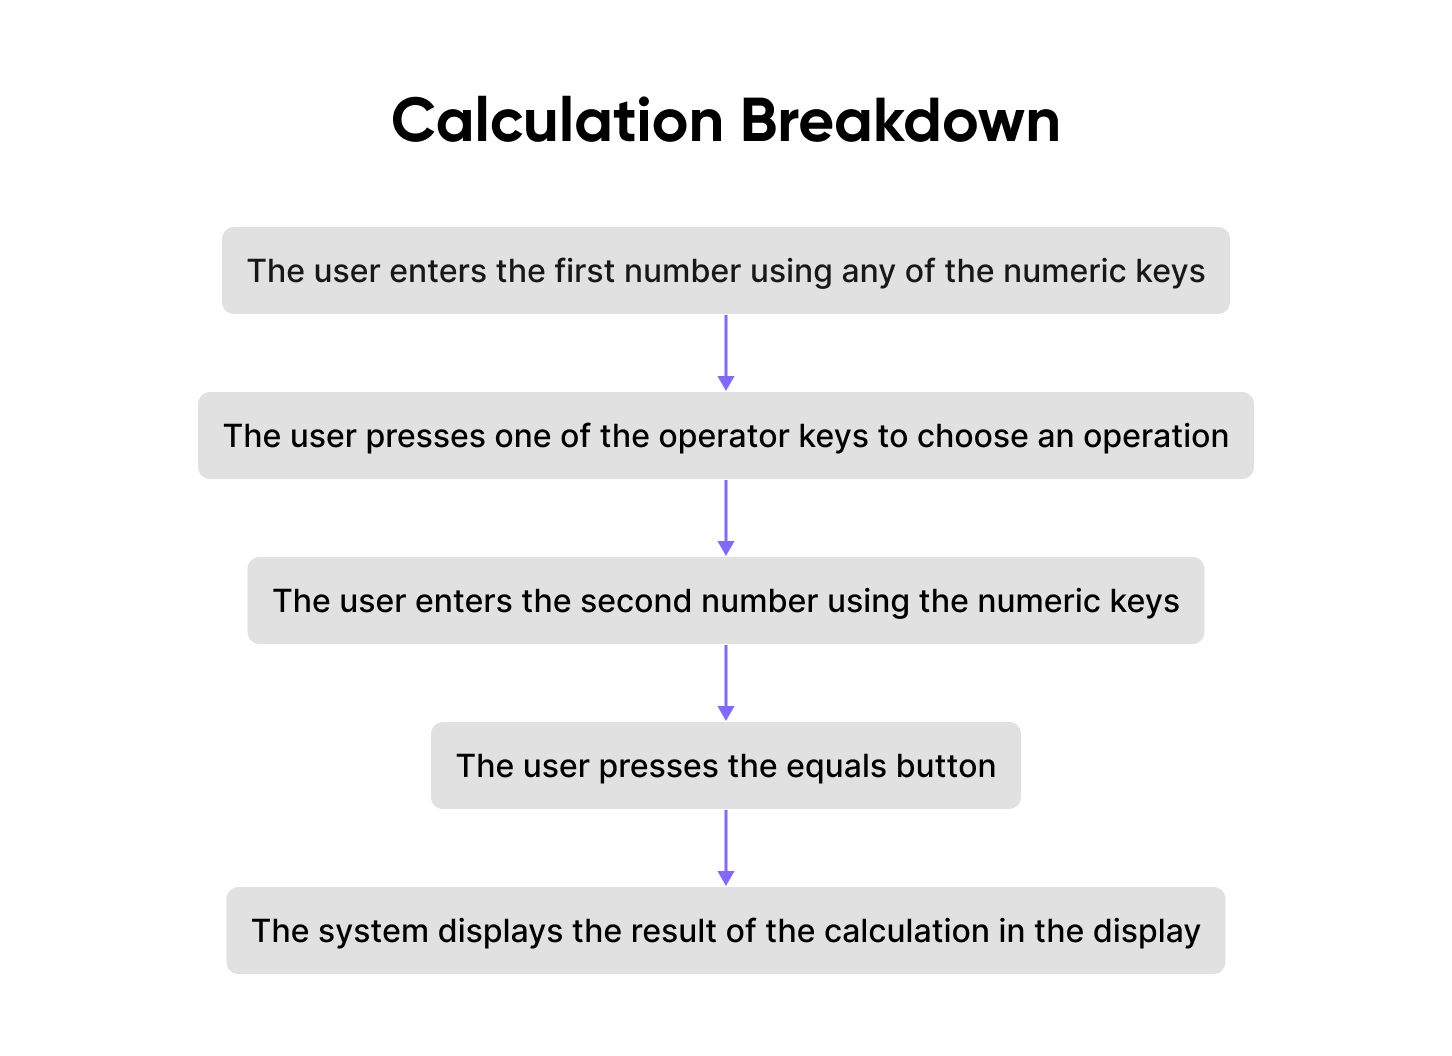
I'll add more functionality as we move along with the prototype. For now, let's focus on Phase 1.
At a glance, the user's interaction with the calculator seems straightforward. However, we aim to move beyond the obvious into the finer details. Let's dissect this single step further:
- The user enters the first number using any of the numeric keys
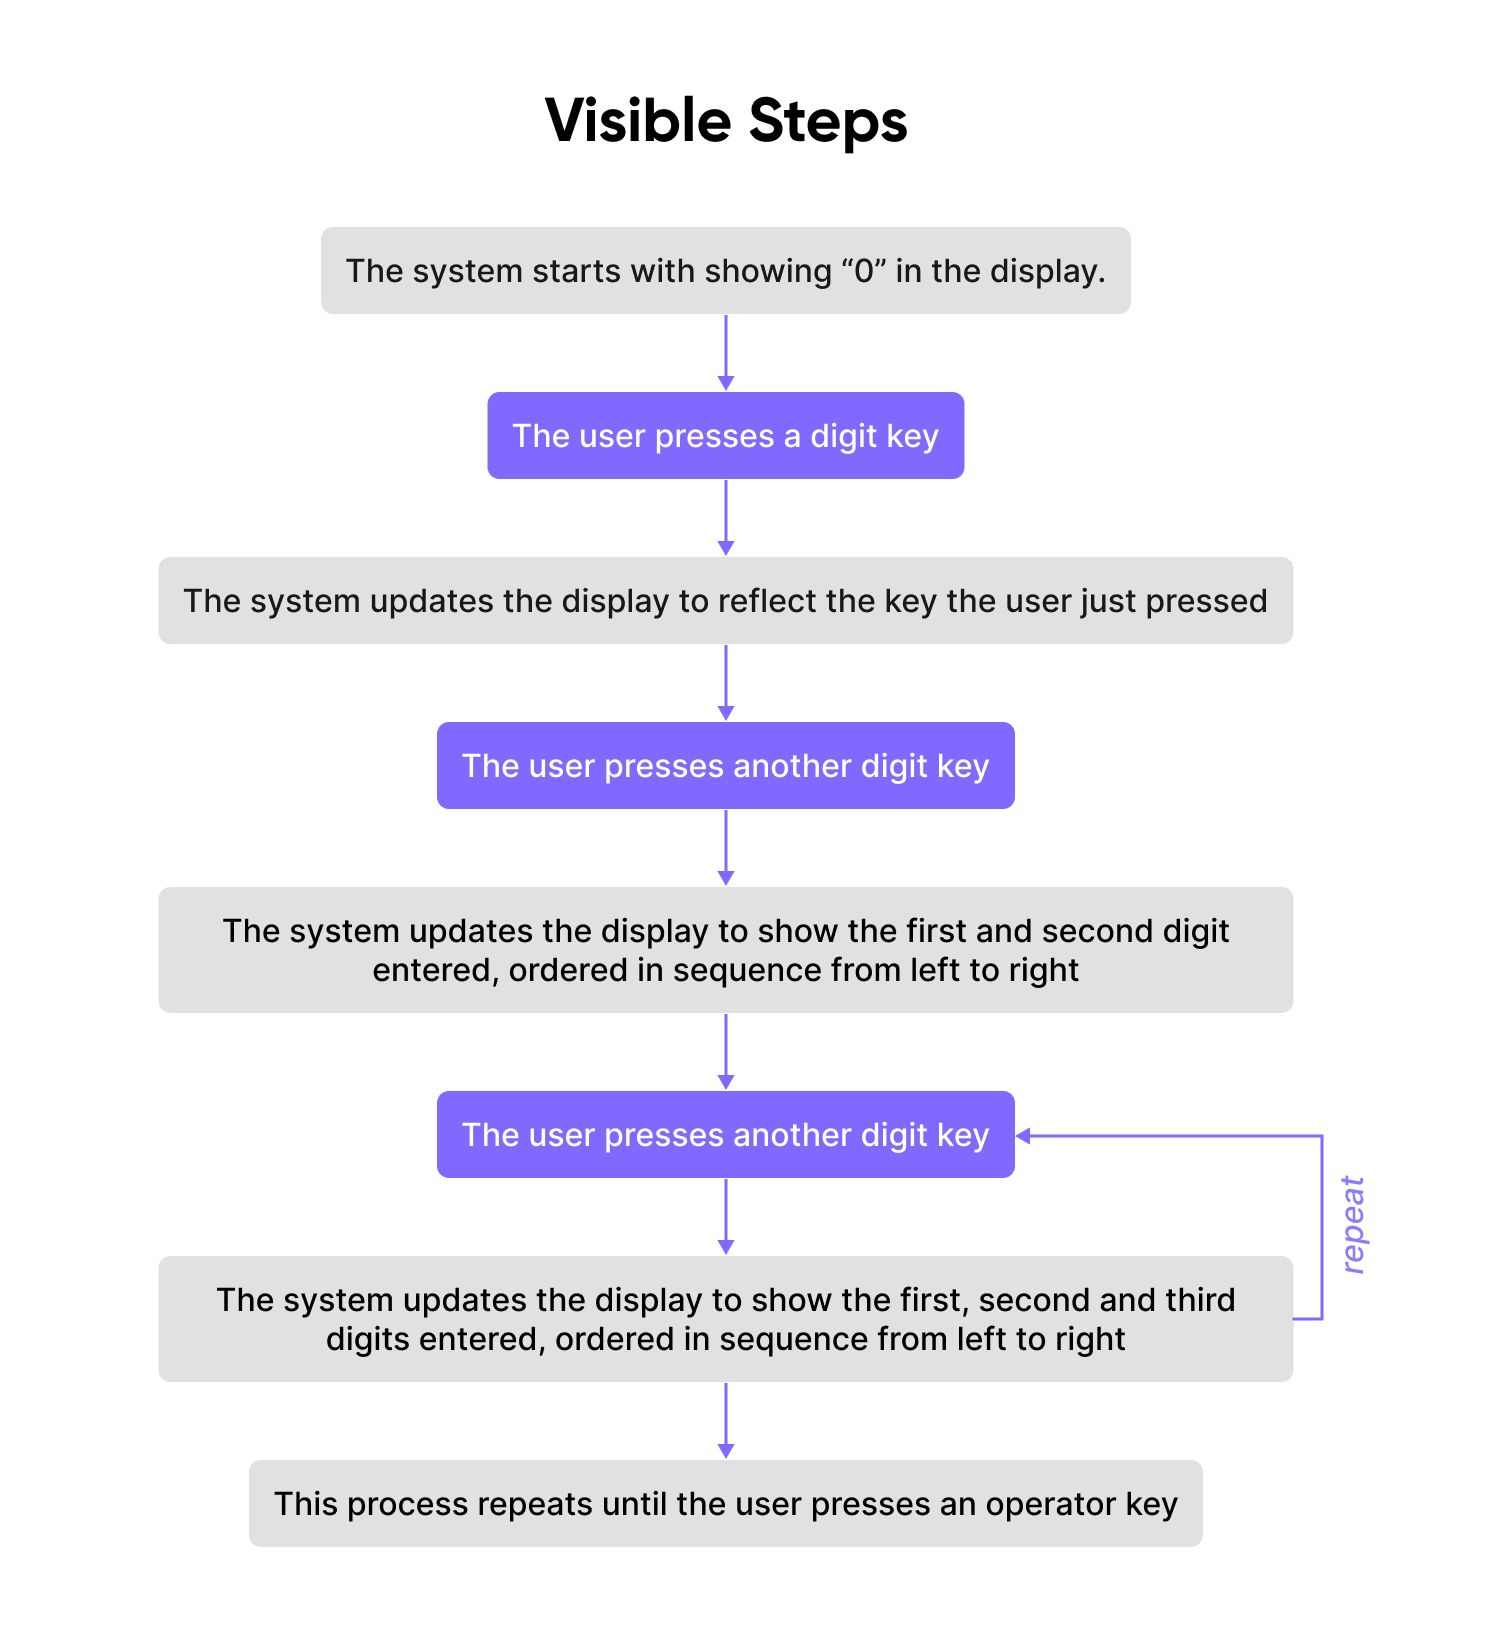
Breaking down user-visible steps
This breakdown of Phase 1 shows user-visible steps. Yet, there’s more going on that we can’t see (but we intuitively know):
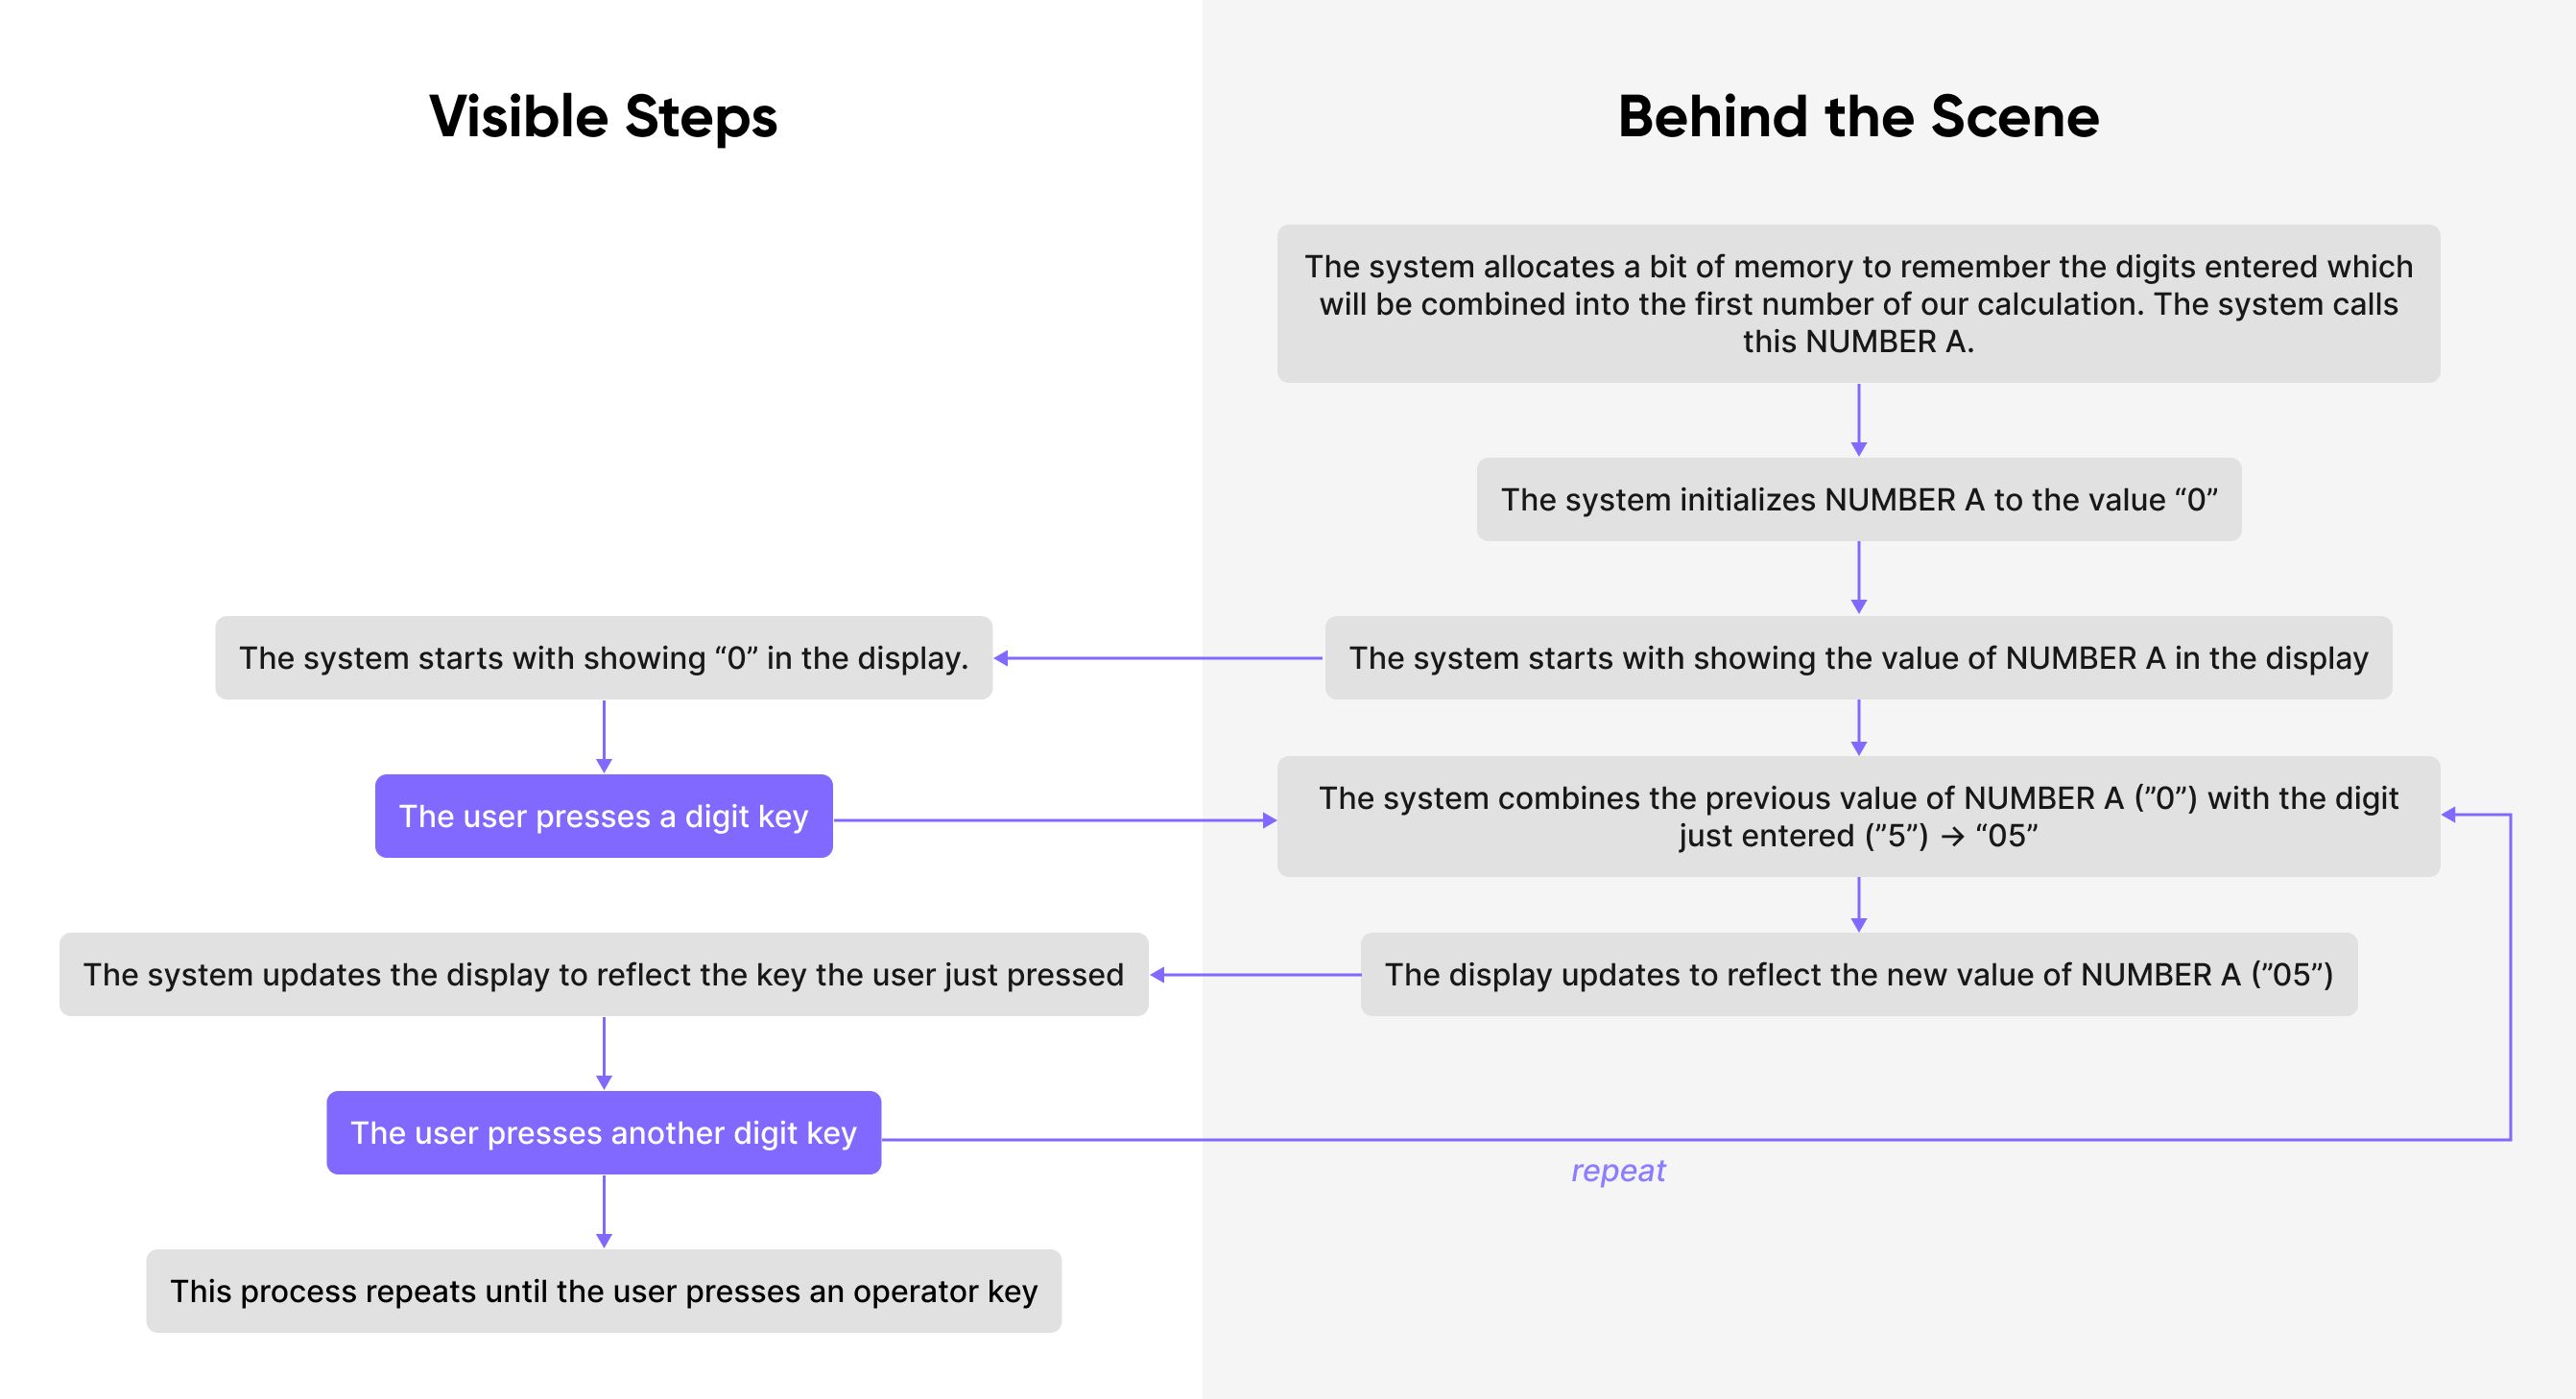
💡 Pro-tip! By diving into the minute details and comparing system and user actions, I now have a clearer vision for my prototype.
Let's revisit these steps and understand their implications for the build:
1. The system allocates a bit of memory to remember the digits entered which will be combined into the first number of our calculation. The system calls this NUMBER A.
- This means we need to create a variable — a variable is a way to store a little bit of information. We’ll call this variable
NUMBER_A, or simplya.
2. The system initializes NUMBER A to the value “0”
- We’ll give our variable
athe initial value of0
3. The system starts with showing the value of NUMBER A in the display
- We’ll need a text box that we can update with the value of
a
4. The user presses a digit key (e.g., “5”)
- This suggests we need a clickable object for each key. When a user clicks or taps on it, the system gets notified of its numerical value, as shown on the key's label.
5. The system combines the previous value of NUMBER A (”0”) with the digit just entered (”5”) → “05”
- We're updating the value of
aby combining its previous value with the newly pressed digit. (There's a subtle aspect here that might not be clear until we actually build the prototype — that's fine! This is an iterative process.)
6. The display updates to reflect the new value of NUMBER A
- We want to update our text box with whatever the new value of
ais, so this infers that we need to update the value ofabefore we update the display text box. - We also want to trim any leading zeros. So even though the value of
ais currently “05”, the display will simply show “5.”
7. The user presses another digit key
- We’re repeating the above steps for each press of a digit key.
8. …repeat for as many digit keys pressed until an operation key is pressed
- We’ll be in the state of entering the first number until an operation key is pressed, so I’ll likely need to keep track of what phase of the process the user is in.
- For now, let's assume our experience will have four phases:
- Enter first number
- Choose operator
- Enter second number
- Calculate
- For the duration of the above steps, we’ll remain in Phase 1: “Enter first number" until an operator key is pressed, at which point the user will be in Phase 2: “Choose operator.”
- We can use a variable to store the phase. We’ll call it
phase.
- For now, let's assume our experience will have four phases:
At this point, I've outlined the steps for Phase 1: "Enter Number A" of the interaction, without thinking about how to use ProtoPie yet.
By the way, remember the flow diagram from earlier? It shows the calculator app’s flow and helps us visualize how it works. We’ve just focused on this part so far:

💡 Pro-tip! Take advantage of all of the work you’ve done thus far to develop your app design. It is invaluable in helping you through this mental exercise. You’ve already thought through it — re-use the thinking you’ve already done.
Moving on to the next phase of the interaction
I can now repeat the above exercise with the next phase of the interaction:
- The user presses one of the operator keys to choose an operation
This can be further broken down as follows:
- The user presses one of the operator keys
- The system changes the phase from “Enter first number” to “Choose Operator”
- The system stores the chosen operator
- The user may press a different operator key before starting to enter the second number
- The system updates the stored operator to the newly chosen one
- These steps repeat until the user presses the digit key to start entering the second number.
And our flow diagram illustrates it like this:
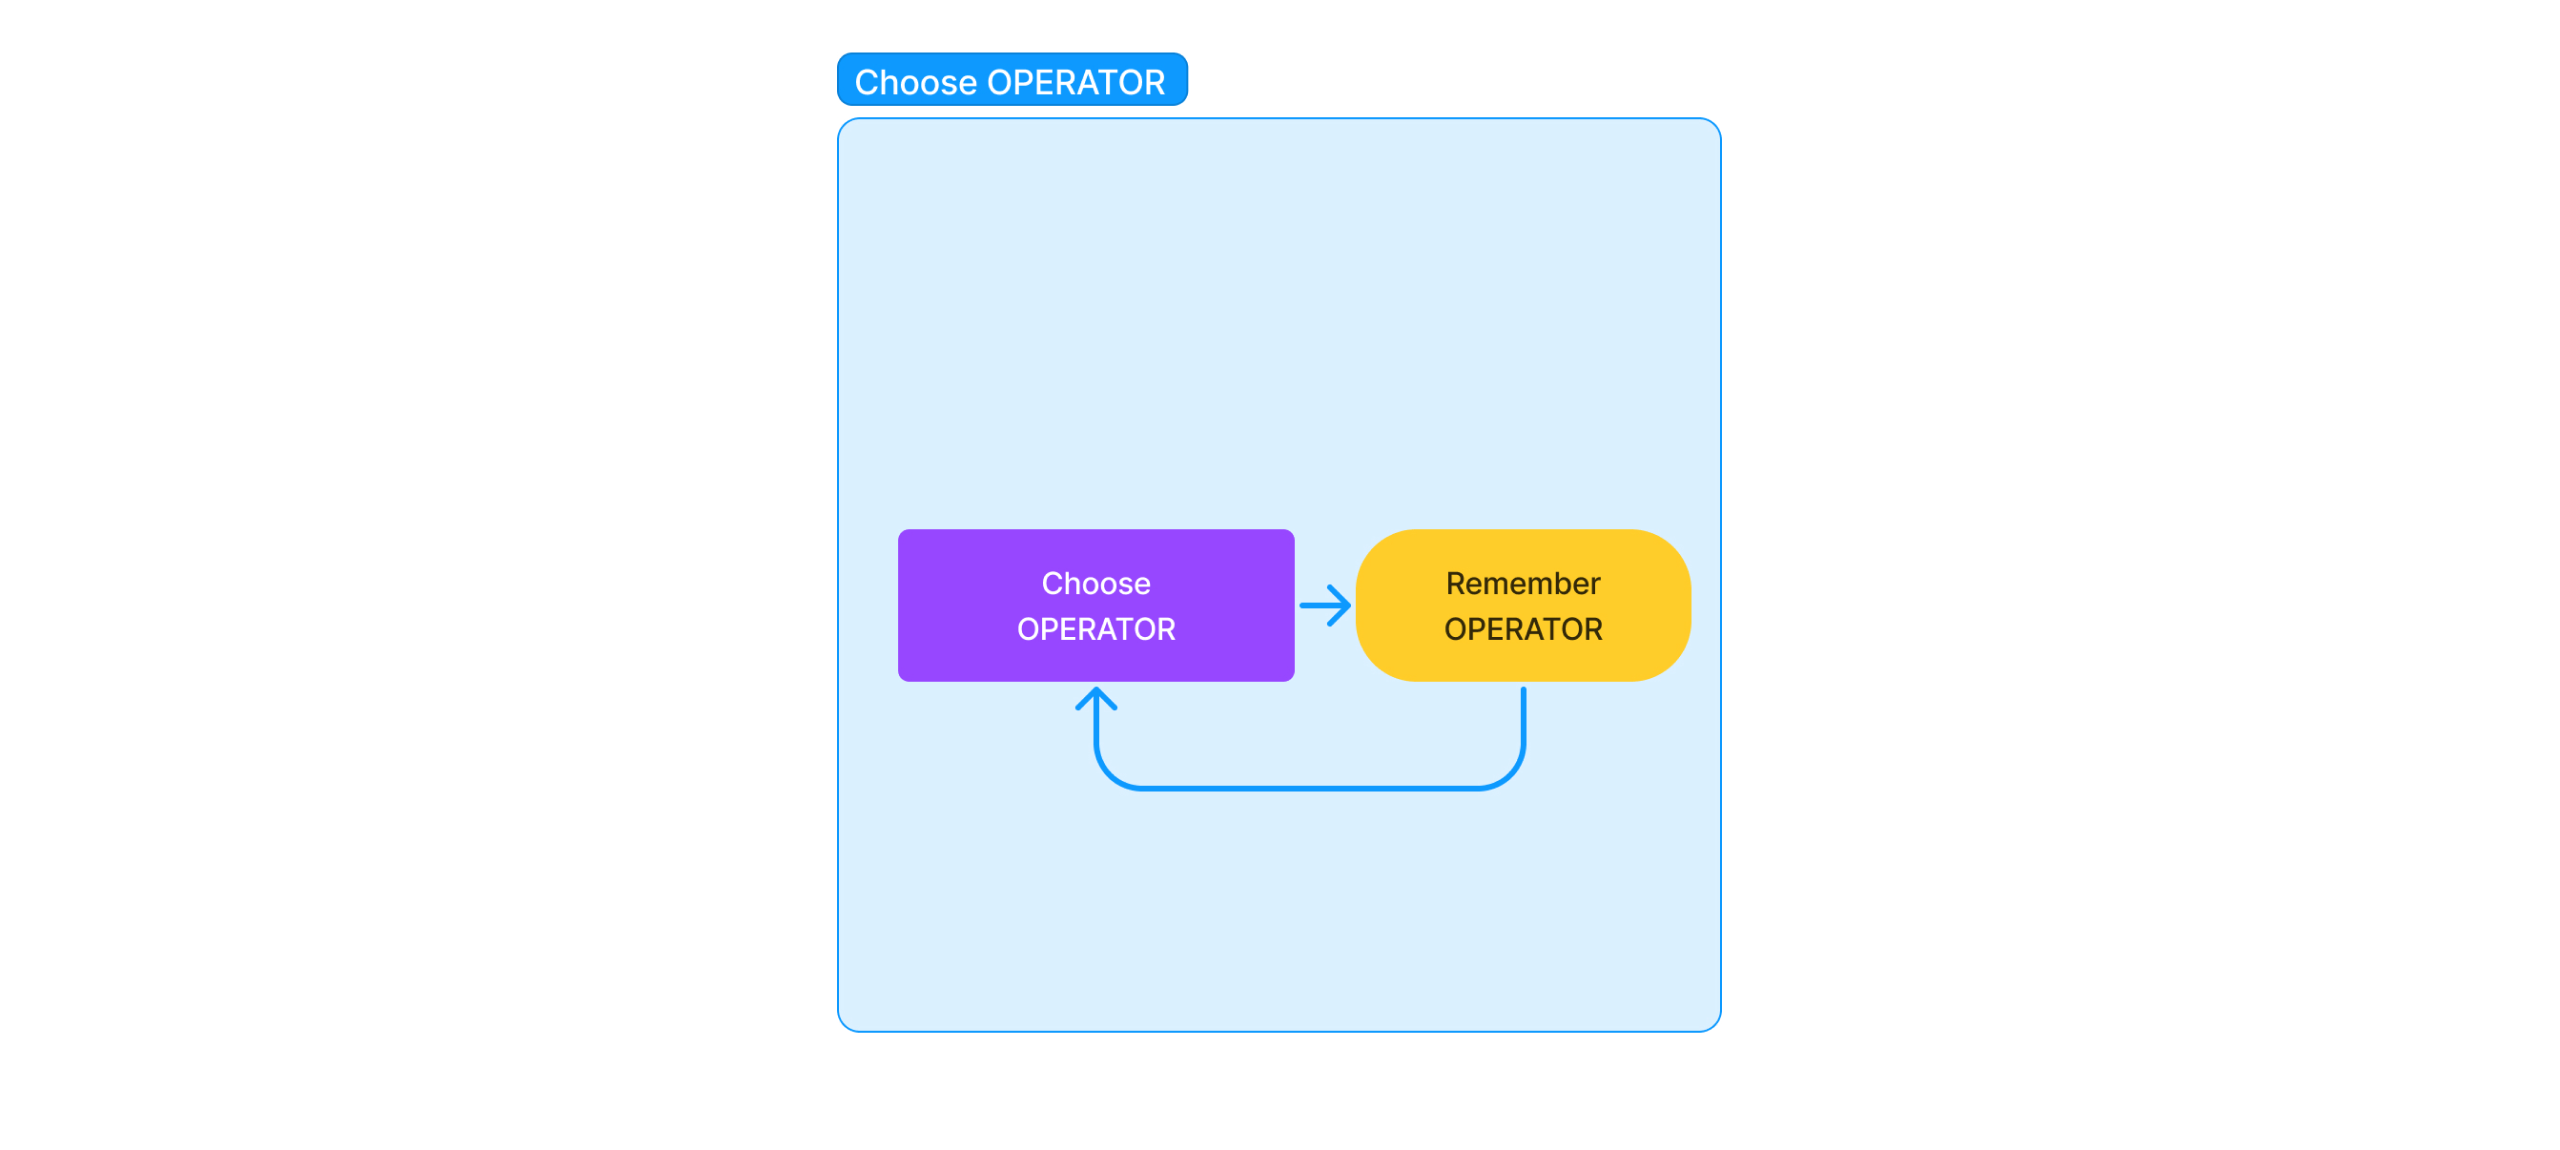
Next, when I deduce the requirements for building it, it appears as follows:
1. The user presses one of the operator keys
- Just like the numeric keys, the operator keys will need to be buttons too. We have four distinct ones: add, subtract, multiply, and divide.
2. The system changes the phase from “Enter Number A” to “Choose Operator”
- We need to update our
phasevariable to reflect that we are no longer in Phase 1: “Entering Number A,” but now in Phase 2 “Choose operator.”
3. The system stores the chosen operator
- We’ll need a variable to store the chosen operator. We can call it
op
4. The user may press a different operator key before starting to enter Number B
- This means the user can change their mind before they start entering Number B. So we’ll make sure not to move on to Phase 3 until a digit key is pressed.
5. The system updates the stored operator to the newly chosen one
- We’ll update the variable
opwith the newly chosen operatorB
6. These steps repeat until the user presses a digit key to start entering Number B
- This means the user can change their mind as often as they like until they start entering numbers again, at which point the user transitions into Phase 3: “Enter Number B.”
I’ll repeat the above exercise for all of the phases and I’ll have everything I need to start building this basic experience. This marks the onset of my prototyping journey. I’ll piece together a working model of these basic interactions first, setting aside the extra functionalities and complexities brought in by modifier keys, or any subsequent calculations for now. The goal is to nail down this basic operation before venturing further.
This breakdown, right down to the unseen system operations, forms a blueprint for our prototype, all before even opening ProtoPie.
The power of advanced prototyping
Now that I know how I’m going to build it, I can start to think about how the above steps translate into my tool of choice. Of course, the obvious choice here is ProtoPie. Its advanced functions allow us to extend our prototype beyond the basic, enabling the exploration and implementation of sophisticated interactions with ease. It can, of course, be done in other design tools like Figma, but ProtoPie makes this far easier and faster.
Recreating a simple utility app is a perfect example of where ProtoPie's functional components come in handy. I can react to all similar keys in the same way (e.g., all of the digit keys can be instances of the same component). This way, their logic gets housed under one roof, making things less complicated. Plus, I can easily track variable values while running the prototype, which is great for sorting out any hitches along the way. And with ProtoPie's built-in advanced mathematical functions, manipulating the calculator's data is a breeze.
Next: how to prototype a calculator step-by-step
The meticulous breakdown of interactions and the translation of these into a working prototype can seem intimidating. Still, with a tool like ProtoPie, the process becomes an exciting exploration rather than a daunting task. Furthermore, this type of app prototype merely scratches the surface of what ProtoPie can do.
In the next part of this article series, join me as we dive step-by-step into building our fully functional calculator app. Together, we'll explore the vast capabilities advanced prototyping offers, ensuring you're well-equipped to bring your most ambitious design projects to life.
.jpg)